
User Guide
Page 2
... are the properties of their respective owners. Alternatively, please try the following help resources for FAQ, technical guide, BIOS updates, driver updates, and other countries. We take every care in the preparation of this document is a registered trademark of American Megatrends Inc...and OS®/2 are registered trademarks of Intel Corporation. ATI® is given as to make changes without notice. Visit the MSI website for further guidance. Intel® and Pentium® are registered trademarks of International Business Machines Corporation. Netware® is ...
... are the properties of their respective owners. Alternatively, please try the following help resources for FAQ, technical guide, BIOS updates, driver updates, and other countries. We take every care in the preparation of this document is a registered trademark of American Megatrends Inc...and OS®/2 are registered trademarks of Intel Corporation. ATI® is given as to make changes without notice. Visit the MSI website for further guidance. Intel® and Pentium® are registered trademarks of International Business Machines Corporation. Netware® is ...
User Guide
Page 9
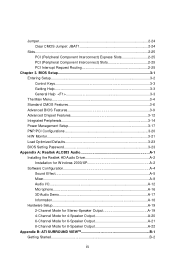
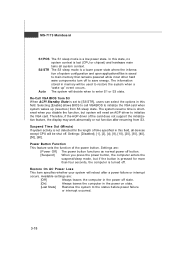
BIOS Setup 3-1 Entering Setup...3-2 Control Keys 3-3 Getting Help 3-3 General Help Jumper...2-24 Clear CMOS Jumper: JBAT1 2-24 Slots...2-25 PCI (Peripheral Component Interconnect) Express Slots 2-25 PCI (Peripheral Component Interconnect) Slots 2-25 PCI Interrupt Request Routing 2-25 Chapter 3.
BIOS Setup 3-1 Entering Setup...3-2 Control Keys 3-3 Getting Help 3-3 General Help Jumper...2-24 Clear CMOS Jumper: JBAT1 2-24 Slots...2-25 PCI (Peripheral Component Interconnect) Express Slots 2-25 PCI (Peripheral Component Interconnect) Slots 2-25 PCI Interrupt Request Routing 2-25 Chapter 3.
User Guide
Page 15
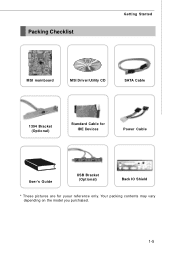
Your packing contents may vary depending on the model you purchased. 1-5 Packing Checklist Getting Started MSI mainboard MSI Driver/Utility CD SATA Cable 1394 Bracket (Optional) Standard Cable for IDE Devices Power Cable User's Guide USB Bracket (Optional) Back IO Shield * These pictures are for yuour reference only.
Your packing contents may vary depending on the model you purchased. 1-5 Packing Checklist Getting Started MSI mainboard MSI Driver/Utility CD SATA Cable 1394 Bracket (Optional) Standard Cable for IDE Devices Power Cable User's Guide USB Bracket (Optional) Back IO Shield * These pictures are for yuour reference only.
User Guide
Page 54
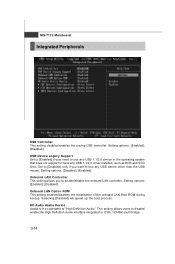
... the operating system that does not support or have any USB device other than the USB mouse. This setting allows users to use any USB 1.1/2.0 driver installed, such as DOS and SCO Unix. MS-7173 M ainboard Integrated Peripherals USB Controller This setting disables/enables the onchip USB controller. Selecting [Disabled] will...
... the operating system that does not support or have any USB device other than the USB mouse. This setting allows users to use any USB 1.1/2.0 driver installed, such as DOS and SCO Unix. MS-7173 M ainboard Integrated Peripherals USB Controller This setting disables/enables the onchip USB controller. Selecting [Disabled] will...
User Guide
Page 58
... support the initialization feature, the display may work abnormally or not function after a power failure or interrupt occurs. Therefore, if the AGP driver of system configuration and open applications/files is saved to main memory that remains powered while most other hard ware components turn off state. ... system resume time is shortened when you press the power button, the computer enters the suspend/sleep mode, but system will need an AGP driver to enter S1 or S3 state. The information stored in this state, no system context is a low power state. Selecting [Enable] allows...
... support the initialization feature, the display may work abnormally or not function after a power failure or interrupt occurs. Therefore, if the AGP driver of system configuration and open applications/files is saved to main memory that remains powered while most other hard ware components turn off state. ... system resume time is shortened when you press the power button, the computer enters the suspend/sleep mode, but system will need an AGP driver to enter S1 or S3 state. The information stored in this state, no system context is a low power state. Selecting [Enable] allows...
User Guide
Page 65
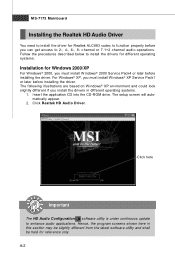
...174; XP environment and could look slightly different if you must install W indows® 2000 Service Pack4 or later before installing the driver. Click here Important The HD Audio Configuration software utility is under continuous update to enhance audio applications. MS-7173 Mainboard Installing the ...Realtek HD Audio Driver You need to install the driver for Windows 2000/XP For W indows® 2000, you must install W indows® XP Service Pack1 or ...
...174; XP environment and could look slightly different if you must install W indows® 2000 Service Pack4 or later before installing the driver. Click here Important The HD Audio Configuration software utility is under continuous update to enhance audio applications. MS-7173 Mainboard Installing the ...Realtek HD Audio Driver You need to install the driver for Windows 2000/XP For W indows® 2000, you must install W indows® XP Service Pack1 or ...
User Guide
Page 66
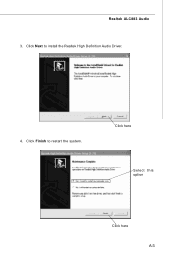
Click Finish to install the Realtek High Definition Audio Driver. 4. Click here Select this option Click here A-3 Realtek ALC883 Audio 3. Click Next to restart the system.
Click Finish to install the Realtek High Definition Audio Driver. 4. Click here Select this option Click here A-3 Realtek ALC883 Audio 3. Click Next to restart the system.
User Guide
Page 67
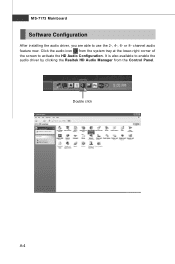
channel audio feature now. It is also available to enable the audio driver by clicking the Realtek HD Audio M anager from the system tray at the lower-right corner of the screen to use the 2-, 4-, 6- MS-7173 Mainboard Software Configuration After installing the audio driver, you are able to activate the HD Audio Configuration. Click the audio icon from the Control Panel. Double click A-4 or 8-
channel audio feature now. It is also available to enable the audio driver by clicking the Realtek HD Audio M anager from the system tray at the lower-right corner of the screen to use the 2-, 4-, 6- MS-7173 Mainboard Software Configuration After installing the audio driver, you are able to activate the HD Audio Configuration. Click the audio icon from the Control Panel. Double click A-4 or 8-
User Guide
Page 81
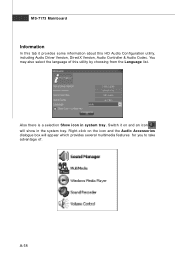
You may also select the language of . Also there is a selection Show icon in the system tray. A-18 Right-click on and an icon will appear which provides several multimedia features for you to take advantage of this utility by choosing from the Language list. Switch it provides some information about this HD Audio Configuration utility, including Audio Driver Version, DirectX Version, Audio Controller & Audio Codec. MS-7173 Mainboard Information In this tab it on the icon and the Audio Accessories dialogue box will show in system tray.
You may also select the language of . Also there is a selection Show icon in the system tray. A-18 Right-click on and an icon will appear which provides several multimedia features for you to take advantage of this utility by choosing from the Language list. Switch it provides some information about this HD Audio Configuration utility, including Audio Driver Version, DirectX Version, Audio Controller & Audio Codec. MS-7173 Mainboard Information In this tab it on the icon and the Audio Accessories dialogue box will show in system tray.
User Guide
Page 89
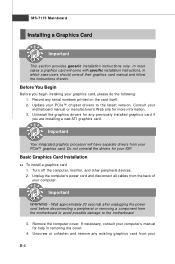
...computer, monitor, and other peripheral devices. 2. Unplug the computer's power cord and disconnect all cables from your B-4 Uninstall the graphics drivers for more information. 3. Wait approximately 20 seconds after unplugging the power cord before disconnecting a peripheral or removing a component from your ...PCIe™ graphics card. Important WARNING - Do not uninstall the drivers for help in which case users should consult their graphics card manual and follow the instructions therein. Unscrew or unfasten...
...computer, monitor, and other peripheral devices. 2. Unplug the computer's power cord and disconnect all cables from your B-4 Uninstall the graphics drivers for more information. 3. Wait approximately 20 seconds after unplugging the power cord before disconnecting a peripheral or removing a component from your ...PCIe™ graphics card. Important WARNING - Do not uninstall the drivers for help in which case users should consult their graphics card manual and follow the instructions therein. Unscrew or unfasten...

User Guide
Page 90
... the metal surface of the installation. Remember to adjust the video settings and configure multiple monitors. computer. 5. Reconnect any cables you have installed the proper drivers and software, you can use the Display Properties control panel to discharge your graphics card with the slot and press it in the computer's pIomwperorctoarnd...
... the metal surface of the installation. Remember to adjust the video settings and configure multiple monitors. computer. 5. Reconnect any cables you have installed the proper drivers and software, you can use the Display Properties control panel to discharge your graphics card with the slot and press it in the computer's pIomwperorctoarnd...
User Guide
Page 105
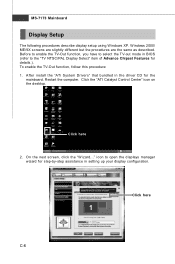
... the TV-out mode in BIOS (refer to open the displays manager wizard for step-by-step assistance in the driver CD for details.). Click here C-6 After install the "ATi System Drivers" that bundled in setting up your display configuration. Click the "ATI Catalyst Control Center" icon on the desktop. To enable...
... the TV-out mode in BIOS (refer to open the displays manager wizard for step-by-step assistance in the driver CD for details.). Click here C-6 After install the "ATi System Drivers" that bundled in setting up your display configuration. Click the "ATI Catalyst Control Center" icon on the desktop. To enable...


