User Guide
Page 15
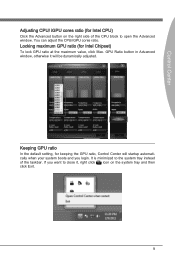
... be dynamically adjusted. You can adjust the CPU/iGPU cores ratio. GPU Ratio button in Advanced window, otherwise it will startup automatically when your system boots and you want to close it, right click icon on the right side of the CPU block to the system tray instead of the taskbar...
... be dynamically adjusted. You can adjust the CPU/iGPU cores ratio. GPU Ratio button in Advanced window, otherwise it will startup automatically when your system boots and you want to close it, right click icon on the right side of the CPU block to the system tray instead of the taskbar...

User Guide
Page 21
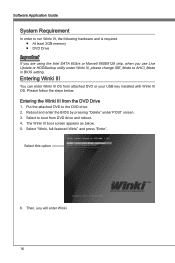
The quick boot Winki III provides Live update, Internet browser, instant messenging, Skype, photo viewer and so on. Winki III Winki III is an MSI self-developed Linux distribution for MSI's proprietary mainboards. Without entering the Microsoft Windows, users still have access to basic programs that are frequently used.
The quick boot Winki III provides Live update, Internet browser, instant messenging, Skype, photo viewer and so on. Winki III Winki III is an MSI self-developed Linux distribution for MSI's proprietary mainboards. Without entering the Microsoft Windows, users still have access to basic programs that are frequently used.
User Guide
Page 22
... Put the attached DVD to the DVD drive. 2. Entering Winki III You can enter Winki III OS from DVD drive and reboot. 4. The Winki III boot screen appears as below : Entering the Winki III from the DVD Drive 1. Then, you use Live Update or HDDBackup utility under POST screen. 3. Select "... press "Enter". Reboot and enter the BIOS by pressing "Delete" under Winki III, please change IDE_Mode to AHCI_Mode in BIOS setting. Select to boot from attached DVD or your USB key installed with Winki III OS. Software Application Guide System Requirement In order to run Winki III, the following...
... Put the attached DVD to the DVD drive. 2. Entering Winki III You can enter Winki III OS from DVD drive and reboot. 4. The Winki III boot screen appears as below : Entering the Winki III from the DVD Drive 1. Then, you use Live Update or HDDBackup utility under POST screen. 3. Select "... press "Enter". Reboot and enter the BIOS by pressing "Delete" under Winki III, please change IDE_Mode to AHCI_Mode in BIOS setting. Select to boot from attached DVD or your USB key installed with Winki III OS. Software Application Guide System Requirement In order to run Winki III, the following...

User Guide
Page 23
Check the installing dialog and click "Start". Select to boot from Your USB Flash Drive You need to prepare a USB drive with Winki installer" and press "Enter". Please backup your data in advance or the .... 4. Insert your USB drive to the DVD drive. 3. Select this option 7. Select "Winki, Start with at least 1GB capacity. Click here 17 The Winki III boot screen appears as below. 6.
Check the installing dialog and click "Start". Select to boot from Your USB Flash Drive You need to prepare a USB drive with Winki installer" and press "Enter". Please backup your data in advance or the .... 4. Insert your USB drive to the DVD drive. 3. Select this option 7. Select "Winki, Start with at least 1GB capacity. Click here 17 The Winki III boot screen appears as below. 6.

User Guide
Page 24
Then, click "Yes" to boot from USB drive and reboot. 13. Click here 9. Click here 10. Select to continue. Click "Reboot" and then "Yes". Make sure that you will enter Winki III. 18 Enter the BIOS by pressing "Delete" under POST screen. 12. The installer is proceeding. Click here 11. Software Application Guide 8. Click "Close" when finish. Then, you backup your data in advanced.
Then, click "Yes" to boot from USB drive and reboot. 13. Click here 9. Click here 10. Select to continue. Click "Reboot" and then "Yes". Make sure that you will enter Winki III. 18 Enter the BIOS by pressing "Delete" under POST screen. 12. The installer is proceeding. Click here 11. Software Application Guide 8. Click "Close" when finish. Then, you backup your data in advanced.

User Guide
Page 71
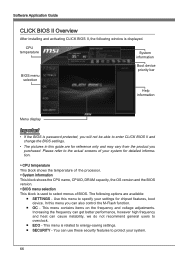
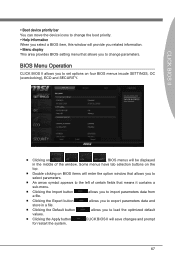
Users can change BIOS settings, monitor CPU temperature, select the boot device priority and view system information such as the CPU name, DRAM capacity, the OS version and the BIOS version. With the CLICK BIOS II, users can import and export parameters data for setting parameters of BIOS from Windows operating system without the need to reboot and enter BIOS utility. CLICK BIOS II CLICK BIOS II is a new application software that provides a interface for backup or sharing with friends.
Users can change BIOS settings, monitor CPU temperature, select the boot device priority and view system information such as the CPU name, DRAM capacity, the OS version and the BIOS version. With the CLICK BIOS II, users can import and export parameters data for setting parameters of BIOS from Windows operating system without the need to reboot and enter BIOS utility. CLICK BIOS II CLICK BIOS II is a new application software that provides a interface for backup or sharing with friends.
User Guide
Page 72
This menu contains items on the frequency and voltage adjustments. CPU temperature System information BIOS menu selection Boot device priority bar Help information Menu display Important • If the BIOS is used to select menus of the processor. ...■ OC - Software Application Guide CLICK BIOS II Overview After installing and activating CLICK BIOS II, the following options are for chipset features, boot device. Increasing the frequency can get better performance, however high frequency and heat can use these security features to energy-saving settings. ■ ...
This menu contains items on the frequency and voltage adjustments. CPU temperature System information BIOS menu selection Boot device priority bar Help information Menu display Important • If the BIOS is used to select menus of the processor. ...■ OC - Software Application Guide CLICK BIOS II Overview After installing and activating CLICK BIOS II, the following options are for chipset features, boot device. Increasing the frequency can get better performance, however high frequency and heat can use these security features to energy-saving settings. ■ ...
User Guide
Page 73
... option window that allows you to select parameters. ■ An arrow symbol appears to the left of certain fields that allows you to change the boot priority. ▶ Help information When you select a BIOS item, this window will provide you related information. ▶ Menu display This area provides BIOS setting menu... Operation CLICK BIOS II allows you to load the optimized default values. ■ Clicking the Apply button for restart the system. CLICK BIOS II ▶ Boot device priority bar You can move the device icons to change parameters.
... option window that allows you to select parameters. ■ An arrow symbol appears to the left of certain fields that allows you to change the boot priority. ▶ Help information When you select a BIOS item, this window will provide you related information. ▶ Menu display This area provides BIOS setting menu... Operation CLICK BIOS II allows you to load the optimized default values. ■ Clicking the Apply button for restart the system. CLICK BIOS II ▶ Boot device priority bar You can move the device icons to change parameters.
User Guide
Page 74
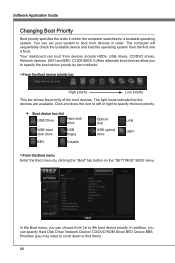
...them). 68 You can specify Hard Disk Drive/ Network Device/ CD/DVD ROM Drive/ BEV Device BBS Priorities (you to specify the boot priority. ■ Boot device icon list USB Drive Hard disk drive USB hard disk drive USB floppy BEV Disable Optical disk USB optical drive LAN UEFI &#... in which the computer searches for a bootable operating system. Click and draw the icon to left or right to specify the boot device priority by clicking the "Boot" tab button on the "SETTINGS" BIOS menu. The computer will sequentially check the bootable device and load the operating system from...
...them). 68 You can specify Hard Disk Drive/ Network Device/ CD/DVD ROM Drive/ BEV Device BBS Priorities (you to specify the boot priority. ■ Boot device icon list USB Drive Hard disk drive USB hard disk drive USB floppy BEV Disable Optical disk USB optical drive LAN UEFI &#... in which the computer searches for a bootable operating system. Click and draw the icon to left or right to specify the boot device priority by clicking the "Boot" tab button on the "SETTINGS" BIOS menu. The computer will sequentially check the bootable device and load the operating system from...


