
User Manual
Page 2
Preface 1-2 Table of Content Preface Table of Content ...1-2 Regulations Information...1-5 FCC-B Radio Frequency Interference Statement 1-5 FCC Conditions ...1-6 Safety Instructions...1-7 Safety Guideline for Using Lithium Battery 1-9 WEEE Statement ...1-13 Trademarks ...1-20 Release History...1-20 Introductions Manual Map ...2-2 Unpacking...2-3 Specification...2-4 Product Overview ...2-9 Top-Open View ...2-9 Front Side View ...2-13 Left Side View...2-15 Right Side View ...2-17
Preface 1-2 Table of Content Preface Table of Content ...1-2 Regulations Information...1-5 FCC-B Radio Frequency Interference Statement 1-5 FCC Conditions ...1-6 Safety Instructions...1-7 Safety Guideline for Using Lithium Battery 1-9 WEEE Statement ...1-13 Trademarks ...1-20 Release History...1-20 Introductions Manual Map ...2-2 Unpacking...2-3 Specification...2-4 Product Overview ...2-9 Top-Open View ...2-9 Front Side View ...2-13 Left Side View...2-15 Right Side View ...2-17

User Manual
Page 3
Preface 1-3 Rear Side View...2-19 Bottom Side View ...2-20 Getting Started Power Management ...3-2 ECO Engine--Power Saving Function 3-2 AC Adapter ...3-4 Battery Pack ...3-6 Using the Battery Pack...3-9 Basic Operations ...3-11 Safety and Comfort Tips...3-11 Having a Good Work Habit...3-12 Knowing the Keyboard ...3-13 Knowing the Touchpad ...3-17 About Hard Disk Drive...3-20 Connecting the External Devices 3-21 Using the External Optical Storage Device 3-21 Connecting the Peripheral Devices 3-23 Connecting the Communication Devices 3-26 Safely Remove Hardware ...3-27
Preface 1-3 Rear Side View...2-19 Bottom Side View ...2-20 Getting Started Power Management ...3-2 ECO Engine--Power Saving Function 3-2 AC Adapter ...3-4 Battery Pack ...3-6 Using the Battery Pack...3-9 Basic Operations ...3-11 Safety and Comfort Tips...3-11 Having a Good Work Habit...3-12 Knowing the Keyboard ...3-13 Knowing the Touchpad ...3-17 About Hard Disk Drive...3-20 Connecting the External Devices 3-21 Using the External Optical Storage Device 3-21 Connecting the Peripheral Devices 3-23 Connecting the Communication Devices 3-26 Safely Remove Hardware ...3-27

User Manual
Page 4
Preface 1-4 BIOS Setup About BIOS Setup...4-2 When to Use BIOS Setup...4-2 How to Run BIOS Setup...4-2 Control Keys ...4-3 BIOS Setup Menu...4-4 Main menu...4-5 Advanced menu...4-7 Security menu...4-9 Boot menu ...4-11 Save & Exit menu...4-12
Preface 1-4 BIOS Setup About BIOS Setup...4-2 When to Use BIOS Setup...4-2 How to Run BIOS Setup...4-2 Control Keys ...4-3 BIOS Setup Menu...4-4 Main menu...4-5 Advanced menu...4-7 Security menu...4-9 Boot menu ...4-11 Save & Exit menu...4-12
User Manual
Page 5
This equipment generates, uses and radiates radio frequency energy, and, if not installed and used in accordance with the limits for a Class B digital device, pursuant to part 15 of the following measures: „ Reorient or relocate the receiving antenna. „ Increase the separation between the equipment and receiver. „ Connect the equipment into an outlet on , the user is encouraged to try to correct the interference by one or more of the FCC rules. However, there is connected. „ Consult the dealer or an experienced radio TV technician for compliance could void the user's...
This equipment generates, uses and radiates radio frequency energy, and, if not installed and used in accordance with the limits for a Class B digital device, pursuant to part 15 of the following measures: „ Reorient or relocate the receiving antenna. „ Increase the separation between the equipment and receiver. „ Connect the equipment into an outlet on , the user is encouraged to try to correct the interference by one or more of the FCC rules. However, there is connected. „ Consult the dealer or an experienced radio TV technician for compliance could void the user's...

User Manual
Page 6
Operation is subject to comply with part 15 of the FCC Rules. Preface 1-6 Š Shield interface cables and AC power cord, if any interference received, including interference that may not cause harmful interference. „ This device must accept any , must be used in order to the following two conditions: „ This device may cause undesired operation. FCC Conditions This device complies with the emission limits.
Operation is subject to comply with part 15 of the FCC Rules. Preface 1-6 Š Shield interface cables and AC power cord, if any interference received, including interference that may not cause harmful interference. „ This device must accept any , must be used in order to the following two conditions: „ This device may cause undesired operation. FCC Conditions This device complies with the emission limits.

User Manual
Page 7
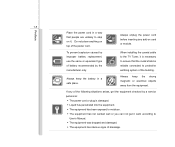
Do not cover the openings. Lay this equipment away from overheating. Keep this equipment on a stable surface before connecting the equipment to the power outlet. All cautions and warnings on the enclosure are used for future reference. The openings on the equipment or user's manual should be noted. Keep the User's Guide that could damage the equipment or cause an electrical shock. Make sure the power voltage is within safety range and has been adjusted properly to prevent the equipment from humidity and high temperature. Preface 1-7 Safety Instructions Read the safety...
Do not cover the openings. Lay this equipment away from overheating. Keep this equipment on a stable surface before connecting the equipment to the power outlet. All cautions and warnings on the enclosure are used for future reference. The openings on the equipment or user's manual should be noted. Keep the User's Guide that could damage the equipment or cause an electrical shock. Make sure the power voltage is within safety range and has been adjusted properly to prevent the equipment from humidity and high temperature. Preface 1-7 Safety Instructions Read the safety...
User Manual
Page 8
Do not place anything on card or module. If any add-on top of the building. To prevent explosion caused by improper battery replacement, use the same or equivalent type of battery recommended by a service personnel: Š The power cord or plug is reliable connected to protective earthing system of the power cord. 1-8 Preface Place the power cord in a safe place. When installing the coaxial cable to the TV Tuner, it is necessary to ensure that people are unlikely to step on it work according to moisture. Š The equipment has not worked well or you can not get the...
Do not place anything on card or module. If any add-on top of the building. To prevent explosion caused by improper battery replacement, use the same or equivalent type of battery recommended by a service personnel: Š The power cord or plug is reliable connected to protective earthing system of the power cord. 1-8 Preface Place the power cord in a safe place. When installing the coaxial cable to the TV Tuner, it is necessary to ensure that people are unlikely to step on it work according to moisture. Š The equipment has not worked well or you can not get the...
User Manual
Page 13
Hävitage kasutatud aku vastavalt tootja juhistele. Asendage ainult sama või tootja poolt soovitatud võrdväärse akuga. Les fabricants de ces équipements Preface 1-13 proizvođača. (Estonian) (Eesti) ETTEVAATUST! Persian) Arabic WEEE Statement (English) Under the European Union ("EU") Directive on Waste Electrical and Electronic Equipment, Directive 2002/96/EC, which takes effect on valesti paigaldatud. Plahvatusoht, kui aku on August 13, 2005, products of "electrical and electronic equipment" cannot be discarded as municipal ...
Hävitage kasutatud aku vastavalt tootja juhistele. Asendage ainult sama või tootja poolt soovitatud võrdväärse akuga. Les fabricants de ces équipements Preface 1-13 proizvođača. (Estonian) (Eesti) ETTEVAATUST! Persian) Arabic WEEE Statement (English) Under the European Union ("EU") Directive on Waste Electrical and Electronic Equipment, Directive 2002/96/EC, which takes effect on valesti paigaldatud. Plahvatusoht, kui aku on August 13, 2005, products of "electrical and electronic equipment" cannot be discarded as municipal ...

User Manual
Page 20
Release History Version 1.0 Revision Note First Released Date 03, 2009 Preface 1-20 Trademarks All trademarks are the properties of their respective owners.
Release History Version 1.0 Revision Note First Released Date 03, 2009 Preface 1-20 Trademarks All trademarks are the properties of their respective owners.

User Manual
Page 21
CHAPTER 2 Introductions
CHAPTER 2 Introductions
User Manual
Page 22
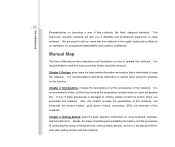
Introductions 2-2 Congratulations on becoming a user of this notebook. We are also provided to help users getting familiar with this notebook. It is recommended to read this manual carefully before using this notebook. Chapter 1, Preface, gives users the basic safety information and caution that is recommended to read these accessories is damaged or missing, please contact the vendor where you purchased this notebook. Chapter 2, Introductions, includes the descriptions of all the accessories included when you a delightful and professional experience in using this notebook. ...
Introductions 2-2 Congratulations on becoming a user of this notebook. We are also provided to help users getting familiar with this notebook. It is recommended to read this manual carefully before using this notebook. Chapter 1, Preface, gives users the basic safety information and caution that is recommended to read these accessories is damaged or missing, please contact the vendor where you purchased this notebook. Chapter 2, Introductions, includes the descriptions of all the accessories included when you a delightful and professional experience in using this notebook. ...
User Manual
Page 23
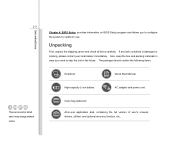
If any item contained is damaged or missing, please contact your local dealer immediately. 2-3 These accessories listed above may change without notice. The package should contain the following items: Notebook Quick Start Manual High-capacity Li-ion battery AC adapter and power cord Carry bag (optional) All-in the future. Unpacking First, unpack the shipping carton and check all items carefully. Also, keep the box and packing materials in case you to ship the unit in -one application disk, containing the full version of user's manual, drivers, utilities, and optional recovery ...
If any item contained is damaged or missing, please contact your local dealer immediately. 2-3 These accessories listed above may change without notice. The package should contain the following items: Notebook Quick Start Manual High-capacity Li-ion battery AC adapter and power cord Carry bag (optional) All-in the future. Unpacking First, unpack the shipping carton and check all items carefully. Also, keep the box and packing materials in case you to ship the unit in -one application disk, containing the full version of user's manual, drivers, utilities, and optional recovery ...
User Manual
Page 24
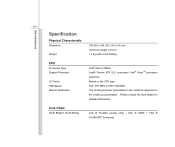
...) Based on the CPU type 533 / 667 MHz or 800/ 1066 MHz The actual processor preinstalled in the notebook depends on the model you purchased. Core Chips North Bridge+ South Bridge Intel ® Poulsbo (single chip) / Intel ® GS45 + Intel ® ICH9M-SFF Enhanced
...) Based on the CPU type 533 / 667 MHz or 800/ 1066 MHz The actual processor preinstalled in the notebook depends on the model you purchased. Core Chips North Bridge+ South Bridge Intel ® Poulsbo (single chip) / Intel ® GS45 + Intel ® ICH9M-SFF Enhanced

User Manual
Page 25
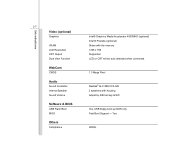
Storage (Items listed here may vary without notice) HDD form factor 2.5", 9.5 mm High, SATA SSD (solid-state disk) 32GB (optional) External Optical Device USB External ODD (optional) Special Notification The actual HDD and SSD preinstalled in the notebook depends on the model you purchased. Introductions 2-5 Memory Technology Memory Maximum DDR2 800MHz DDR2 SO-DIMM X 1 slot 2GB /4GB (optional) Power AC Adapter Battery Type RTC Battery Special Notification 40W, 20V (optional) 4 cells 8 cells (optional) Yes The actual battery pack that comes with the package may vary without ...
Storage (Items listed here may vary without notice) HDD form factor 2.5", 9.5 mm High, SATA SSD (solid-state disk) 32GB (optional) External Optical Device USB External ODD (optional) Special Notification The actual HDD and SSD preinstalled in the notebook depends on the model you purchased. Introductions 2-5 Memory Technology Memory Maximum DDR2 800MHz DDR2 SO-DIMM X 1 slot 2GB /4GB (optional) Power AC Adapter Battery Type RTC Battery Special Notification 40W, 20V (optional) 4 cells 8 cells (optional) Yes The actual battery pack that comes with the package may vary without ...
User Manual
Page 26
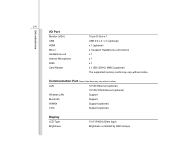
Introductions 2-6 I/O Port Monitor (VGA) USB HDMI Mic-in Headphone-out Internal Microphone RJ45 Card Reader 15 pin D-Sub x 1 USB 2.0 x 2 / x 3 (optional) x 1 (optional) x 1(support Headphone-out function) x 1 x 1 x 1 x 1 (SD/ SDHC/ MMC) (optional) The supported memory cards may vary without notice. Communication Port (Items listed here may vary without notice) LAN 10/100 Ethernet (optional) 10/100/1000 Ethernet (optional) Wireless LAN Support Bluetooth Support WiMAX Support (optional) 3.5G Support (optional) Display LCD Type Brightness 13.4" WXGA (Glare type) Brightness ...
Introductions 2-6 I/O Port Monitor (VGA) USB HDMI Mic-in Headphone-out Internal Microphone RJ45 Card Reader 15 pin D-Sub x 1 USB 2.0 x 2 / x 3 (optional) x 1 (optional) x 1(support Headphone-out function) x 1 x 1 x 1 x 1 (SD/ SDHC/ MMC) (optional) The supported memory cards may vary without notice. Communication Port (Items listed here may vary without notice) LAN 10/100 Ethernet (optional) 10/100/1000 Ethernet (optional) Wireless LAN Support Bluetooth Support WiMAX Support (optional) 3.5G Support (optional) Display LCD Type Brightness 13.4" WXGA (Glare type) Brightness ...
User Manual
Page 27
Introductions 2-7 Video (optional) Graphics VRAM LCD Resolution CRT Output Dual View Function WebCam CMOS Audio Sound Controller Internal Speaker Sound Volume Software & BIOS USB Flash Boot BIOS Others Compliance Intel® Graphics Media Accelerator 4500MHD (optional) Intel ® Poulsbo (optional) Share with the memory 1366 x 768 Supported LCD or CRT will be auto detected when connected. 1.3 Mega Pixel Realtek® ALC 888-VC2-GR 2 speakers with housing Adjust by K/B hot-key & SW Yes, USB floppy boot up DOS only Fast Boot Support --- Yes WHQL
Introductions 2-7 Video (optional) Graphics VRAM LCD Resolution CRT Output Dual View Function WebCam CMOS Audio Sound Controller Internal Speaker Sound Volume Software & BIOS USB Flash Boot BIOS Others Compliance Intel® Graphics Media Accelerator 4500MHD (optional) Intel ® Poulsbo (optional) Share with the memory 1366 x 768 Supported LCD or CRT will be auto detected when connected. 1.3 Mega Pixel Realtek® ALC 888-VC2-GR 2 speakers with housing Adjust by K/B hot-key & SW Yes, USB floppy boot up DOS only Fast Boot Support --- Yes WHQL

User Manual
Page 28
However, please always contact the authorized dealer or service center for the upgrade service due to any attempt to replace the components of the product may be replaceable and upgradable by user's request. Introductions 2-8 Upgrade and Warranty Please be noticed that the memory, hard disk drive, optical storage drive, and battery pack preinstalled in the product users purchased may cause the warranty void.
However, please always contact the authorized dealer or service center for the upgrade service due to any attempt to replace the components of the product may be replaceable and upgradable by user's request. Introductions 2-8 Upgrade and Warranty Please be noticed that the memory, hard disk drive, optical storage drive, and battery pack preinstalled in the product users purchased may cause the warranty void.

User Manual
Page 29
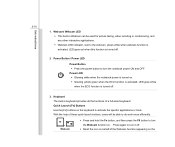
2-9 The figures show here are for reference only. Internal Microphone 3 4 Keyboard 4. Introductions Product Overview This section provides the description of basic aspects of your notebook. 5 1 1. Top-open View The figure of top-open view and description shown below will help you to know more about the appearance of this section may vary from the actual one that the notebook shown in this notebook before using it. Power Button / Power LED 3. It will lead you to browse the main operating area of the notebook. WebCam 2. Please be aware that users purchased....
2-9 The figures show here are for reference only. Internal Microphone 3 4 Keyboard 4. Introductions Product Overview This section provides the description of basic aspects of your notebook. 5 1 1. Top-open View The figure of top-open view and description shown below will help you to know more about the appearance of this section may vary from the actual one that the notebook shown in this notebook before using it. Power Button / Power LED 3. It will lead you to browse the main operating area of the notebook. WebCam 2. Please be aware that users purchased....
User Manual
Page 30
Power LED: Š Glowing white when the notebook power is turned on the With the help of these quick launch buttons, users will be used for picture taking, video recoding or conferencing, and any other interactive applications. Š Webcam LED indicator, next to the webcam, grows white when webcam function is turned off . Š Read the icon on behalf of a full-sized keyboard. Keyboard The built-in Webcam can be able to do work more efficiently. + Webcam Š Press and hold the Fn button, and then press the F6 button to turn the Webcam function on the keyboard to turn ...
Power LED: Š Glowing white when the notebook power is turned on the With the help of these quick launch buttons, users will be used for picture taking, video recoding or conferencing, and any other interactive applications. Š Webcam LED indicator, next to the webcam, grows white when webcam function is turned off . Š Read the icon on behalf of a full-sized keyboard. Keyboard The built-in Webcam can be able to do work more efficiently. + Webcam Š Press and hold the Fn button, and then press the F6 button to turn the Webcam function on the keyboard to turn ...

User Manual
Page 31
Introductions + ECO Engine (Power Saving) Š Press and hold the Fn button, and then press the F5 button to turn the ECO Engine function on. Š Refer to the Power Management section in chapter 3 of this manual for the detailed information of Bluetooth appearing on . Press again to turn it off . Š Read the icon on behalf of the function of Wireless LAN (WiFi)/ WiMAX (optional) appearing on the display to learn the function status. Š The actual activate function will be controlled by the Intel PROSet software. (WiMAX) + Bluetooth Š Press and hold the Fn button,...
Introductions + ECO Engine (Power Saving) Š Press and hold the Fn button, and then press the F5 button to turn the ECO Engine function on. Š Refer to the Power Management section in chapter 3 of this manual for the detailed information of Bluetooth appearing on . Press again to turn it off . Š Read the icon on behalf of the function of Wireless LAN (WiFi)/ WiMAX (optional) appearing on the display to learn the function status. Š The actual activate function will be controlled by the Intel PROSet software. (WiMAX) + Bluetooth Š Press and hold the Fn button,...
