

User Manual
Page 2
... 1-7 Vietnam RoHS...1-7 Upgrade and Warranty 1-8 Acquisition of Replaceable Parts 1-8 Safety Instructions...1-9 MSI Highlights ...1-11 Introductions 2-1 Unpacking...2-2 Product Overview...2-3 Top-open View...2-3 Front Side View...2-5 Right Side View...2-6 Left Side View...2-8 Rear Side View...2-10 Bottom Side View 2-11 How to Use the Keyboard 2-13 Windows Key...2-13 Quick Launch Keys 2-14 Disable or Enable Touchpad 2-15 Enter Sleep Mode 2-15 Switch Display...2-15 Use Multiple Monitors 2-15 Adjust the Brightness Level of the Display 2-16 1-2
... 1-7 Vietnam RoHS...1-7 Upgrade and Warranty 1-8 Acquisition of Replaceable Parts 1-8 Safety Instructions...1-9 MSI Highlights ...1-11 Introductions 2-1 Unpacking...2-2 Product Overview...2-3 Top-open View...2-3 Front Side View...2-5 Right Side View...2-6 Left Side View...2-8 Rear Side View...2-10 Bottom Side View 2-11 How to Use the Keyboard 2-13 Windows Key...2-13 Quick Launch Keys 2-14 Disable or Enable Touchpad 2-15 Enter Sleep Mode 2-15 Switch Display...2-15 Use Multiple Monitors 2-15 Adjust the Brightness Level of the Display 2-16 1-2
User Manual
Page 3
... to Set Up Windows Hello Fingerprint Login 3-11 How to Use the Touchpad 3-16 About HDD and SSD 3-17 About M.2 SSD Slot...3-17 How to Connect the Internet 3-18 Wireless LAN...3-18 Wired LAN...3-20 How to Set Up Bluetooth Connection 3-25 Activating Bluetooth Connection 3-25 How to Connect External Devices 3-28 Video: How to Use RAID Function 3-29 How to Select Boot Mode in BIOS 3-30 Video: How to Restore Windows 10 Operating System on MSI Notebooks 3-31 Video: How to Use MSI One Touch Install...
... to Set Up Windows Hello Fingerprint Login 3-11 How to Use the Touchpad 3-16 About HDD and SSD 3-17 About M.2 SSD Slot...3-17 How to Connect the Internet 3-18 Wireless LAN...3-18 Wired LAN...3-20 How to Set Up Bluetooth Connection 3-25 Activating Bluetooth Connection 3-25 How to Connect External Devices 3-28 Video: How to Use RAID Function 3-29 How to Select Boot Mode in BIOS 3-30 Video: How to Restore Windows 10 Operating System on MSI Notebooks 3-31 Video: How to Use MSI One Touch Install...
User Manual
Page 8
... acquisition of replaceable parts (or compatible ones) of spare parts. 1-8 Upgrade and Warranty Please note that certain components, such as memory modules, HDD, SSD, ODD, and Bluetooth/WiFi combo card, etc., preinstalled in certain countries or territories may be fulfilled by user's request depending on the official regulations declared at most since it may cause the product to assembly/disassembly, since the...
... acquisition of replaceable parts (or compatible ones) of spare parts. 1-8 Upgrade and Warranty Please note that certain components, such as memory modules, HDD, SSD, ODD, and Bluetooth/WiFi combo card, etc., preinstalled in certain countries or territories may be fulfilled by user's request depending on the official regulations declared at most since it may cause the product to assembly/disassembly, since the...
User Manual
Page 9
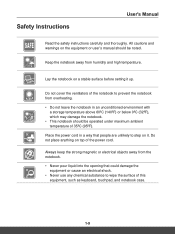
... as keyboard, touchpad, and notebook case. 1-9 Safety Instructions User's Manual Read the safety instructions carefully and thoroughly. Lay the notebook on the equipment or user's manual should be noted. Do not cover the ventilators of the notebook to prevent the notebook from overheating. • Do not leave the notebook in a way that could damage the equipment or cause an electrical shock. • Never use any...
... as keyboard, touchpad, and notebook case. 1-9 Safety Instructions User's Manual Read the safety instructions carefully and thoroughly. Lay the notebook on the equipment or user's manual should be noted. Do not cover the ventilators of the notebook to prevent the notebook from overheating. • Do not leave the notebook in a way that could damage the equipment or cause an electrical shock. • Never use any...
User Manual
Page 16
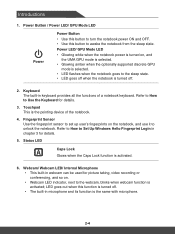
... mode is selected. • LED flashes when the notebook goes to the webcam, blinks when webcam function is activated; Fingerprint Sensor Use the fingerprint sensor to set up user's fingerprints on the notebook, and use it to awake the notebook from the sleep state. LED goes out when this button to unlock the notebook. Power LED/ GPU Mode LED • Glowing white when the notebook power is turned on . • Webcam LED indicator, next to the sleep state. • LED goes off . 2. Webcam/ Webcam LED/ Internal Microphone...
... mode is selected. • LED flashes when the notebook goes to the webcam, blinks when webcam function is activated; Fingerprint Sensor Use the fingerprint sensor to set up user's fingerprints on the notebook, and use it to awake the notebook from the sleep state. LED goes out when this button to unlock the notebook. Power LED/ GPU Mode LED • Glowing white when the notebook power is turned on . • Webcam LED indicator, next to the sleep state. • LED goes off . 2. Webcam/ Webcam LED/ Internal Microphone...
User Manual
Page 17
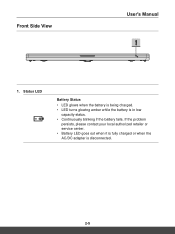
Front Side View User's Manual 1. Status LED Battery Status • LED glows when the battery is being charged. • LED turns glowing amber while the battery is disconnected. 2-5 If the problem persists, please contact your local authorized retailer or service center. • Battery LED goes out when it is fully charged or when the AC/DC adapter is in low capacity status. • Continuously blinking if the battery fails.
Front Side View User's Manual 1. Status LED Battery Status • LED glows when the battery is being charged. • LED turns glowing amber while the battery is disconnected. 2-5 If the problem persists, please contact your local authorized retailer or service center. • Battery LED goes out when it is fully charged or when the AC/DC adapter is in low capacity status. • Continuously blinking if the battery fails.

User Manual
Page 20
... connect a LAN cable for connecting various devices, such as storage devices, hard drives, or video cameras, and offers more advantages over high-speed data transferring. 2-8 Card Reader The built-in card reader supports various types of 10/100/1000 megabits per second, is designed to cool the system. Ventilator The ventilator is used to connect the AC/DC adapter and supply power for the notebook. 5. Check the Specifications for air circulation. 2. USB 3.2 Gen 2 Port USB...
... connect a LAN cable for connecting various devices, such as storage devices, hard drives, or video cameras, and offers more advantages over high-speed data transferring. 2-8 Card Reader The built-in card reader supports various types of 10/100/1000 megabits per second, is designed to cool the system. Ventilator The ventilator is used to connect the AC/DC adapter and supply power for the notebook. 5. Check the Specifications for air circulation. 2. USB 3.2 Gen 2 Port USB...

User Manual
Page 25
Windows Key You can find the Windows Logo key on the keyboard which is a must to install SCM application before using the keyboard function keys. To ensure that the keyboard will be functioning properly, it is used to Use the Keyboard This notebook provides a full functioned keyboard. User's Manual How to perform Windows-specific functions, such as opening the Start menu and launching the shortcut menu. 2-13
Windows Key You can find the Windows Logo key on the keyboard which is a must to install SCM application before using the keyboard function keys. To ensure that the keyboard will be functioning properly, it is used to Use the Keyboard This notebook provides a full functioned keyboard. User's Manual How to perform Windows-specific functions, such as opening the Start menu and launching the shortcut menu. 2-13
User Manual
Page 26
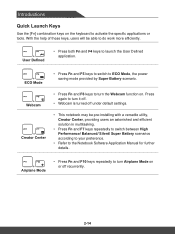
... under default settings. • This notebook may be able to do work more efficiently. + User Defined • Press both Fn and F4 keys to launch the User Defined application. + ECO Mode • Press Fn and F5 keys to switch to ECO Mode, the power saving mode provided by Super Battery scenario. + Webcam + Creator Center • Press Fn and F6 keys to turn Airplane Mode on the keyboard to turn the Webcam function...
... under default settings. • This notebook may be able to do work more efficiently. + User Defined • Press both Fn and F4 keys to launch the User Defined application. + ECO Mode • Press Fn and F5 keys to switch to ECO Mode, the power saving mode provided by Super Battery scenario. + Webcam + Creator Center • Press Fn and F6 keys to turn Airplane Mode on the keyboard to turn the Webcam function...
User Manual
Page 27
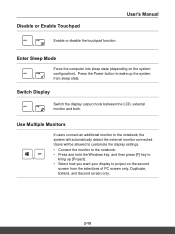
... screen only. 2-15 Users will automatically detect the external monitor connected. Switch Display Switch the display output mode between the LCD, external + monitor and both. Use Multiple Monitors If users connect an additional monitor to the notebook, the system will be allowed to customize the display settings. • Connect the monitor to the notebook. • Press and hold the Windows key, and then press [P] key to project on the system configuration). Disable or Enable Touchpad User's Manual Enable or disable the touchpad function. + Enter Sleep Mode Force...
... screen only. 2-15 Users will automatically detect the external monitor connected. Switch Display Switch the display output mode between the LCD, external + monitor and both. Use Multiple Monitors If users connect an additional monitor to the notebook, the system will be allowed to customize the display settings. • Connect the monitor to the notebook. • Press and hold the Windows key, and then press [P] key to project on the system configuration). Disable or Enable Touchpad User's Manual Enable or disable the touchpad function. + Enter Sleep Mode Force...

User Manual
Page 31
User's Manual I/O Port USB Audio Connectors ThunderboltTM 3 Video Connectors LAN Card Reader Communication Port LAN Wireless LAN Bluetooth Display LCD Type Video Graphics VRAM (optional) Webcam Resolution Audio Internal Speakers 1 x USB 3.2 Gen 1 Type-C 3 x USB 3.2 Gen 2 1 x Mic-in 1 x Headphone-out (HiFi audio output supported) 1 x USB 3.2 Gen 2 Type-C • 5K display monitor output • up to 40Gbps data rate • up to 5V/3A portable charging power when AC power is connected. 1 x HDMI 1 x RJ-45 1 x MicroSD Supported Supported Supported 17.3" FHD LED panel • NVIDIA® ...
User's Manual I/O Port USB Audio Connectors ThunderboltTM 3 Video Connectors LAN Card Reader Communication Port LAN Wireless LAN Bluetooth Display LCD Type Video Graphics VRAM (optional) Webcam Resolution Audio Internal Speakers 1 x USB 3.2 Gen 1 Type-C 3 x USB 3.2 Gen 2 1 x Mic-in 1 x Headphone-out (HiFi audio output supported) 1 x USB 3.2 Gen 2 Type-C • 5K display monitor output • up to 40Gbps data rate • up to 5V/3A portable charging power when AC power is connected. 1 x HDMI 1 x RJ-45 1 x MicroSD Supported Supported Supported 17.3" FHD LED panel • NVIDIA® ...

User Manual
Page 36
... • Use the adapter that your notebook only. • Always be replaced by users. ▶▶ Safety guidelines • This notebook is equipped with a non-removable battery, follow the local regulations while discarding the notebook. • Always keep the notebook and its battery away from the in use adapter since it is connected to an AC power source via the AC adapter before installing any module to cause...
... • Use the adapter that your notebook only. • Always be replaced by users. ▶▶ Safety guidelines • This notebook is equipped with a non-removable battery, follow the local regulations while discarding the notebook. • Always keep the notebook and its battery away from the in use adapter since it is connected to an AC power source via the AC adapter before installing any module to cause...

User Manual
Page 37
...; The rechargeable battery pack is an internal power source of the notebook. ▶▶ Battery charging behavior To optimize battery life and avoid a sudden power loss, read the tips below: • Suspend system operation if the system will be determined by the applications in use. 3-5 However, to optimize the life of time. • Disable unnecessary settings or remove idle peripherals. • Connect an AC...
...; The rechargeable battery pack is an internal power source of the notebook. ▶▶ Battery charging behavior To optimize battery life and avoid a sudden power loss, read the tips below: • Suspend system operation if the system will be determined by the applications in use. 3-5 However, to optimize the life of time. • Disable unnecessary settings or remove idle peripherals. • Connect an AC...

User Manual
Page 41
Change the settings for the new power plan. User's Manual Create Your Own Power Plan You can create your own power plan and customize it will be recommended to use ECO Mode power saving function to optimize the battery life while using this notebook. 1. Now you have a new power plan that meet your requirement. Click [Create a power plan] in the menu. Select an existing plan that is automatically set as your needs most, and give...
Change the settings for the new power plan. User's Manual Create Your Own Power Plan You can create your own power plan and customize it will be recommended to use ECO Mode power saving function to optimize the battery life while using this notebook. 1. Now you have a new power plan that meet your requirement. Click [Create a power plan] in the menu. Select an existing plan that is automatically set as your needs most, and give...
User Manual
Page 43
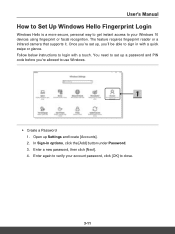
... reader or a infrared camera that supports it. Open up a password and PIN code before you 'll be able to your account password, click [OK] to login with a quick swipe or glance. In Sign-in with a touch. Enter a new password, then click [Next]. 4. Follow below instructions to close. 3-11 You need to set up, you 're allowed to use Windows. ▶▶ Create a Password 1. User's Manual How to Set Up Windows Hello Fingerprint Login Windows...
... reader or a infrared camera that supports it. Open up a password and PIN code before you 'll be able to your account password, click [OK] to login with a quick swipe or glance. In Sign-in with a touch. Enter a new password, then click [Next]. 4. Follow below instructions to close. 3-11 You need to set up, you 're allowed to use Windows. ▶▶ Create a Password 1. User's Manual How to Set Up Windows Hello Fingerprint Login Windows...

User Manual
Page 46
Place your PIN code. 4. How to repeat the process with your preferred finger on the upper-left corner of the touchpad. Click [Add Another] if you want to Get Started ▶▶ Set up ] button under Fingerprint. 2. On the Windows Hello setup wizard, click [Get started] button. 3. In Sign-in with another finger, or close the program. 3-14 Log in options, click the [Set up a Fingerprint 1. You will be asked swipe the same finger for a few times to setup Windows Hello. 5.
Place your PIN code. 4. How to repeat the process with your preferred finger on the upper-left corner of the touchpad. Click [Add Another] if you want to Get Started ▶▶ Set up ] button under Fingerprint. 2. On the Windows Hello setup wizard, click [Get started] button. 3. In Sign-in with another finger, or close the program. 3-14 Log in options, click the [Set up a Fingerprint 1. You will be asked swipe the same finger for a few times to setup Windows Hello. 5.

User Manual
Page 48
... you are a left-handed user, you can use the standard Microsoft or IBM PS/2 driver in your Windows operating system. When you can customize the pointing device to meet your personal needs. The Mouse Properties in Control Panel allows you to control the notebook by pointing the location of the cursor on the screen. ▶▶ Configure the Touchpad You can change the configuration. ▶▶ Position and...
... you are a left-handed user, you can use the standard Microsoft or IBM PS/2 driver in your Windows operating system. When you can customize the pointing device to meet your personal needs. The Mouse Properties in Control Panel allows you to control the notebook by pointing the location of the cursor on the screen. ▶▶ Configure the Touchpad You can change the configuration. ▶▶ Position and...
User Manual
Page 49
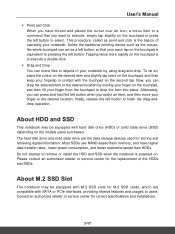
... powered on. finally, release the left button to drop the item into place. Do not attempt to remove or install the HDD and SSD when the notebook is the basics of the HDDs and SSDs. The hard disk drive and solid state drive are compatible with the touchpad on the second tap. Consult an authorized retailer or service center for the replacement of operating your notebook...
... powered on. finally, release the left button to drop the item into place. Do not attempt to remove or install the HDD and SSD when the notebook is the basics of the HDDs and SSDs. The hard disk drive and solid state drive are compatible with the touchpad on the second tap. Consult an authorized retailer or service center for the replacement of operating your notebook...

User Manual
Page 51
Before setting up a Wireless LAN connection, make sure that Airplane mode is available in the lower-right corner of the task bar and click on it to the desktop. Check if Wireless LAN mode is turned off . Find the icon in the Network settings. 3-19 Go to unfold the settings menu. 2. User's Manual ▶▶ Check the Wireless LAN status When Airplane mode is enabled, Wireless LAN connection will be turned off . 1.
Before setting up a Wireless LAN connection, make sure that Airplane mode is available in the lower-right corner of the task bar and click on it to the desktop. Check if Wireless LAN mode is turned off . Find the icon in the Network settings. 3-19 Go to unfold the settings menu. 2. User's Manual ▶▶ Check the Wireless LAN status When Airplane mode is enabled, Wireless LAN connection will be turned off . 1.
User Manual
Page 52
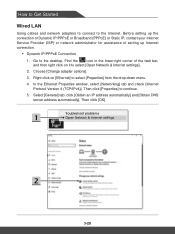
... click on it to select [Open Network & Internet settings]. 2. Then click [OK]. Choose [Change adapter options]. 3. Select [General] tab, click [Obtain an IP address automatically] and [Obtain DNS server address automatically]. How to Get Started Wired LAN Using cables and network adapters to connect to continue. 5. Then click [Properties] to the Internet. Go to select [Properties] from the drop-down menu. 4. Find the icon in the...
... click on it to select [Open Network & Internet settings]. 2. Then click [OK]. Choose [Change adapter options]. 3. Select [General] tab, click [Obtain an IP address automatically] and [Obtain DNS server address automatically]. How to Get Started Wired LAN Using cables and network adapters to connect to continue. 5. Then click [Properties] to the Internet. Go to select [Properties] from the drop-down menu. 4. Find the icon in the...


