

User Manual
Page 23
...instructions and illustrations on becoming a user of this notebook. Beside, the steps of this notebook. It is interrelated to using this notebook for unsurpassed dependability and customer satisfaction. Introductions 2-2 Congratulations on how to operate this notebook. If any of connecting the various external devices,... and caution that if you have all the accessories of installing and uninstalling the battery; This brand-new exquisite notebook will give you open the packing box. It is recommended to read these accessories is recommended to check out that...
...instructions and illustrations on becoming a user of this notebook. Beside, the steps of this notebook. It is interrelated to using this notebook for unsurpassed dependability and customer satisfaction. Introductions 2-2 Congratulations on how to operate this notebook. If any of connecting the various external devices,... and caution that if you have all the accessories of installing and uninstalling the battery; This brand-new exquisite notebook will give you open the packing box. It is recommended to read these accessories is recommended to check out that...

User Manual
Page 24
... to configure the system for optimum use. Unpacking First, unpack the shipping carton and check all items carefully. The package should contain the following items: Notebook Quick Start Manual High-capacity Li-ion battery AC adapter and power cord Carry bag (optional) All-in the future.
... to configure the system for optimum use. Unpacking First, unpack the shipping carton and check all items carefully. The package should contain the following items: Notebook Quick Start Manual High-capacity Li-ion battery AC adapter and power cord Carry bag (optional) All-in the future.

User Manual
Page 29
... below will help you to know more about the appearance of this section may vary from the actual one that the notebook shown in this notebook before using it. Rubber Pads 2. Touchpad 9. Please be aware that users purchased. The figure of top-open the Display... Panel. Introductions Product Overview This section provides the description of basic aspects of your notebook. 1 2 3 4 5 6 7 8 9 1. 2-8 The figures show here are for reference only. Stereo Speakers 5. Status LED WebCam 3. It will lead you to...
... below will help you to know more about the appearance of this section may vary from the actual one that the notebook shown in this notebook before using it. Rubber Pads 2. Touchpad 9. Please be aware that users purchased. The figure of top-open the Display... Panel. Introductions Product Overview This section provides the description of basic aspects of your notebook. 1 2 3 4 5 6 7 8 9 1. 2-8 The figures show here are for reference only. Stereo Speakers 5. Status LED WebCam 3. It will lead you to...

User Manual
Page 30
... able to do work more efficiently. With the help of these 5 different modes or to fasten the display panel on the main deck of the notebook in chapter 3 of this manual for picture taking, video recoding or conferencing, and any other interactive applications. 3. Stereo Speakers Give high quality sound blaster with... off recurrently. ECO ECO Engine (Power Saving) w To enable or disable the ECO Engine, touch the ECO quick launch touch sensor repeatedly to protect your notebook from random closing. 2.
... able to do work more efficiently. With the help of these 5 different modes or to fasten the display panel on the main deck of the notebook in chapter 3 of this manual for picture taking, video recoding or conferencing, and any other interactive applications. 3. Stereo Speakers Give high quality sound blaster with... off recurrently. ECO ECO Engine (Power Saving) w To enable or disable the ECO Engine, touch the ECO quick launch touch sensor repeatedly to protect your notebook from random closing. 2.

User Manual
Page 31
... ON and OFF. Keyboard The built-in keyboard provides all the functions of the notebook. 9. Status LED Wireless LAN and Bluetooth: w Glowing green when wireless LAN function is enabled. Introductions 2-10 WLAN & BT Press this button to activate ...the Internet browser. Internet Press this button repeatedly to turn the Webcam function on . 7. Webcam 6. Power LED: Glowing blue when the notebook power is a pointing device of a standard keyboard. 8. Power Button / Power LED Power Button:Press the power button to enable or disable the Wireless...
... ON and OFF. Keyboard The built-in keyboard provides all the functions of the notebook. 9. Status LED Wireless LAN and Bluetooth: w Glowing green when wireless LAN function is enabled. Introductions 2-10 WLAN & BT Press this button to activate ...the Internet browser. Internet Press this button repeatedly to turn the Webcam function on . 7. Webcam 6. Power LED: Glowing blue when the notebook power is a pointing device of a standard keyboard. 8. Power Button / Power LED Power Button:Press the power button to enable or disable the Wireless...

User Manual
Page 34
... function supported. Contact the local dealer for further and correct information and be noted that the supported memory cards may support various types of the notebook in card reader may vary without notice. 3. Introductions 2-13 Front View 1 2 3 1. Cover Latch 2.
... function supported. Contact the local dealer for further and correct information and be noted that the supported memory cards may support various types of the notebook in card reader may vary without notice. 3. Introductions 2-13 Front View 1 2 3 1. Cover Latch 2.
User Manual
Page 36
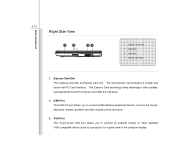
Introductions 2-15 Right Side View 1 2 3 4 1. VGA Port 4. Express Card Slot The notebook provides an Express Card slot. USB Port 3. The Express Card technology takes advantage of the computer display. USB Port The USB 2.0 port allows you to ...
Introductions 2-15 Right Side View 1 2 3 4 1. VGA Port 4. Express Card Slot The notebook provides an Express Card slot. USB Port 3. The Express Card technology takes advantage of the computer display. USB Port The USB 2.0 port allows you to ...

User Manual
Page 37
Introductions 2-16 4. Power Connector To connect the AC adapter and supply power for the notebook.
Introductions 2-16 4. Power Connector To connect the AC adapter and supply power for the notebook.
User Manual
Page 38
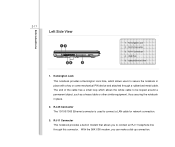
... looped around a permanent object, such as a heavy table or other similar equipment, thus securing the notebook in modem that allows you can make a dial-up connection. RJ-11 Connector This notebook provides a built-in place. 2. RJ-11 Connector 4. RJ-45 Connector 3. Optical Device Drive ...1. With the 56K V.90 modem, you to secure the notebook in place with a key or some mechanical PIN device and attached through this connector. Kensington Lock This notebook provides a Kensington Lock hole, which allows the whole cable to connect a LAN cable ...
... looped around a permanent object, such as a heavy table or other similar equipment, thus securing the notebook in modem that allows you can make a dial-up connection. RJ-11 Connector This notebook provides a built-in place. 2. RJ-11 Connector 4. RJ-45 Connector 3. Optical Device Drive ...1. With the 56K V.90 modem, you to secure the notebook in place with a key or some mechanical PIN device and attached through this connector. Kensington Lock This notebook provides a Kensington Lock hole, which allows the whole cable to connect a LAN cable ...

User Manual
Page 39
Introductions 2-18 4. w The optical device allows you to use the CD/ DVD disc for installing software, accessing data and playing music/movie on the model you purchased. USB Port The USB 2.0 port allows you to connect USB-interface peripheral devices, such as the mouse, keyboard, modem, portable hard disk module, printer and more. 5. Optical Device Drive w A slim DVD Super Multi (DVD Dual and DVD RAM) or DVD Combo drive is available in this notebook, depending on the computer.
Introductions 2-18 4. w The optical device allows you to use the CD/ DVD disc for installing software, accessing data and playing music/movie on the model you purchased. USB Port The USB 2.0 port allows you to connect USB-interface peripheral devices, such as the mouse, keyboard, modem, portable hard disk module, printer and more. 5. Optical Device Drive w A slim DVD Super Multi (DVD Dual and DVD RAM) or DVD Combo drive is available in this notebook, depending on the computer.
User Manual
Page 40
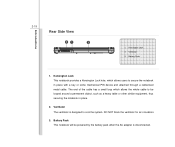
...a Kensington Lock hole, which allows the whole cable to be powered by the battery pack when the AC adapter is designed to secure the notebook in place. 2. DO NOT block the ventilator for air circulation. 3. Ventilator The ventilator is disconnected. Introductions 2-19 Rear Side View 2 ... users to cool the system. Battery Pack 1. Kensington Lock 2. Battery Pack This notebook will be looped around a permanent object, such as a heavy table or other similar equipment, thus securing the notebook in place with a key or some mechanical PIN device and attached through a rubberised...
...a Kensington Lock hole, which allows the whole cable to be powered by the battery pack when the AC adapter is designed to secure the notebook in place. 2. DO NOT block the ventilator for air circulation. 3. Ventilator The ventilator is disconnected. Introductions 2-19 Rear Side View 2 ... users to cool the system. Battery Pack 1. Kensington Lock 2. Battery Pack This notebook will be looped around a permanent object, such as a heavy table or other similar equipment, thus securing the notebook in place with a key or some mechanical PIN device and attached through a rubberised...
User Manual
Page 41
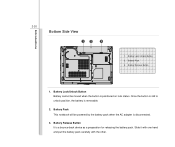
Battery Release Button 1. Battery Release Button It is removable. 2. Introductions 2-20 Bottom Side View 1 2 3 1. Once the button is slid to unlock position, the battery is a bounce-back device as a preparation for releasing the battery pack. Slide it with one hand and pull the battery pack carefully with the other. Battery Pack 3. Battery Pack This notebook will be moved when the button is disconnected. 3. Battery Lock/Unlock Button Battery cannot be powered by the battery pack when the AC adapter is positioned on lock status. Battery Lock/ Unlock Button 2.
Battery Release Button 1. Battery Release Button It is removable. 2. Introductions 2-20 Bottom Side View 1 2 3 1. Once the button is slid to unlock position, the battery is a bounce-back device as a preparation for releasing the battery pack. Slide it with one hand and pull the battery pack carefully with the other. Battery Pack 3. Battery Pack This notebook will be moved when the button is disconnected. 3. Battery Lock/Unlock Button Battery cannot be powered by the battery pack when the AC adapter is positioned on lock status. Battery Lock/ Unlock Button 2.
User Manual
Page 43
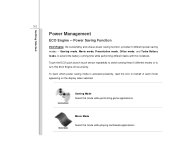
... applications. Gaming Mode Select this mode while playing multimedia applications Gaming mode, Movie mode, Presentation mode, Office mode, and Turbo Battery mode, to turn this notebook. Touch the ECO quick launch touch sensor repeatedly to switch among these 5 different modes or to extend the battery running time while performing different tasks...
... applications. Gaming Mode Select this mode while playing multimedia applications Gaming mode, Movie mode, Presentation mode, Office mode, and Turbo Battery mode, to turn this notebook. Touch the ECO quick launch touch sensor repeatedly to switch among these 5 different modes or to extend the battery running time while performing different tasks...
User Manual
Page 45
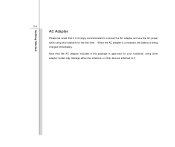
Getting Started 3-4 AC Adapter Please be noted that the AC adapter included in the package is approved for the first time. When the AC adapter is connected, the battery is strongly recommended to it. Note that it is being charged immediately. using other adapter model may damage either the notebook or other devices attached to connect the AC adapter and use the AC power while using this notebook for your notebook;
Getting Started 3-4 AC Adapter Please be noted that the AC adapter included in the package is approved for the first time. When the AC adapter is connected, the battery is strongly recommended to it. Note that it is being charged immediately. using other adapter model may damage either the notebook or other devices attached to connect the AC adapter and use the AC power while using this notebook for your notebook;

User Manual
Page 46
... cord and the connector of the power cord to the connector of the cord. Getting Started 3-5 Connecting the AC Power 1. Unpack the package to the notebook, and the male end of AC adapter. 4. Plug the DC end of the adapter to find the AC adapter and power cord. 2. Unplug the power...
... cord and the connector of the power cord to the connector of the cord. Getting Started 3-5 Connecting the AC Power 1. Unpack the package to the notebook, and the male end of AC adapter. 4. Plug the DC end of the adapter to find the AC adapter and power cord. 2. Unplug the power...
User Manual
Page 47
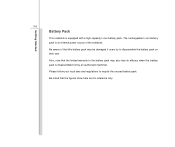
Be aware of the notebook. Please follow your local laws and regulations to disassemble the battery pack on their own. The rechargeable Li-ion battery pack is an internal power ... is equipped with a high-capacity Li-ion battery pack. Be noted that the figures show here are for reference only. Getting Started 3-6 Battery Pack This notebook is disassembled not by an authorized machinist.
Be aware of the notebook. Please follow your local laws and regulations to disassemble the battery pack on their own. The rechargeable Li-ion battery pack is an internal power ... is equipped with a high-capacity Li-ion battery pack. Be noted that the figures show here are for reference only. Getting Started 3-6 Battery Pack This notebook is disassembled not by an authorized machinist.
User Manual
Page 48
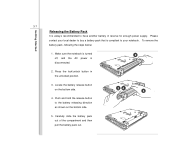
.... 2. Push and hold the release button to the battery releasing direction as shown on the bottom side. 4. Make sure the notebook is turned 2 off, and the AC power is compliant to your notebook. Locate the battery release button on the bottom side. 3 4 5 5. To remove the battery pack, following the steps below: 1. Carefully...
.... 2. Push and hold the release button to the battery releasing direction as shown on the bottom side. 4. Make sure the notebook is turned 2 off, and the AC power is compliant to your notebook. Locate the battery release button on the bottom side. 3 4 5 5. To remove the battery pack, following the steps below: 1. Carefully...

User Manual
Page 51
.../DC power source. Please pay attention to optimize the life of battery, we suggest that have no "memory effect." w If you do not use the notebook for a long time, it is not available, save your work and close all running programs and shut down and turn off the system without interrupting... the charging process. w You can be recharged while it is suggested to remove the battery pack from your battery life. w Plug in the notebook. It is unnecessary to extend your...
.../DC power source. Please pay attention to optimize the life of battery, we suggest that have no "memory effect." w If you do not use the notebook for a long time, it is not available, save your work and close all running programs and shut down and turn off the system without interrupting... the charging process. w You can be recharged while it is suggested to remove the battery pack from your battery life. w Plug in the notebook. It is unnecessary to extend your...

User Manual
Page 52
... during the operations. w Place you feet flat and naturally on the bed). w Adjust the angle/position of time. w Avoid using your notebook in the space where may cause you discomfort (such as on the floor, so that allows you to work area should have an optimal view... the chair, adjust the chair's back (if available) to support your wrists. Getting Started 3-11 Basic Operations If you are a beginner to the notebook, please read the following instructions to assure your posture when operating. w Your work anywhere. w When sitting on the desk naturally to support your back...
... during the operations. w Place you feet flat and naturally on the bed). w Adjust the angle/position of time. w Avoid using your notebook in the space where may cause you discomfort (such as on the floor, so that allows you to work area should have an optimal view... the chair, adjust the chair's back (if available) to support your wrists. Getting Started 3-11 Basic Operations If you are a beginner to the notebook, please read the following instructions to assure your posture when operating. w Your work anywhere. w When sitting on the desk naturally to support your back...

User Manual
Page 53
Please keep a good posture. 5. w Stretch and exercise you have to work habit is important if you body regularly. w Change your hands and feet with your notebook for a period of LCD panel. 3. Adjust the desk's height. 4. otherwise, it may cause discomfort or injury to take a break after working for long periods of ...
Please keep a good posture. 5. w Stretch and exercise you have to work habit is important if you body regularly. w Change your hands and feet with your notebook for a period of LCD panel. 3. Adjust the desk's height. 4. otherwise, it may cause discomfort or injury to take a break after working for long periods of ...


