User Manual
Page 1
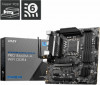
PRO B660M-A WIFI DDR4 PRO B660M-A DDR4 Motherboard User Guide Manuel d'utilisation Benutzerhandbuch
PRO B660M-A WIFI DDR4 PRO B660M-A DDR4 Motherboard User Guide Manuel d'utilisation Benutzerhandbuch

User Manual
Page 2
Thank you for purchasing the MSI® motherboard. Contents Safety Information...3 Specifications...4 Special Features...8 Back Panel Connectors 9 LAN Port LED Status Table 10 Installing antennas (PRO B660M-A WIFI DDR4 11 Overview of Components 12 CPU Socket...13 DIMM Slots...14 PCI_E1~3: PCIe Expansion Slots 15 JFP1, JFP2: Front Panel Connectors 15 M2_1~2: M.2 Slots (Key M ...
Thank you for purchasing the MSI® motherboard. Contents Safety Information...3 Specifications...4 Special Features...8 Back Panel Connectors 9 LAN Port LED Status Table 10 Installing antennas (PRO B660M-A WIFI DDR4 11 Overview of Components 12 CPU Socket...13 DIMM Slots...14 PCI_E1~3: PCIe Expansion Slots 15 JFP1, JFP2: Front Panel Connectors 15 M2_1~2: M.2 Slots (Key M ...
User Manual
Page 4
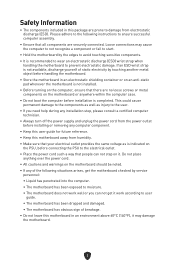
... on the PSU, before installation is completed. Do not place anything over the power cord. ∙∙All cautions and warnings on the motherboard should be noted. ∙∙If any of the following instructions to ensure successful computer assembly. ∙∙Ensure that all components are ...securely connected. If an ESD wrist strap is not available, discharge yourself of breakage. ∙∙Do not leave this motherboard in an environment above 60°C (140°F), it . Please adhere to the following situations arises, get it work well or you ...
... on the PSU, before installation is completed. Do not place anything over the power cord. ∙∙All cautions and warnings on the motherboard should be noted. ∙∙If any of the following instructions to ensure successful computer assembly. ∙∙Ensure that all components are ...securely connected. If an ESD wrist strap is not available, discharge yourself of breakage. ∙∙Do not leave this motherboard in an environment above 60°C (140°F), it . Please adhere to the following situations arises, get it work well or you ...
User Manual
Page 14
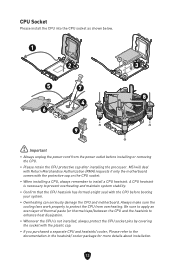
... to protect the CPU from the power outlet before booting your system. ∙∙Overheating can seriously damage the CPU and motherboard. Always make sure the cooling fans work properly to the documentation in the heatsink/ cooler package for more details about installation. 13... MSI will deal with Return Merchandise Authorization (RMA) requests if only the motherboard comes with the CPU before installing or removing the CPU. ∙∙Please retain the CPU protective ...
... to protect the CPU from the power outlet before booting your system. ∙∙Overheating can seriously damage the CPU and motherboard. Always make sure the cooling fans work properly to the documentation in the heatsink/ cooler package for more details about installation. 13... MSI will deal with Return Merchandise Authorization (RMA) requests if only the motherboard comes with the CPU before installing or removing the CPU. ∙∙Please retain the CPU protective ...
User Manual
Page 16
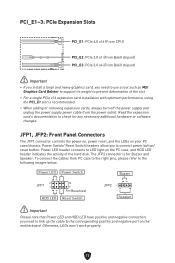
... for any necessary additional hardware or software changes. Power Switch/ Reset Switch headers allow you need to use a tool such as MSI Graphics Card Bolster to support its weight to prevent deformation of the hard disk. Read the expansion card's documentation to the corresponding... positive and negative port on the motherboard. Power LED Power Switch Buzzer JFP1 2 1 HDD LED 10 9 Reserved Reset Switch JFP2 1 Speaker ⚠⚠Important Please note that...
... for any necessary additional hardware or software changes. Power Switch/ Reset Switch headers allow you need to use a tool such as MSI Graphics Card Bolster to support its weight to prevent deformation of the hard disk. Read the expansion card's documentation to the corresponding... positive and negative port on the motherboard. Power LED Power Switch Buzzer JFP1 2 1 HDD LED 10 9 Reserved Reset Switch JFP2 1 Speaker ⚠⚠Important Please note that...
User Manual
Page 19
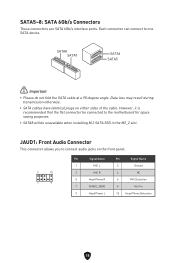
... device. JAUD1: Front Audio Connector This connector allows you to connect audio jacks on either sides of the cable. Each connector can connect to the motherboard for space saving purposes. ∙∙SATA8 will be unavailable when installing M.2 SATA SSD in the M2_2 slot.
... device. JAUD1: Front Audio Connector This connector allows you to connect audio jacks on either sides of the cable. Each connector can connect to the motherboard for space saving purposes. ∙∙SATA8 will be unavailable when installing M.2 SATA SSD in the M2_2 slot.
User Manual
Page 20
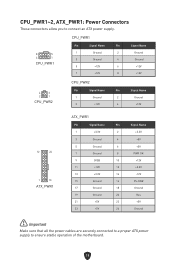
CPU_PWR1~2, ATX_PWR1: Power Connectors These connectors allow you to ensure stable operation of the motherboard. 19 CPU_PWR1 8 5 4 1 CPU_PWR1 Pin Signal Name Pin Signal Name 1 Ground 2 Ground 3 Ground 4 Ground 5 +12V 6 +12V 7 +12V 8 +12V 4 3 2 1 CPU_PWR2 CPU_PWR2 Pin Signal Name Pin Signal Name 1 ...
CPU_PWR1~2, ATX_PWR1: Power Connectors These connectors allow you to ensure stable operation of the motherboard. 19 CPU_PWR1 8 5 4 1 CPU_PWR1 Pin Signal Name Pin Signal Name 1 Ground 2 Ground 3 Ground 4 Ground 5 +12V 6 +12V 7 +12V 8 +12V 4 3 2 1 CPU_PWR2 CPU_PWR2 Pin Signal Name Pin Signal Name 1 ...
User Manual
Page 22
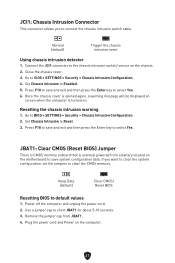
... Chassis Intrusion to default values 1. Keep Data (default) Clear CMOS/ Reset BIOS Resetting BIOS to Reset. 3. Go to the chassis intrusion switch/ sensor on the motherboard to Enabled. 5. Connect the JCI1 connector to BIOS > SETTINGS > Security > Chassis Intrusion Configuration. 4. Remove the jumper cap from a battery located on the chassis. 2. JCI1: Chassis...
... Chassis Intrusion to default values 1. Keep Data (default) Clear CMOS/ Reset BIOS Resetting BIOS to Reset. 3. Go to the chassis intrusion switch/ sensor on the motherboard to Enabled. 5. Connect the JCI1 connector to BIOS > SETTINGS > Security > Chassis Intrusion Configuration. 4. Remove the jumper cap from a battery located on the chassis. 2. JCI1: Chassis...

User Manual
Page 28
...;⚠Important The term BIOS in this user guide refers to ensure that no GOP (Graphics Output protocol) support detected in the future. The MSI UEFI BIOS uses UEFI as the default boot mode to take full advantage of new devices - BIOS Mode: UEFI 27 Power on the screen ... can also eliminate the time to switch to enter Boot Menu message appears on your graphics card. the system will completely replace BIOS in this motherboard supports only Windows 10/ Windows 11 64-bit operating system. ∙∙ Older graphics card - UEFI has many new functions and advantages that...
...;⚠Important The term BIOS in this user guide refers to ensure that no GOP (Graphics Output protocol) support detected in the future. The MSI UEFI BIOS uses UEFI as the default boot mode to take full advantage of new devices - BIOS Mode: UEFI 27 Power on the screen ... can also eliminate the time to switch to enter Boot Menu message appears on your graphics card. the system will completely replace BIOS in this motherboard supports only Windows 10/ Windows 11 64-bit operating system. ∙∙ Older graphics card - UEFI has many new functions and advantages that...
User Manual
Page 30
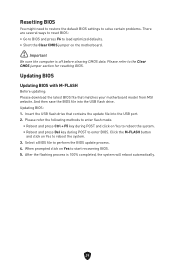
... Please download the latest BIOS file that contains the update file into the USB flash drive. Insert the USB flash drive that matches your motherboard model from MSI website. Please refer to perform the BIOS update process. 4. Click the M-FLASH button and click on Yes to start recovering BIOS. ...;∙Short the Clear CMOS jumper on Yes to reboot the system. • Reboot and press Del key during POST and click on the motherboard. ⚠⚠Important Be sure the computer is 100% completed, the system will reboot automatically. 29 Please refer the following methods to enter...
... Please download the latest BIOS file that contains the update file into the USB flash drive. Insert the USB flash drive that matches your motherboard model from MSI website. Please refer to perform the BIOS update process. 4. Click the M-FLASH button and click on Yes to start recovering BIOS. ...;∙Short the Clear CMOS jumper on Yes to reboot the system. • Reboot and press Del key during POST and click on the motherboard. ⚠⚠Important Be sure the computer is 100% completed, the system will reboot automatically. 29 Please refer the following methods to enter...


