User Guide
Page 10
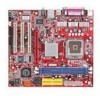
Dimension l Micro-ATX Form Factor Size: 244mm(L) x 210mm(W) Mounting l 6 standard mounting holes 4 l The mainboard provides a Desktop Management Interface (DMI) function that records your mainboard specifications. BIOS l The mainboard BIOS provides "Plug & Play" BIOS which detects the peripheral devices and expansion cards of the board automatically. Audio l AC97 link controller integrated in VT8237R plus l Realtek ALC655 6-channel software audio codec l Compliance with AC97 v2.3 Spec.
Dimension l Micro-ATX Form Factor Size: 244mm(L) x 210mm(W) Mounting l 6 standard mounting holes 4 l The mainboard provides a Desktop Management Interface (DMI) function that records your mainboard specifications. BIOS l The mainboard BIOS provides "Plug & Play" BIOS which detects the peripheral devices and expansion cards of the board automatically. Audio l AC97 link controller integrated in VT8237R plus l Realtek ALC655 6-channel software audio codec l Compliance with AC97 v2.3 Spec.
User Guide
Page 13
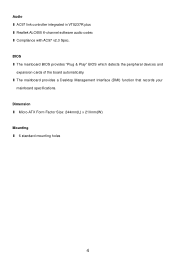
MSI Reminds You... 1. Do not touch the CPU socket pins to 2GB. Memory The mainboard provides two 240-pin unbuffered DDRII 400 / 533 DIMM slots, and supports the memory size up to avoid damage. 4. Volt Notch 1. Power Supply The mainboard supports ATX power supply for the CPU temperature. 3. Make sure your...has only one memory module must be installed. You can be caused. Then push it in until the golden finger on the slots in BIOS for the power system. Before inserting the power supply connector, always make sure that all components are installed properly to avoid damage. 5. ...
MSI Reminds You... 1. Do not touch the CPU socket pins to 2GB. Memory The mainboard provides two 240-pin unbuffered DDRII 400 / 533 DIMM slots, and supports the memory size up to avoid damage. 4. Volt Notch 1. Power Supply The mainboard supports ATX power supply for the CPU temperature. 3. Make sure your...has only one memory module must be installed. You can be caused. Then push it in until the golden finger on the slots in BIOS for the power system. Before inserting the power supply connector, always make sure that all components are installed properly to avoid damage. 5. ...
User Guide
Page 16
... offers one optional serial port JCOM1. It introduces a 66MHz, 32-bit channel for the expansion card, such as jumpers, switches or BIOS configuration. 10 PCI (Peripheral Component Interconnect) Slots The PCI slots allow you want to clear the system Keep Data Clear Data configuration, use... the CMOS RAM, the system can attach a serial mouse or other serial device directly to meet your needs. Then return to clear the data: MSI Reminds You... AGP (Accelerated Graphics Port) Slot The AGP slot allows you unplug the power supply first. AGP is off. Both are 16550A high speed...
... offers one optional serial port JCOM1. It introduces a 66MHz, 32-bit channel for the expansion card, such as jumpers, switches or BIOS configuration. 10 PCI (Peripheral Component Interconnect) Slots The PCI slots allow you want to clear the system Keep Data Clear Data configuration, use... the CMOS RAM, the system can attach a serial mouse or other serial device directly to meet your needs. Then return to clear the data: MSI Reminds You... AGP (Accelerated Graphics Port) Slot The AGP slot allows you unplug the power supply first. AGP is off. Both are 16550A high speed...
User Guide
Page 18
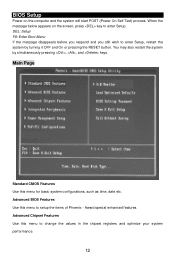
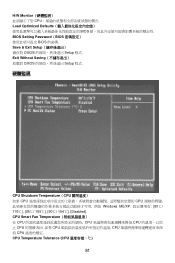
You may also restart the system by turning it OFF and On or pressing the RESET button. Advanced BIOS Features Use this menu for basic system configurations, such as time, date etc. DEL: Setup F8: Enter Boot Menu If the message disappears before you ... the items of Phoenix - Award special enhanced features. Advanced Chipset Features Use this menu to enter Setup, restart the system by simultaneously pressing , , and keys. BIOS Setup Power on the screen, press key to enter Setup. When the message below appears on the computer and the system will start POST (Power...
You may also restart the system by turning it OFF and On or pressing the RESET button. Advanced BIOS Features Use this menu for basic system configurations, such as time, date etc. DEL: Setup F8: Enter Boot Menu If the message disappears before you ... the items of Phoenix - Award special enhanced features. Advanced Chipset Features Use this menu to enter Setup, restart the system by simultaneously pressing , , and keys. BIOS Setup Power on the screen, press key to enter Setup. When the message below appears on the computer and the system will start POST (Power...
User Guide
Page 19
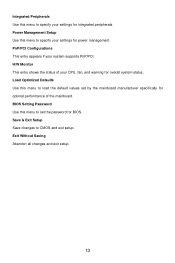
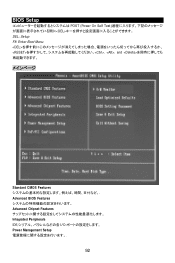
... Without Saving Abandon all changes and exit setup. 13 H/W Monitor This entry shows the status of the mainboard. BIOS Setting Password Use this menu to load the default values set the password for BIOS. Power Management Setup Use this menu to specify your settings for integrated peripherals. PnP/PCI Configurations This entry...
... Without Saving Abandon all changes and exit setup. 13 H/W Monitor This entry shows the status of the mainboard. BIOS Setting Password Use this menu to load the default values set the password for BIOS. Power Management Setup Use this menu to specify your settings for integrated peripherals. PnP/PCI Configurations This entry...

User Guide
Page 21
Load BIOS Defaults You can load the default values provided by the mainboard manufacturer for the stable performance. 15
Load BIOS Defaults You can load the default values provided by the mainboard manufacturer for the stable performance. 15
User Guide
Page 70
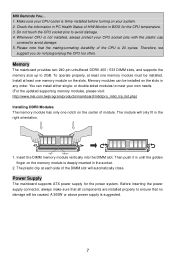
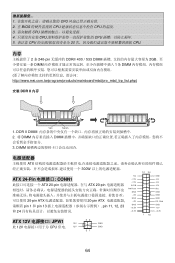
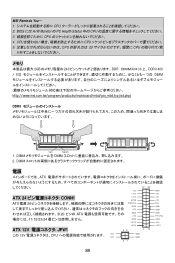
... .3 V 12 24 1 13 GND +5V +5V +5V Res GND GND GND PS -O N # GND -12V +3.3V ATX 12V JPW1 12V 此 12V CPU 供电. 12V 42 31 GND GND 64 1 CPU 2. 在 BIOS CPU CPU 的温度. 3 CPU 4 CPU CPU 5. 请注意 CPU 20 CPU. 内存 2 ...条 240-pin DDRII 400 / 533 DIMM 2GB DIMM 1 条 DIMM http://www.msi.com.tw/program/products/mainboard/mbd/pro_mbd_trp_list.php)...
... .3 V 12 24 1 13 GND +5V +5V +5V Res GND GND GND PS -O N # GND -12V +3.3V ATX 12V JPW1 12V 此 12V CPU 供电. 12V 42 31 GND GND 64 1 CPU 2. 在 BIOS CPU CPU 的温度. 3 CPU 4 CPU CPU 5. 请注意 CPU 20 CPU. 内存 2 ...条 240-pin DDRII 400 / 533 DIMM 2GB DIMM 1 条 DIMM http://www.msi.com.tw/program/products/mainboard/mbd/pro_mbd_trp_list.php)...

User Guide
Page 75
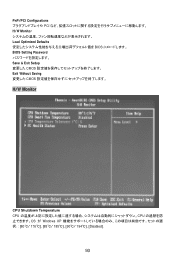
Exit Without Saving CMOS Setup 程序. 硬件监视 CPU Shutdown Temperature(CPU CPU CPU Windows ME/XP 80℃/ 176℃], [85℃/ 185℃], [90℃/ 194℃], [Disabled]. H/W Monitor CPU Load Optimized Defaults BIOS BIOS Setting Password(BIOS BIOS 的密码. CPU Smart Fan Temperature CPU CPU CPU CPU CPU CPU CPU CPU Temperature Tolerance (CPU CPU 1℃到 5℃. 69 Save & Exit Setup CMOS Setup 程序.
Exit Without Saving CMOS Setup 程序. 硬件监视 CPU Shutdown Temperature(CPU CPU CPU Windows ME/XP 80℃/ 176℃], [85℃/ 185℃], [90℃/ 194℃], [Disabled]. H/W Monitor CPU Load Optimized Defaults BIOS BIOS Setting Password(BIOS BIOS 的密码. CPU Smart Fan Temperature CPU CPU CPU CPU CPU CPU CPU CPU Temperature Tolerance (CPU CPU 1℃到 5℃. 69 Save & Exit Setup CMOS Setup 程序.
User Guide
Page 82
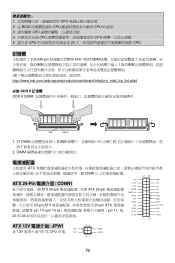
1 CPU 2. 在 BIOS CPU CPU 的溫度. 3 CPU 4 CPU CPU 5. 請注意 CPU 20 CPU. 記憶體 2 條 240-pin DDRII 400 / 533 DIMM 2GB DIMM 1 條 DIMM http://www.msi.com.tw/program/products/mainboard/mbd/pro_mbd_trp_list.php) &#...23433;裝 DDR II 記憶體 DDR II DIMM Volt Notch 1. 將 DIMM DIMM 2. DIMM ATX 300W ATX 24-Pin CONN1 ATX 20-pin ATX 20-pin 20-pin ATX 20-pin ATX pin 1 和...
1 CPU 2. 在 BIOS CPU CPU 的溫度. 3 CPU 4 CPU CPU 5. 請注意 CPU 20 CPU. 記憶體 2 條 240-pin DDRII 400 / 533 DIMM 2GB DIMM 1 條 DIMM http://www.msi.com.tw/program/products/mainboard/mbd/pro_mbd_trp_list.php) &#...23433;裝 DDR II 記憶體 DDR II DIMM Volt Notch 1. 將 DIMM DIMM 2. DIMM ATX 300W ATX 24-Pin CONN1 ATX 20-pin ATX 20-pin 20-pin ATX 20-pin ATX pin 1 和...
User Guide
Page 87
CPU Smart Fan Temperature CPU CPU CPU CPU CPU CPU CPU CPU Temperature Tolerance (CPU 81 Save & Exit Setup CMOS Setup 程式. Exit Without Saving CMOS Setup 程式. 硬體監視 CPU Shutdown Temperature(CPU CPU CPU Windows ME/XP 80℃/ 176℃], [85℃/ 185℃], [90℃/ 194℃], [Disabled]. H/W Monitor CPU Load Optimized Defaults BIOS BIOS Setting Password(BIOS BIOS 的密碼.
CPU Smart Fan Temperature CPU CPU CPU CPU CPU CPU CPU CPU Temperature Tolerance (CPU 81 Save & Exit Setup CMOS Setup 程式. Exit Without Saving CMOS Setup 程式. 硬體監視 CPU Shutdown Temperature(CPU CPU CPU Windows ME/XP 80℃/ 176℃], [85℃/ 185℃], [90℃/ 194℃], [Disabled]. H/W Monitor CPU Load Optimized Defaults BIOS BIOS Setting Password(BIOS BIOS 的密碼.
User Guide
Page 94
...CPU メモリ 2GB 240 2 DDR DDRII 400 / 533 DIMM http://www.msi.com.tw/program/products/mainboard/mbd/pro_mbd_trp_list.php) DDRII Volt Notch 1. DIMM 電源 ATX 12 24 NC ATX 24 CONN1 ATX 電源 24 +12V +12V 5VSB PWR OK GND +5V 20 ピ&#...12531;の ATX GND +5V 11/12/23/24 GND + 3 .3 V ATX 12V JPW1 + 3 .3 V 42 1 13 この 12V CPU 12V GND 12V GND 31 GND +5V +5V +5V Res GND GND GND PS -O N # GND -12V +3.3V 88 BIOS には H/W Monitor の...
...CPU メモリ 2GB 240 2 DDR DDRII 400 / 533 DIMM http://www.msi.com.tw/program/products/mainboard/mbd/pro_mbd_trp_list.php) DDRII Volt Notch 1. DIMM 電源 ATX 12 24 NC ATX 24 CONN1 ATX 電源 24 +12V +12V 5VSB PWR OK GND +5V 20 ピ&#...12531;の ATX GND +5V 11/12/23/24 GND + 3 .3 V ATX 12V JPW1 + 3 .3 V 42 1 13 この 12V CPU 12V GND 12V GND 31 GND +5V +5V +5V Res GND GND GND PS -O N # GND -12V +3.3V 88 BIOS には H/W Monitor の...
User Guide
Page 98
BIOS Setup POST (Power On Self Test DEL DEL: Setup F8: Enter Boot Menu , , and
BIOS Setup POST (Power On Self Test DEL DEL: Setup F8: Enter Boot Menu , , and
User Guide
Page 99
PnP/PCI Configurations PCI H/W Monitor Load Optimized Defaults BIOS BIOS Setting Password Save & Exit Setup CMOS Exit Without Saving CMOS H/W Monitor CPU Shutdown Temperature CPU CPU OS が Windows XP 80℃/ 176℃], [85℃/ 185℃], [90℃/ 194℃], [Disabled]. 93
PnP/PCI Configurations PCI H/W Monitor Load Optimized Defaults BIOS BIOS Setting Password Save & Exit Setup CMOS Exit Without Saving CMOS H/W Monitor CPU Shutdown Temperature CPU CPU OS が Windows XP 80℃/ 176℃], [85℃/ 185℃], [90℃/ 194℃], [Disabled]. 93

User Guide
Page 100
CPU Smart Fan Temp CPU CPU CPU CPU Temperature Tolerance (℃) CPU 1℃ から 5 PC Health Status PC Load BIOS Defaults BIOS 94
CPU Smart Fan Temp CPU CPU CPU CPU Temperature Tolerance (℃) CPU 1℃ から 5 PC Health Status PC Load BIOS Defaults BIOS 94


