User Guide
Page 20
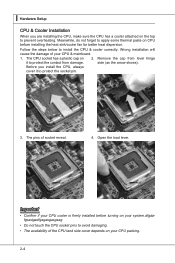
...9613; Hardware Setup CPU & Cooler Installation When you install the CPU, always cover it to protect the contact from lever hinge it to protect the socket pin. 3. Remove the cap from damage. Follow the steps below to apply some thermal paste on CPU before turning on 2. The pins of the... CPU land side cover depends on the top to avoid damaging. • The availability of socket reveal. 4. Wrong installation will cause the damage of your CPU packing. 2-4 side (as the arrow shows). Before you are installing the CPU, make...
...9613; Hardware Setup CPU & Cooler Installation When you install the CPU, always cover it to protect the contact from lever hinge it to protect the socket pin. 3. Remove the cap from damage. Follow the steps below to apply some thermal paste on CPU before turning on 2. The pins of the... CPU land side cover depends on the top to avoid damaging. • The availability of socket reveal. 4. Wrong installation will cause the damage of your CPU packing. 2-4 side (as the arrow shows). Before you are installing the CPU, make...
User Guide
Page 21
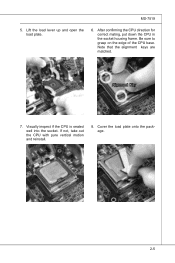
If not, take out the CPU with pure vertical motion and reinstall. 8. After confirming the CPU direction for correct mating, put down the CPU in the socket housing frame. Visually inspect if the CPU is seated well into the socket. MS-7519 5. Be sure to grasp on the edge of the CPU base. Alignment Key 7. Cover the load plate onto the package. 2-5 Note that the alignment keys are matched. Lift the load lever up and open the load plate. 6.
If not, take out the CPU with pure vertical motion and reinstall. 8. After confirming the CPU direction for correct mating, put down the CPU in the socket housing frame. Visually inspect if the CPU is seated well into the socket. MS-7519 5. Be sure to grasp on the edge of the CPU base. Alignment Key 7. Cover the load plate onto the package. 2-5 Note that the alignment keys are matched. Lift the load lever up and open the load plate. 6.

User Guide
Page 22
... mainboard to lock the hooks. 12. Press the four hooks down the cooler until its four clips get wedged into the holes of your CPU socket pin with the hook under retention tab. 10. The appearance of the mainboard. 11. Align the holes on the model you purchase. 2-6 stallation only. ▍...
... mainboard to lock the hooks. 12. Press the four hooks down the cooler until its four clips get wedged into the holes of your CPU socket pin with the hook under retention tab. 10. The appearance of the mainboard. 11. Align the holes on the model you purchase. 2-6 stallation only. ▍...

