
User Guide
Page 6
BIOS Setup 3-1 Entering Setup ...3-2 Selecting the First Boot Device 3-2 Control Keys 3-3 Getting Help 3-3 The Main Menu 3-4 Standard CMOS Features 3-6 Advanced BIOS Features 3-8 Advanced Chipset Features 3-10 Integrated Peripherals 3-14 Power Management Setup 3-19 ...
BIOS Setup 3-1 Entering Setup ...3-2 Selecting the First Boot Device 3-2 Control Keys 3-3 Getting Help 3-3 The Main Menu 3-4 Standard CMOS Features 3-6 Advanced BIOS Features 3-8 Advanced Chipset Features 3-10 Integrated Peripherals 3-14 Power Management Setup 3-19 ...

User Guide
Page 12
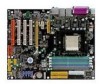
...4 (SP4) is required. To create a bootable RAID volume for Windows 2000 and Windows XP. 2. Dimension h ATX Form Factor (30.4 cm X 24.4 cm) Mounting h 9 mounting holes MSI Reminds You... 1. To create the combination installation CD, please refer to install the operating system onto the bootable RAID volume. MS-7125 ATX Mainboard BIOS... your mainboard specifications. h The mainboard provides a Desktop Management Interface (DMI) function which detects the peripheral devices and expansion cards of the board automatically. h Supports boot from LAN, USB Device 1.1 & 2.0, and SATA HDD.
...4 (SP4) is required. To create a bootable RAID volume for Windows 2000 and Windows XP. 2. Dimension h ATX Form Factor (30.4 cm X 24.4 cm) Mounting h 9 mounting holes MSI Reminds You... 1. To create the combination installation CD, please refer to install the operating system onto the bootable RAID volume. MS-7125 ATX Mainboard BIOS... your mainboard specifications. h The mainboard provides a Desktop Management Interface (DMI) function which detects the peripheral devices and expansion cards of the board automatically. h Supports boot from LAN, USB Device 1.1 & 2.0, and SATA HDD.

User Guide
Page 25
... avoid this issue mostly happens while the users intensively swap memory modules under S5 (power-off) states, and the power code is very sensitive to boot. Unplug the AC power cable (shown in figure 1) or unplug the ATX1 & JPW1 power connectors (shown in figure 2 & figure 3) before the 1st installation or during...
... avoid this issue mostly happens while the users intensively swap memory modules under S5 (power-off) states, and the power code is very sensitive to boot. Unplug the AC power cable (shown in figure 1) or unplug the ATX1 & JPW1 power connectors (shown in figure 2 & figure 3) before the 1st installation or during...

User Guide
Page 37
... users can debug all problems that fail the system, such as VGA, RAM or other failures. Hardware Setup D-Bracket™ 2 is very useful for fast booting. The 4 LEDs can use graphic signal display to help users understand their system.
... users can debug all problems that fail the system, such as VGA, RAM or other failures. Hardware Setup D-Bracket™ 2 is very useful for fast booting. The 4 LEDs can use graphic signal display to help users understand their system.

User Guide
Page 38
... video adapter. Testing Base and Extended Memory Testing base memory from 240K to all ISA. Boot Attempt This will initialize IDE drive and controller. Operating System Booting 2-24 Initializing Hard Drive Controller This will set low stack and boot via INT 19h. BIOS Sign On This will start showing information about logo, processor...
... video adapter. Testing Base and Extended Memory Testing base memory from 240K to all ISA. Boot Attempt This will initialize IDE drive and controller. Operating System Booting 2-24 Initializing Hard Drive Controller This will set low stack and boot via INT 19h. BIOS Sign On This will start showing information about logo, processor...

User Guide
Page 39
... change your motherboard's function through the use the SW1 (Clear CMOS Button ) to clear data. Clear CMOS Button: SW1 There is turned on board that has a power supply from external battery to keep the system configuration data. With the CMOS RAM, the system can automatically boot OS every ...time it is a CMOS RAM on . SW1 2-25 Hardware Setup Button The motherboard provides the following button for you want to clear the system configuration, use of the connector top...
... change your motherboard's function through the use the SW1 (Clear CMOS Button ) to clear data. Clear CMOS Button: SW1 There is turned on board that has a power supply from external battery to keep the system configuration data. With the CMOS RAM, the system can automatically boot OS every ...time it is a CMOS RAM on . SW1 2-25 Hardware Setup Button The motherboard provides the following button for you want to clear the system configuration, use of the connector top...

User Guide
Page 42
... error message appears on the BIOS Setup program and allows you to run SETUP. ” You want to change the default settings for optimum use. MSI Reminds You... 1. V1.0 refers to the BIOS version. 061704 refers to configure the system for customized features. W=AWARD(R) 2nd - 5th digit refers to ... chipset. 7th - 8th digit refers to BIOS maker as A=AMI(R); BIOS Setup BIOS Setup This chapter provides information on the screen during the system booting up , the BIOS version is shown in this BIOS is usually in the format: example: W7125NMS V1.0B32 061704 where: 1st digit refers to ...
... error message appears on the BIOS Setup program and allows you to run SETUP. ” You want to change the default settings for optimum use. MSI Reminds You... 1. V1.0 refers to the BIOS version. 061704 refers to configure the system for customized features. W=AWARD(R) 2nd - 5th digit refers to ... chipset. 7th - 8th digit refers to BIOS maker as A=AMI(R); BIOS Setup BIOS Setup This chapter provides information on the screen during the system booting up , the BIOS version is shown in this BIOS is usually in the format: example: W7125NMS V1.0B32 061704 where: 1st digit refers to ...

User Guide
Page 43
...Setup, restart the system by too quickly for reference only. 3-2 If so, restart the system and press after around 2 or 3 seconds to activate the boot menu similar to enter Setup. When the message below appears on the screen, press key to the following. Press DEL to enter SETUP If the...The POST messages might pass by turning it will list all the bootable devices. MSI Reminds You... When the same message as listed above appears on the screen, press to respond in this chapter are allowed to boot up. Therefore, the description may also restart the system by using arrow keys, ...
...Setup, restart the system by too quickly for reference only. 3-2 If so, restart the system and press after around 2 or 3 seconds to activate the boot menu similar to enter Setup. When the message below appears on the screen, press key to the following. Press DEL to enter SETUP If the...The POST messages might pass by turning it will list all the bootable devices. MSI Reminds You... When the same message as listed above appears on the screen, press to respond in this chapter are allowed to boot up. Therefore, the description may also restart the system by using arrow keys, ...

User Guide
Page 48
... of heads. The system doesn't stop for a disk error. Halt On The setting determines whether the system will stop for any error is detected at boot. Available options are: [All Errors] [No Errors] [All, But Keyboard] [All, But Diskette] [All, But Disk/Key] The system stops when any detected error. The...
... of heads. The system doesn't stop for a disk error. Halt On The setting determines whether the system will stop for any error is detected at boot. Available options are: [All Errors] [No Errors] [All, But Keyboard] [All, But Diskette] [All, But Disk/Key] The system stops when any detected error. The...

User Guide
Page 49
...Settings: [Enabled], [Disabled]. Settings: [1.4], [1.1]. When you choose [No], you cannot run the OS/2® operating system with PC2001 design guide, the system is able to boot within 5 seconds since it is used for the system. You need to show the company logo on the full screen at...the MPS version supported by your operating system. MPS Table Version This field allows you choose [Yes]. MS-7125 ATX Mainboard Advanced BIOS Features Quick Boot Setting the item to [Enabled] allows the system to run in APIC mode. Due to compliance with DRAM larger than 64MB. To find out ...
...Settings: [Enabled], [Disabled]. Settings: [1.4], [1.1]. When you choose [No], you cannot run the OS/2® operating system with PC2001 design guide, the system is able to boot within 5 seconds since it is used for the system. You need to show the company logo on the full screen at...the MPS version supported by your operating system. MPS Table Version This field allows you choose [Yes]. MS-7125 ATX Mainboard Advanced BIOS Features Quick Boot Setting the item to [Enabled] allows the system to run in APIC mode. Due to compliance with DRAM larger than 64MB. To find out ...

User Guide
Page 50
... where BIOS attempts to load the disk operating system. Hard Disk Boot Priority Press to boot from the 1st/2nd/3rd boot device. BIOS Setup Boot Sequence Press to enter the sub-menu and the following screen appears: 1st/2nd/3rd Boot Device The items allow you may use the arrow keys ( ↑↓ )... to select the desired device, then press , or , key to move it up/down in this hard disk boot priority list. 3-9 Boot Other Device Setting the option to [Enabled] allows the system to try to boot from other device if the system fails to enter the sub-menu.
... where BIOS attempts to load the disk operating system. Hard Disk Boot Priority Press to boot from the 1st/2nd/3rd boot device. BIOS Setup Boot Sequence Press to enter the sub-menu and the following screen appears: 1st/2nd/3rd Boot Device The items allow you may use the arrow keys ( ↑↓ )... to select the desired device, then press , or , key to move it up/down in this hard disk boot priority list. 3-9 Boot Other Device Setting the option to [Enabled] allows the system to try to boot from other device if the system fails to enter the sub-menu.

User Guide
Page 56
... [Enabled] allows the BIOS to specify the operation mode for the first serial port. Onboard GigaBit LAN ROM This setting controls the onboard Marvell LAN Boot ROM. IR Function Select This setting allows you wish to use other controller cards to detect whether an audio device is detected, the onboard AC...
... [Enabled] allows the BIOS to specify the operation mode for the first serial port. Onboard GigaBit LAN ROM This setting controls the onboard Marvell LAN Boot ROM. IR Function Select This setting allows you wish to use other controller cards to detect whether an audio device is detected, the onboard AC...

User Guide
Page 61
... : [Off] Always leaves the computer in the power off . Resume S3 by PS2/Keyboard, Resume S3 by PS2/Mouse These fields allow the activity of booting up the system from the power saving modes through any event on PME (Power Management Event). Settings: [Enabled], [Disabled]. HH:MM:SS The field specifies...
... : [Off] Always leaves the computer in the power off . Resume S3 by PS2/Keyboard, Resume S3 by PS2/Mouse These fields allow the activity of booting up the system from the power saving modes through any event on PME (Power Management Event). Settings: [Enabled], [Disabled]. HH:MM:SS The field specifies...
User Guide
Page 62
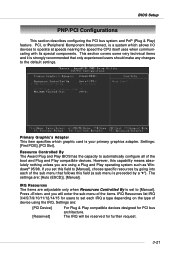
PCI, or Peripheral Component Interconnect, is set to [Manual]. If you set each of the boot and Plug and Play compatible devices. BIOS Setup PNP/PCI Configurations This section describes configuring the PCI bus system and PnP (Plug & Play) feature. However, ...
PCI, or Peripheral Component Interconnect, is set to [Manual]. If you set each of the boot and Plug and Play compatible devices. BIOS Setup PNP/PCI Configurations This section describes configuring the PCI bus system and PnP (Plug & Play) feature. However, ...

User Guide
Page 70
... to enter it every time you select this function, a message as below will appear on the screen: Type the password, up confirming the password will boot and you are prompted to enter the password. BIOS Setup BIOS Setting Password When you try to enter Setup. You will show up to abort...
... to enter it every time you select this function, a message as below will appear on the screen: Type the password, up confirming the password will boot and you are prompted to enter the password. BIOS Setup BIOS Setting Password When you try to enter Setup. You will show up to abort...

User Guide
Page 90
... the following situations: 1. If you are using a computer belonging to a domain in office, and you need to enter your user name & password everytime when you boot up your computer. 2. If you are using a computer belonging to a domain in office, please enter your login password in this setting if you want to...
... the following situations: 1. If you are using a computer belonging to a domain in office, and you need to enter your user name & password everytime when you boot up your computer. 2. If you are using a computer belonging to a domain in office, please enter your login password in this setting if you want to...

User Guide
Page 93
... are to be RAID enabled in the system BIOS. 2. Initialize the NVRAID Array Disks. The RAID prompt appears as part of the system POST and boot process prior to copy and install the nForce RAID software. (Check p.5-9 for details.) 4. Setting Up the NVRAID BIOS Be sure to press F10. The PC...
... are to be RAID enabled in the system BIOS. 2. Initialize the NVRAID Array Disks. The RAID prompt appears as part of the system POST and boot process prior to copy and install the nForce RAID software. (Check p.5-9 for details.) 4. Setting Up the NVRAID BIOS Be sure to press F10. The PC...

User Guide
Page 97
... nVIDIA RAID driver for the Windows Setup screen to appear. 3. Please follow the instruction below : MSI Reminds You... Ignore the Setup screen and use "Explorer" to a formatted floppy disk. 4. After you complete the RAID BIOS setup, boot from the Windows CD, and the Windows Setup program starts. 2. nVIDIA RAID Introduction NVIDIA RAID..." and then press Enter. (3) Press S again at the Specify Devices screen, then press Enter. (4) Select "NVIDIA NForce Storage Controller" and then press Enter. Insert the MSI CD into the CD-ROM drive. 2. Press F6 and wait for yourself. 1.
... nVIDIA RAID driver for the Windows Setup screen to appear. 3. Please follow the instruction below : MSI Reminds You... Ignore the Setup screen and use "Explorer" to a formatted floppy disk. 4. After you complete the RAID BIOS setup, boot from the Windows CD, and the Windows Setup program starts. 2. nVIDIA RAID Introduction NVIDIA RAID..." and then press Enter. (3) Press S again at the Specify Devices screen, then press Enter. (4) Select "NVIDIA NForce Storage Controller" and then press Enter. Insert the MSI CD into the CD-ROM drive. 2. Press F6 and wait for yourself. 1.

User Guide
Page 104
... by any other array, unlike a free disk which can be used only by any RAID array, but can take over for a RAID 1 or RAID 0+1 array2. Boot into Windows and run the NVRAIDMAN program. Enter the system BIOS setup and make sure that you have a system with four hard disks where one... disk is used to boot the OS, two hard drives are set up in a mirrored array, and a fourth hard disk is set up as a free disk, then if one of...
... by any other array, unlike a free disk which can be used only by any RAID array, but can take over for a RAID 1 or RAID 0+1 array2. Boot into Windows and run the NVRAIDMAN program. Enter the system BIOS setup and make sure that you have a system with four hard disks where one... disk is used to boot the OS, two hard drives are set up in a mirrored array, and a fourth hard disk is set up as a free disk, then if one of...

User Guide
Page 105
... a specific array, Step 1: Mark the Disk as free is not part of any array (if one of the available disks under the Free Disk section. Boot into Windows and run the NVRAIDMAN program. nVIDIA RAID Introduction Assigning a Dedicated Disk To mark a disk as dedicated, or reserve it to mark as a Free...
... a specific array, Step 1: Mark the Disk as free is not part of any array (if one of the available disks under the Free Disk section. Boot into Windows and run the NVRAIDMAN program. nVIDIA RAID Introduction Assigning a Dedicated Disk To mark a disk as dedicated, or reserve it to mark as a Free...


