User Manual
Page 2
.../index.php?func=service ◙ Contact our technical staff at: http://ocss.msi.com ii We take every care in this document, but no solution can be obtained from the user's manual, please contact your place of purchase or local distributor. Alternatively, please try the following help... resources for further guidance. ◙ Visit the MSI website for PCB 1.X Date July 2009 Technical Support If a problem ...
.../index.php?func=service ◙ Contact our technical staff at: http://ocss.msi.com ii We take every care in this document, but no solution can be obtained from the user's manual, please contact your place of purchase or local distributor. Alternatively, please try the following help... resources for further guidance. ◙ Visit the MSI website for PCB 1.X Date July 2009 Technical Support If a problem ...
User Manual
Page 3
...cord. ■ Always Unplug the Power Cord before inserting any liquid into the equipment. ◯ The equipment has been exposed to User's Manual. ◯ The equipment has dropped and damaged. ◯ The equipment has obvious sign of the following situations arises, get the equipment ...checked by the manufacturer. MS-7612 Safety Instructions ■ Always read the safety instructions carefully. ■ Keep this User's Manual for future reference. ■ Keep this equipment on a reliable flat surface before setting it up. ■ The openings on it. DO NOT...
...cord. ■ Always Unplug the Power Cord before inserting any liquid into the equipment. ◯ The equipment has been exposed to User's Manual. ◯ The equipment has dropped and damaged. ◯ The equipment has obvious sign of the following situations arises, get the equipment ...checked by the manufacturer. MS-7612 Safety Instructions ■ Always read the safety instructions carefully. ■ Keep this User's Manual for future reference. ■ Keep this equipment on a reliable flat surface before setting it up. ■ The openings on it. DO NOT...

User Manual
Page 22
... module vertically into the DIMM slot. Important You can barely see the golden finger if the memory module is deeply inserted in the right orientation. 2. Manually check if the memory module has been locked in the DIMM slot. MS-7612 Installing Memory Modules 1. Notch Volt 2-7
... module vertically into the DIMM slot. Important You can barely see the golden finger if the memory module is deeply inserted in the right orientation. 2. Manually check if the memory module has been locked in the DIMM slot. MS-7612 Installing Memory Modules 1. Notch Volt 2-7
User Manual
Page 24
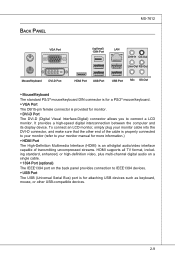
... USB-compatible devices. 2-9 It provides a high-speed digital interconnection between the computer and its display device. To connect an LCD monitor, simply plug your monitor manual for more information.) ▶ HDMI Port The High-Definition Multimedia Interface (HDMI) is an all-digital audio/video interface capable of transmitting uncompressed streams. HDMI...
... USB-compatible devices. 2-9 It provides a high-speed digital interconnection between the computer and its display device. To connect an LCD monitor, simply plug your monitor manual for more information.) ▶ HDMI Port The High-Definition Multimedia Interface (HDMI) is an all-digital audio/video interface capable of transmitting uncompressed streams. HDMI...

User Manual
Page 33
▍ Hardware Setup TPM Module connector: JTPM1 (optional) This connector connects to the TPM security platform manual for more details and usages. 2.34V.36S..3tS8aVe.n15Prd0iVaob1.NlwyP2I1o.eRopG4rwoPQ.rwGeionreurornudnd 1.L3P.L5CP.LCC7P.loLRC9cP.eLka1CsPd1e1ad.CtL3drPea.dLsdCrPsedasCr&edsFdsd&sraraedt&amsasdpteaa&intpa0dinap1tian2pin3 2-18 Please refer to a TPM (Trusted Platform Module) module (optional).
▍ Hardware Setup TPM Module connector: JTPM1 (optional) This connector connects to the TPM security platform manual for more details and usages. 2.34V.36S..3tS8aVe.n15Prd0iVaob1.NlwyP2I1o.eRopG4rwoPQ.rwGeionreurornudnd 1.L3P.L5CP.LCC7P.loLRC9cP.eLka1CsPd1e1ad.CtL3drPea.dLsdCrPsedasCr&edsFdsd&sraraedt&amsasdpteaa&intpa0dinap1tian2pin3 2-18 Please refer to a TPM (Trusted Platform Module) module (optional).
User Manual
Page 38
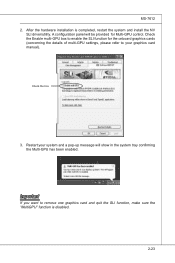
... and a pop-up message will be provided for the onboard graphics cards (concerning the details of multi-GPU settings, please refer to your graphics card manual). A configuration panel will show in the system tray confirming the Multi-GPU has been enabled. Check the Enable multi-GPU box to remove one graphics...
... and a pop-up message will be provided for the onboard graphics cards (concerning the details of multi-GPU settings, please refer to your graphics card manual). A configuration panel will show in the system tray confirming the Multi-GPU has been enabled. Check the Enable multi-GPU box to remove one graphics...
User Manual
Page 52
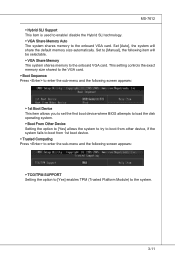
... boot from other device, if the system fails to boot from 1st boot device. ▶ Trusted Computing Press to the onboard VGA card. Set to [Manual], the following screen appears: ▶ TCG/TPM SUPPORT Setting the option to [Yes] enables TPM (Trusted Platform Module) to the onboard VGA card. MS-7612...
... boot from other device, if the system fails to boot from 1st boot device. ▶ Trusted Computing Press to the onboard VGA card. Set to [Manual], the following screen appears: ▶ TCG/TPM SUPPORT Setting the option to [Yes] enables TPM (Trusted Platform Module) to the onboard VGA card. MS-7612...
User Manual
Page 118
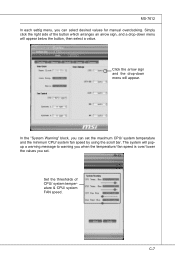
In the "System Warning" block, you can select desired values for manual overclocking. C-7 Click the arrow sign and the drop-down menu will appear. MS-7612 In each settig menu, you set the maximum CPU/ system temperature ...
In the "System Warning" block, you can select desired values for manual overclocking. C-7 Click the arrow sign and the drop-down menu will appear. MS-7612 In each settig menu, you set the maximum CPU/ system temperature ...


