User Guide
Page 4
...adjust properly 110/220V be noted. 10. com.tw/program/service/faq/faq/esc_faq_list.php † Contact our technical staff at: support@msi.com.tw Safety Instructions 1. Lay this equipment away from overheating. Do not cover the openings. 6. Do not place anything over the ... inserting any of the following help resources for further guidance. † Visit the MSI homepage & FAQ site for technical guide, BIOS updates, driver updates, and other information: http://www.msi.com.tw & http://www.msi. Keep this equipment in an environment unconditioned, storage temperature above 600 C (1400F...
...adjust properly 110/220V be noted. 10. com.tw/program/service/faq/faq/esc_faq_list.php † Contact our technical staff at: support@msi.com.tw Safety Instructions 1. Lay this equipment away from overheating. Do not cover the openings. 6. Do not place anything over the ... inserting any of the following help resources for further guidance. † Visit the MSI homepage & FAQ site for technical guide, BIOS updates, driver updates, and other information: http://www.msi.com.tw & http://www.msi. Keep this equipment in an environment unconditioned, storage temperature above 600 C (1400F...
User Guide
Page 9
...Channel Audio Function 4-4 Testing the Connected Speakers 4-9 Playing KaraOK 4-11 Chapter 5.VIA VT8237R/ VT8237R Plus SATA RAID Introduction 5-1 Introduction ...5-2 BIOS Configuration 5-3 Create Disk Array 5-4 Delete Disk Array 5-6 Create and Delete Spare Hard Drive 5-7 View Serial Number of Hard Drive 5-7 ... VIA SATA RAID Drvier and Utility 5-11 Using VIA RAID Tool 5-13 ix BIOS Setup 3-1 Entering Setup 3-2 The Main Menu 3-3 Standard CMOS Features 3-5 Advanced BIOS Features 3-7 Advanced Chipset Features 3-9 Integrated Peripherals 3-14 Power Management Features 3-17 PNP...
...Channel Audio Function 4-4 Testing the Connected Speakers 4-9 Playing KaraOK 4-11 Chapter 5.VIA VT8237R/ VT8237R Plus SATA RAID Introduction 5-1 Introduction ...5-2 BIOS Configuration 5-3 Create Disk Array 5-4 Delete Disk Array 5-6 Create and Delete Spare Hard Drive 5-7 View Serial Number of Hard Drive 5-7 ... VIA SATA RAID Drvier and Utility 5-11 Using VIA RAID Tool 5-13 ix BIOS Setup 3-1 Entering Setup 3-2 The Main Menu 3-3 Standard CMOS Features 3-5 Advanced BIOS Features 3-7 Advanced Chipset Features 3-9 Integrated Peripherals 3-14 Power Management Features 3-17 PNP...

User Guide
Page 12
...memory modules, please visit http://www.msi.com.tw/ program/products/mainboard/mbd/pro_mbd_trp_list.ph 1-3 Supports 10Mb/s, 100Mb/s and 1000Mb/s(1000Mb/s for 8110SB only). - BIOS † The mainboard BIOS provides "Plug & Play" BIOS which detects the peripheral devices and ...expansion cards of the board automatically. † The mainboard provides a Desktop Management Interface (DMI) function which records your mainboard specifications. Dimension † Micro-ATX Form Factor: ...
...memory modules, please visit http://www.msi.com.tw/ program/products/mainboard/mbd/pro_mbd_trp_list.ph 1-3 Supports 10Mb/s, 100Mb/s and 1000Mb/s(1000Mb/s for 8110SB only). - BIOS † The mainboard BIOS provides "Plug & Play" BIOS which detects the peripheral devices and ...expansion cards of the board automatically. † The mainboard provides a Desktop Management Interface (DMI) function which records your mainboard specifications. Dimension † Micro-ATX Form Factor: ...

User Guide
Page 13
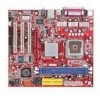
In B:SS Out Winbond W83627EHF COM2 VIA P4M800PRO AGP Slot RTL8100C AC97 JAUDIO01 CD_IN1 PCI Slot 1 PCI Slot 2 PCI Slot 3 VIA VT6307 (Optional) FDD 1 (Optional) (Optional) 1394_J2 1394_J3 JUSB1 BATT + VIA VT8237R PLUS BIOS JUSB2 JFP1 PM8PM (MS-7222 v1.X) Micro-ATX Mainboard IDE 2 IDE 1 SATA1 JBAT2 SATA2 JWP1 1-4 DIMM1 DIMM2 CONN1 MS-7222 Micro-ATX Mainboard Mainboard Layout Top : mouse Bottom: keyboard SYS_FAN1 Top : Parallel Port Bottom: COM Port VGA Port C P U _ FAN 1 Bottom: USB ports Top: LAN jack Bottom: USB ports JPW2 T:MIC-In M:Line-
In B:SS Out Winbond W83627EHF COM2 VIA P4M800PRO AGP Slot RTL8100C AC97 JAUDIO01 CD_IN1 PCI Slot 1 PCI Slot 2 PCI Slot 3 VIA VT6307 (Optional) FDD 1 (Optional) (Optional) 1394_J2 1394_J3 JUSB1 BATT + VIA VT8237R PLUS BIOS JUSB2 JFP1 PM8PM (MS-7222 v1.X) Micro-ATX Mainboard IDE 2 IDE 1 SATA1 JBAT2 SATA2 JWP1 1-4 DIMM1 DIMM2 CONN1 MS-7222 Micro-ATX Mainboard Mainboard Layout Top : mouse Bottom: keyboard SYS_FAN1 Top : Parallel Port Bottom: COM Port VGA Port C P U _ FAN 1 Bottom: USB ports Top: LAN jack Bottom: USB ports JPW2 T:MIC-In M:Line-
User Guide
Page 22
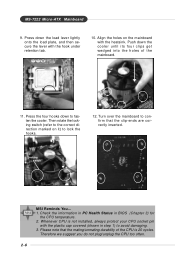
Align the holes on it) to lock the hooks. 12. Push down to the correct direction marked on the mainboard with the heatsink. locking switch MSI Reminds You... 1. Therefore we suggest you do not plug/unplug the CPU too often. 2-6 Then rotate the locking switch (refer to fasten the...tab. 10. Please note that the clip-ends are correctly inserted. Turn over the mainboard to avoid damaging. 3. Whenever CPU is 20 cycles. MS-7222 Micro-ATX Mainboard 9. Press down the load lever lightly onto the load plate, and then secure the lever with the plastic cap covered (shown in...
Align the holes on it) to lock the hooks. 12. Push down to the correct direction marked on the mainboard with the heatsink. locking switch MSI Reminds You... 1. Therefore we suggest you do not plug/unplug the CPU too often. 2-6 Then rotate the locking switch (refer to fasten the...tab. 10. Please note that the clip-ends are correctly inserted. Turn over the mainboard to avoid damaging. 3. Whenever CPU is 20 cycles. MS-7222 Micro-ATX Mainboard 9. Press down the load lever lightly onto the load plate, and then secure the lever with the plastic cap covered (shown in...
User Guide
Page 36
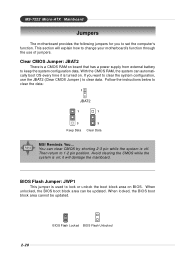
... on . You can be updated. 2-20 BIOS Flash Locked BIOS Flash Unlocked When locked, the BIOS boot block area cannot be updated. Then return to clear the data: 1 JBAT2 1 1 3 Keep Data 3 Clear Data MSI Reminds You... BIOS Flash Jumper: JWP1 This jumper is a CMOS... RAM on ; When unlocked, the BIOS boot block area can clear CMOS by shorting 2-3 pin while the system is turned on BIOS. it is off. MS-7222 Micro-ATX Mainboard Jumpers The motherboard provides the following jumpers ...
... on . You can be updated. 2-20 BIOS Flash Locked BIOS Flash Unlocked When locked, the BIOS boot block area cannot be updated. Then return to clear the data: 1 JBAT2 1 1 3 Keep Data 3 Clear Data MSI Reminds You... BIOS Flash Jumper: JWP1 This jumper is a CMOS... RAM on ; When unlocked, the BIOS boot block area can clear CMOS by shorting 2-3 pin while the system is turned on BIOS. it is off. MS-7222 Micro-ATX Mainboard Jumpers The motherboard provides the following jumpers ...
User Guide
Page 37
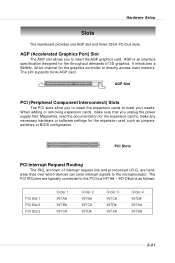
... hardware lines over which devices can send interrupt signals to make sure that you to the PCI bus INT A# ~ INT D# pins as jumpers, switches or BIOS configuration. AGP (Accelerated Graphics Port) Slot The AGP slot allows you unplug the power supply first. When adding or removing expansion cards, make any necessary...
... hardware lines over which devices can send interrupt signals to make sure that you to the PCI bus INT A# ~ INT D# pins as jumpers, switches or BIOS configuration. AGP (Accelerated Graphics Port) Slot The AGP slot allows you unplug the power supply first. When adding or removing expansion cards, make any necessary...
User Guide
Page 38
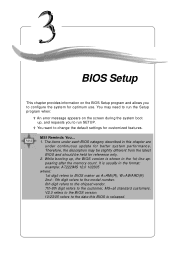
...settings for optimum use. It is usually in the format: example: A7222IMS 12.0 102305 where: 1st digit refers to the customer, MS=all standard customers. V2.0 refers to the BIOS version. 10/23/05 refers to run SETUP. ² You want to configure the system for customized features... on the screen during the system boot up , the BIOS version is released. 3-1 You may be slightly different from the latest BIOS and should be held for better system performance. BIOS Setup Chapter 3. MSI Reminds You... 1. The items under each BIOS category described in the 1st line appearing after the memory ...
...settings for optimum use. It is usually in the format: example: A7222IMS 12.0 102305 where: 1st digit refers to the customer, MS=all standard customers. V2.0 refers to the BIOS version. 10/23/05 refers to run SETUP. ² You want to configure the system for customized features... on the screen during the system boot up , the BIOS version is released. 3-1 You may be slightly different from the latest BIOS and should be held for better system performance. BIOS Setup Chapter 3. MSI Reminds You... 1. The items under each BIOS category described in the 1st line appearing after the memory ...

User Guide
Page 39
...next item Move to the item in the left hand Move to the item in this chapter are under continuous update for reference only. 3-2 MS-7222 Micro-ATX Mainboard Entering Setup Power on the screen, press key to enter Setup. The on-line description for all devices and the system. Main Menu... The main menu displays the setup categories the BIOS supplies. Press F1 to continue, DEL to select the item. MSI Reminds You... You can use the arrow keys ( ↑↓ ) to enter SETUP If the message disappears ...
...next item Move to the item in the left hand Move to the item in this chapter are under continuous update for reference only. 3-2 MS-7222 Micro-ATX Mainboard Entering Setup Power on the screen, press key to enter Setup. The on-line description for all devices and the system. Main Menu... The main menu displays the setup categories the BIOS supplies. Press F1 to continue, DEL to select the item. MSI Reminds You... You can use the arrow keys ( ↑↓ ) to enter SETUP If the message disappears ...
User Guide
Page 40
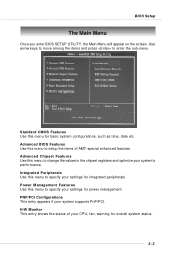
Advanced BIOS Features Use this menu to specify your settings for overall system status. 3-3 Power Management Features Use this menu to change the values in the chipset ...; special enhanced features. PNP/PCI Configurations This entry appears if your settings for basic system configurations, such as time, date etc. BIOS Setup The Main Menu Once you enter BIOS SETUP UTILITY, the Main Menu will appear on the screen. Use arrow keys to move among the items and press to specify...
Advanced BIOS Features Use this menu to specify your settings for overall system status. 3-3 Power Management Features Use this menu to change the values in the chipset ...; special enhanced features. PNP/PCI Configurations This entry appears if your settings for basic system configurations, such as time, date etc. BIOS Setup The Main Menu Once you enter BIOS SETUP UTILITY, the Main Menu will appear on the screen. Use arrow keys to move among the items and press to specify...
User Guide
Page 41
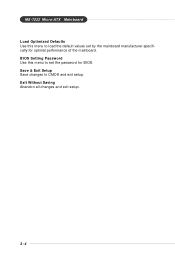
Exit Without Saving Abandon all changes and exit setup. 3-4 Save & Exit Setup Save changes to CMOS and exit setup. BIOS Setting Password Use this menu to load the default values set the password for optimal performance of the mainboard. MS-7222 Micro-ATX Mainboard Load Optimized Defaults Use this menu to set by the mainboard manufacturer specifically for BIOS.
Exit Without Saving Abandon all changes and exit setup. 3-4 Save & Exit Setup Save changes to CMOS and exit setup. BIOS Setting Password Use this menu to load the default values set the password for optimal performance of the mainboard. MS-7222 Micro-ATX Mainboard Load Optimized Defaults Use this menu to set by the mainboard manufacturer specifically for BIOS.
User Guide
Page 42
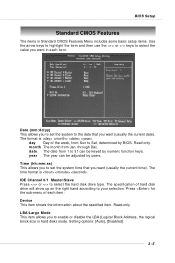
...drive will show up on the right hand according to your selection. through Dec. The specification of the week, from Sun to Sat, determined by BIOS. LBA/Large Mode This item allows you to enable or disable the LBA (Logical Block Address, the logical block size in each item: Device ...Press or to 31 can be keyed by users. Setting options: [Auto], [Disabled]. 3-5 Press for the sub-menu of each item. The time format is . BIOS Setup Standard CMOS Features The items in Standard CMOS Features Menu includes some basic setup items. Use the arrow keys to highlight the item and...
...drive will show up on the right hand according to your selection. through Dec. The specification of the week, from Sun to Sat, determined by BIOS. LBA/Large Mode This item allows you to enable or disable the LBA (Logical Block Address, the logical block size in each item: Device ...Press or to 31 can be keyed by users. Setting options: [Auto], [Disabled]. 3-5 Press for the sub-menu of each item. The time format is . BIOS Setup Standard CMOS Features The items in Standard CMOS Features Menu includes some basic setup items. Use the arrow keys to highlight the item and...
User Guide
Page 43
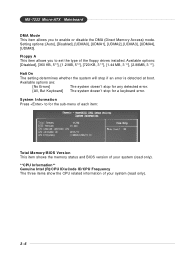
... the memory status and BIOS version of your system (read only). 3-6 Available options are: [No Errors] [All, But Keyboard] The system doesn't stop for a keyboard error. The system doesn't stop for any detected error. System Information Press to enable or disable the DMA (Direct Memory Access) mode. MS-7222 Micro-ATX Mainboard DMA Mode This...
... the memory status and BIOS version of your system (read only). 3-6 Available options are: [No Errors] [All, But Keyboard] The system doesn't stop for a keyboard error. The system doesn't stop for any detected error. System Information Press to enable or disable the DMA (Direct Memory Access) mode. MS-7222 Micro-ATX Mainboard DMA Mode This...
User Guide
Page 44
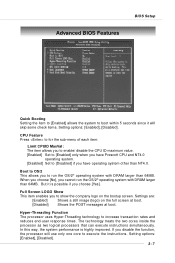
... item allows you to enable/ disable the CPU ID maximum value. [Enabled] Set to [Enabled] only when you have operating system other than 64MB. Advanced BIOS Features BIOS Setup Quick Booting Setting the item to [Enabled] allows the system to boot within 5 seconds since it is highly improved.
... item allows you to enable/ disable the CPU ID maximum value. [Enabled] Set to [Enabled] only when you have operating system other than 64MB. Advanced BIOS Features BIOS Setup Quick Booting Setting the item to [Enabled] allows the system to boot within 5 seconds since it is highly improved.
User Guide
Page 45
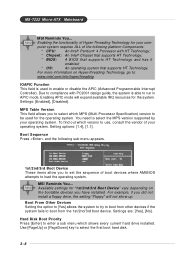
... you to compliance with HT Technology; * Chipset: An Intel® Chipset that supports HT Technology; * BIOS: A BIOS that supports HT Technology and has it enabled; * OS: An operating system that supports HT Technology. Boot... resources for your operating system. Enabling APIC mode will not show up. Settings: [Enabled], [Disabled]. MSI Reminds You... For more information on the bootable devices you to select which MPS (Multi-Processor Specification) ...settings for the operating system. Setting options: [1.4], [1.1]. MS-7222 Micro-ATX Mainboard MSI Reminds You...
... you to compliance with HT Technology; * Chipset: An Intel® Chipset that supports HT Technology; * BIOS: A BIOS that supports HT Technology and has it enabled; * OS: An operating system that supports HT Technology. Boot... resources for your operating system. Enabling APIC mode will not show up. Settings: [Enabled], [Disabled]. MSI Reminds You... For more information on the bootable devices you to select which MPS (Multi-Processor Specification) ...settings for the operating system. Setting options: [1.4], [1.1]. MS-7222 Micro-ATX Mainboard MSI Reminds You...
User Guide
Page 46
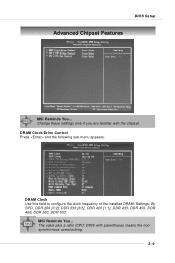
Change these settings only if you are familiar with parentheses means the nonsynchronous overclocking. 3-9 DRAM Clock Use this field to configure the clock frequency of the installed DRAM. The value plus a ratio (CPU: DDR) with the chipset. DRAM Clock/Drive Control Press and the following sub-menu appears. Settings: By SPD, DDR 266 [3:2], DDR 333 [6:5], DDR 400 [1:1], DDR 433, DDR 450, DDR 466, DDR 500, DDR 533. MSI Reminds You... BIOS Setup Advanced Chipset Features MSI Reminds You...
Change these settings only if you are familiar with parentheses means the nonsynchronous overclocking. 3-9 DRAM Clock Use this field to configure the clock frequency of the installed DRAM. The value plus a ratio (CPU: DDR) with the chipset. DRAM Clock/Drive Control Press and the following sub-menu appears. Settings: By SPD, DDR 266 [3:2], DDR 333 [6:5], DDR 400 [1:1], DDR 433, DDR 450, DDR 466, DDR 500, DDR 533. MSI Reminds You... BIOS Setup Advanced Chipset Features MSI Reminds You...

User Guide
Page 47
... configure these fields manually. Setting options: [2T], [3T]. 3-10 Setting to [Auto By SPD] enables the following fields automatically to be allowed to retain data. MS-7222 Micro-ATX Mainboard DRAM Timing Selects whether DRAM timing is controlled by BIOS based on the configurations on the DRAM module. Setting options: [08T]~ [71T].
... configure these fields manually. Setting options: [2T], [3T]. 3-10 Setting to [Auto By SPD] enables the following fields automatically to be allowed to retain data. MS-7222 Micro-ATX Mainboard DRAM Timing Selects whether DRAM timing is controlled by BIOS based on the configurations on the DRAM module. Setting options: [08T]~ [71T].
User Guide
Page 48
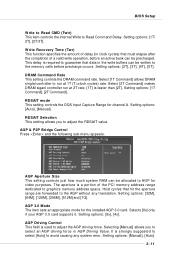
... cycles) that hit the aperture range are forwarded to adjust the AGP driving force. AGP & P2P Bridge Control Press and the following sub-menu appears. BIOS Setup Write to Read CMD (Twtr) This item controls the internal Write to avoid causing any translation. AGP Driving Control This field is strongly suggested...
... cycles) that hit the aperture range are forwarded to adjust the AGP driving force. AGP & P2P Bridge Control Press and the following sub-menu appears. BIOS Setup Write to Read CMD (Twtr) This item controls the internal Write to avoid causing any translation. AGP Driving Control This field is strongly suggested...
User Guide
Page 50
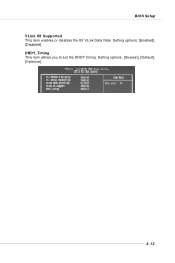
Setting options: [Slowest], [Default], [Optimize]. 3-13 DRDY_Timing This item allows you to set the DRDY timing. BIOS Setup VLink 8X Supported This item enables or disables the 8X VLink Data Rate. Setting options: [Enabled], [Disabled].
Setting options: [Slowest], [Default], [Optimize]. 3-13 DRDY_Timing This item allows you to set the DRDY timing. BIOS Setup VLink 8X Supported This item enables or disables the 8X VLink Data Rate. Setting options: [Enabled], [Disabled].
User Guide
Page 52
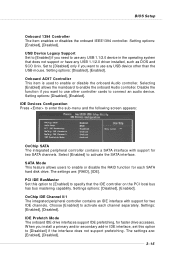
... USB 1.1/2.0 device in IDE interface, set this option to [Enabled] to activate each SATA hard disk drive. Setting options: [Disabled], [Enabled]. Setting options: [Disabled], [Enabled]. BIOS Setup Onboard 1394 Controller The item enables or disables the onboard IEEE1394 controller. When you need to enter the sub-menu and the following screen...
... USB 1.1/2.0 device in IDE interface, set this option to [Enabled] to activate each SATA hard disk drive. Setting options: [Disabled], [Enabled]. Setting options: [Disabled], [Enabled]. BIOS Setup Onboard 1394 Controller The item enables or disables the onboard IEEE1394 controller. When you need to enter the sub-menu and the following screen...


