
User Manual
Page 1
MAG B660M BAZOOKA DDR4 Motherboard User Guide Benutzerhandbuch Manuel d'utilisation I
MAG B660M BAZOOKA DDR4 Motherboard User Guide Benutzerhandbuch Manuel d'utilisation I

User Manual
Page 7
Installing the Motherboard/ Installation des Motherboards/ Installer la carte mère Youtube ⚽ https://youtu.be/wWI6Qt51Wnc 1 优酷 ⚽ https://v.youku.com/v_show/id_ XNDUwMDUyNTkwOA==.html Torque: 3 kgf·cm* 2 *3 kgf·cm = 0.3 N·m = 2.6 lbf·in VII
Installing the Motherboard/ Installation des Motherboards/ Installer la carte mère Youtube ⚽ https://youtu.be/wWI6Qt51Wnc 1 优酷 ⚽ https://v.youku.com/v_show/id_ XNDUwMDUyNTkwOA==.html Torque: 3 kgf·cm* 2 *3 kgf·cm = 0.3 N·m = 2.6 lbf·in VII

User Manual
Page 15
...or you can not step on the computer, ensure that all components are prone to user guide. ▪ The motherboard has been dropped and damaged. ▪ The motherboard has obvious sign of static electricity by touching another metal object before connecting the PSU to the electrical outlet. ∙... Place the power cord such a way that people can not get the motherboard checked by the edges to avoid touching sensitive components. ∙ It is not installed. ∙ Before turning on it may cause the computer...
...or you can not step on the computer, ensure that all components are prone to user guide. ▪ The motherboard has been dropped and damaged. ▪ The motherboard has obvious sign of static electricity by touching another metal object before connecting the PSU to the electrical outlet. ∙... Place the power cord such a way that people can not get the motherboard checked by the edges to avoid touching sensitive components. ∙ It is not installed. ∙ Before turning on it may cause the computer...

User Manual
Page 16
Avoid collision notification Protective paint is printed around each screw hole to the motherboard, any unnecessary mounting stand-off between the motherboard circuits and the computer case is prohibited. Case stand-off notification To prevent damage to prevent parts from being scratched. * The diagrams above are for reference only and may vary by the product you purchased. 4 Contents The Case standoff keep out zone signs will be marked on the backside of motherboard (as shown below) to serve as a warning to user.
Avoid collision notification Protective paint is printed around each screw hole to the motherboard, any unnecessary mounting stand-off between the motherboard circuits and the computer case is prohibited. Case stand-off notification To prevent damage to prevent parts from being scratched. * The diagrams above are for reference only and may vary by the product you purchased. 4 Contents The Case standoff keep out zone signs will be marked on the backside of motherboard (as shown below) to serve as a warning to user.
User Manual
Page 23
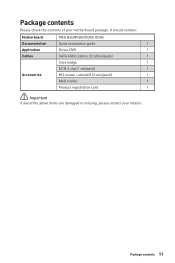
Package contents Please check the contents of the above items are damaged or missing, please contact your motherboard package. Package contents 11 It should contain: Motherboard MAG B660M BAZOOKA DDR4 Documentation Quick installation guide 1 Application Driver DVD 1 Cables SATA 6Gb/s cables (2 cables/pack) 1 Case badge 1 EZ M.2 clip (1 set/pack) 1 Accessories M.2 screw + standoff (2 sets/pack) 1 MAG sticker 1 Product registration card 1 ⚠ Important If any of your retailer.
Package contents Please check the contents of the above items are damaged or missing, please contact your motherboard package. Package contents 11 It should contain: Motherboard MAG B660M BAZOOKA DDR4 Documentation Quick installation guide 1 Application Driver DVD 1 Cables SATA 6Gb/s cables (2 cables/pack) 1 Case badge 1 EZ M.2 clip (1 set/pack) 1 Accessories M.2 screw + standoff (2 sets/pack) 1 MAG sticker 1 Product registration card 1 ⚠ Important If any of your retailer.
User Manual
Page 27
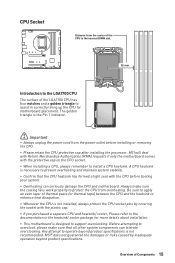
... the power outlet before booting your system. ∙ Overheating can tolerate overclocking. Overview of Components 15 MSI will deal with Return Merchandise Authorization (RMA) requests if only the motherboard comes with the plastic cap. ∙ If you purchased a separate CPU and heatsink/ cooler, Please... refer to the documentation in correctly lining up the CPU for more details about installation. ∙ This motherboard is designed to support overclocking. Always make sure that the CPU heatsink has formed a tight seal with the CPU before installing or...
... the power outlet before booting your system. ∙ Overheating can tolerate overclocking. Overview of Components 15 MSI will deal with Return Merchandise Authorization (RMA) requests if only the motherboard comes with the plastic cap. ∙ If you purchased a separate CPU and heatsink/ cooler, Please... refer to the documentation in correctly lining up the CPU for more details about installation. ∙ This motherboard is designed to support overclocking. Always make sure that the CPU heatsink has formed a tight seal with the CPU before installing or...

User Manual
Page 32
... SATA 6Gb/s interface ports. Secure the supplied M.2 standoff according to one SATA device. However, it is recommended that the flat connector be connected to the motherboard for space saving purposes. 20 Overview of the cable. Each connector can connect to your M.2 SSD into the M.2 slot at a 90-degree angle. Insert your...
... SATA 6Gb/s interface ports. Secure the supplied M.2 standoff according to one SATA device. However, it is recommended that the flat connector be connected to the motherboard for space saving purposes. 20 Overview of the cable. Each connector can connect to your M.2 SSD into the M.2 slot at a 90-degree angle. Insert your...

User Manual
Page 34
... +5V Ground ⚠ Important Make sure that all the power cables are securely connected to a proper ATX power supply to ensure stable operation of the motherboard. 22 Overview of Components
... +5V Ground ⚠ Important Make sure that all the power cables are securely connected to a proper ATX power supply to ensure stable operation of the motherboard. 22 Overview of Components

User Manual
Page 41
... clear the CMOS memory. Onboard LEDs EZ Debug LED These LEDs indicate the debug status of the motherboard. DRAM - indicates GPU is not detected or fail. Plug the power cord and Power on the motherboard to default values 1. If you want to clear the system configuration, set the jumpers to short JBAT1...
... clear the CMOS memory. Onboard LEDs EZ Debug LED These LEDs indicate the debug status of the motherboard. DRAM - indicates GPU is not detected or fail. Plug the power cord and Power on the motherboard to default values 1. If you want to clear the system configuration, set the jumpers to short JBAT1...
User Manual
Page 43
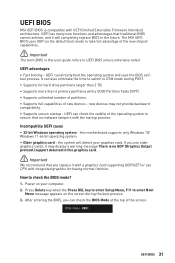
...BIOS cannot achieve, and it may not provide backward compatibility. ∙ Supports secure startup - the system will completely replace BIOS in this motherboard supports only Windows 10/ Windows 11 64-bit operating system. ∙ Older graphics card - Press Delete key when the Press DEL key...UEFI BIOS unless otherwise noted. After entering the BIOS, you can directly boot the operating system and save the BIOS selftest process. UEFI BIOS MSI UEFI BIOS is no malware tampers with a GUID Partition Table (GPT). ∙ Supports unlimited number of partitions. ∙ Supports full ...
...BIOS cannot achieve, and it may not provide backward compatibility. ∙ Supports secure startup - the system will completely replace BIOS in this motherboard supports only Windows 10/ Windows 11 64-bit operating system. ∙ Older graphics card - Press Delete key when the Press DEL key...UEFI BIOS unless otherwise noted. After entering the BIOS, you can directly boot the operating system and save the BIOS selftest process. UEFI BIOS MSI UEFI BIOS is no malware tampers with a GUID Partition Table (GPT). ∙ Supports unlimited number of partitions. ∙ Supports full ...
User Manual
Page 45
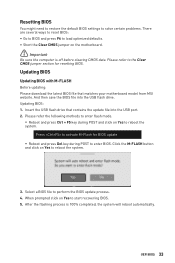
...: Please download the latest BIOS file that contains the update file into the USB flash drive. Insert the USB flash drive that matches your motherboard model from MSI website. Press to activate M-Flash for resetting BIOS. And then save the BIOS file into the USB port. 2. After the flashing process is .... ▪ Reboot and press Del key during POST and click on Yes to load optimized defaults. ∙ Short the Clear CMOS jumper on the motherboard. ⚠ Important Be sure the computer is 100% completed, the system will reboot automatically. Select a BIOS file to enter BIOS.
...: Please download the latest BIOS file that contains the update file into the USB flash drive. Insert the USB flash drive that matches your motherboard model from MSI website. Press to activate M-Flash for resetting BIOS. And then save the BIOS file into the USB port. 2. After the flashing process is .... ▪ Reboot and press Del key during POST and click on Yes to load optimized defaults. ∙ Short the Clear CMOS jumper on the motherboard. ⚠ Important Be sure the computer is 100% completed, the system will reboot automatically. Select a BIOS file to enter BIOS.


