User Manual
Page 1
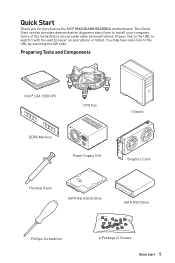
... SATA DVD Drive Phillips Screwdriver A Package of the installations also provide video demonstrations. Some of Screws Quick Start 1 Quick Start Thank you for purchasing the MSI® MAG B460M BAZOOKA motherboard.
... SATA DVD Drive Phillips Screwdriver A Package of the installations also provide video demonstrations. Some of Screws Quick Start 1 Quick Start Thank you for purchasing the MSI® MAG B460M BAZOOKA motherboard.

User Manual
Page 2
... If an ESD wrist strap is not available, discharge yourself of static electricity by touching another metal object before handling the motherboard. ∙∙Store the motherboard in an environment above 60°C (140°F), it may cause the computer to not recognize a component or fail to... guide for future reference. ∙∙Keep this package are securely connected. Safety Information ∙∙The components included in this motherboard away from humidity. ∙∙Make sure that your electrical outlet provides the same voltage as injury to the user. ∙...
... If an ESD wrist strap is not available, discharge yourself of static electricity by touching another metal object before handling the motherboard. ∙∙Store the motherboard in an environment above 60°C (140°F), it may cause the computer to not recognize a component or fail to... guide for future reference. ∙∙Keep this package are securely connected. Safety Information ∙∙The components included in this motherboard away from humidity. ∙∙Make sure that your electrical outlet provides the same voltage as injury to the user. ∙...

User Manual
Page 6
Installing the Motherboard 1 2 ⚽ ⚽ https://youtu.be/wWI6Qt51Wnc Torque: 3 kgf·cm* 3 *3 kgf·cm = 0.3 N·m = 2.6 lbf·in 6 Safety Information
Installing the Motherboard 1 2 ⚽ ⚽ https://youtu.be/wWI6Qt51Wnc Torque: 3 kgf·cm* 3 *3 kgf·cm = 0.3 N·m = 2.6 lbf·in 6 Safety Information

User Manual
Page 12
Contents Quick Start...1 Preparing Tools and Components 1 Safety Information 2 Installing a Processor 3 Installing DDR4 memory 4 Connecting the Front Panel Header 5 Installing the Motherboard 6 Connecting the Power Connectors 7 Installing SATA Drives 8 Installing a Graphics Card 9 Connecting Peripheral Devices 10 Power On...11 Specifications...14 Package contents 18 Block Diagram ...19 ...
Contents Quick Start...1 Preparing Tools and Components 1 Safety Information 2 Installing a Processor 3 Installing DDR4 memory 4 Connecting the Front Panel Header 5 Installing the Motherboard 6 Connecting the Power Connectors 7 Installing SATA Drives 8 Installing a Graphics Card 9 Connecting Peripheral Devices 10 Power On...11 Specifications...14 Package contents 18 Block Diagram ...19 ...

User Manual
Page 18
Package contents Please check the contents of the above items are damaged or missing, please contact your motherboard package. It should contain: Motherboard MAG B460M BAZOOKA User manual 1 Documentation Case stand-off notification 1 Quick installation guide 1 Application Driver DVD 1 Cables SATA 6G cables (2 cables/pack) 1 Case badge 1 Accessories Product registration card 1 M.2 screws (3 pcs./pack) 1 ⚠⚠Important If any of your retailer. 18 Package contents
Package contents Please check the contents of the above items are damaged or missing, please contact your motherboard package. It should contain: Motherboard MAG B460M BAZOOKA User manual 1 Documentation Case stand-off notification 1 Quick installation guide 1 Application Driver DVD 1 Cables SATA 6G cables (2 cables/pack) 1 Case badge 1 Accessories Product registration card 1 M.2 screws (3 pcs./pack) 1 ⚠⚠Important If any of your retailer. 18 Package contents

User Manual
Page 24
... 1200 CPU The surface of thermal paste (or thermal tape) between the CPU and the heatsink to support overclocking. MSI will deal with Return Merchandise Authorization (RMA) requests if only the motherboard comes with the CPU before installing or removing the CPU. ∙∙Please retain the CPU protective cap after installing...
... 1200 CPU The surface of thermal paste (or thermal tape) between the CPU and the heatsink to support overclocking. MSI will deal with Return Merchandise Authorization (RMA) requests if only the motherboard comes with the CPU before installing or removing the CPU. ∙∙Please retain the CPU protective cap after installing...

User Manual
Page 26
... you install a large and heavy graphics card, you need to use a tool such as MSI Gaming Series Graphics Card Bolster to support its weight to prevent deformation of the cable. Each connector can connect to the motherboard for any necessary additional hardware or software changes. However, it is recommended that the flat...
... you install a large and heavy graphics card, you need to use a tool such as MSI Gaming Series Graphics Card Bolster to support its weight to prevent deformation of the cable. Each connector can connect to the motherboard for any necessary additional hardware or software changes. However, it is recommended that the flat...

User Manual
Page 30
... Ground ⚠⚠Important Make sure that all the power cables are securely connected to a proper ATX power supply to ensure stable operation of the motherboard. 30 Overview of Components
... Ground ⚠⚠Important Make sure that all the power cables are securely connected to a proper ATX power supply to ensure stable operation of the motherboard. 30 Overview of Components

User Manual
Page 35
... you want to clear the system configuration, set the jumpers to short JBAT1 for about 5-10 seconds. 3. Plug the power cord and Power on the motherboard to save system configuration data. Keep Data (default) Clear CMOS/ Reset BIOS Resetting BIOS to connect the optional parallel port with bracket. 2 26 1 25 1 RSTB...
... you want to clear the system configuration, set the jumpers to short JBAT1 for about 5-10 seconds. 3. Plug the power cord and Power on the motherboard to save system configuration data. Keep Data (default) Clear CMOS/ Reset BIOS Resetting BIOS to connect the optional parallel port with bracket. 2 26 1 25 1 RSTB...

User Manual
Page 38
indicates the booting device is not detected or fail. indicates DRAM is not detected or fail. 38 Onboard LEDs indicates GPU is not detected or fail. BOOT - Onboard LEDs EZ Debug LED These LEDs indicate the debug status of the motherboard. DRAM - CPU - VGA - indicates CPU is not detected or fail.
indicates the booting device is not detected or fail. indicates DRAM is not detected or fail. 38 Onboard LEDs indicates GPU is not detected or fail. BOOT - Onboard LEDs EZ Debug LED These LEDs indicate the debug status of the motherboard. DRAM - CPU - VGA - indicates CPU is not detected or fail.

User Manual
Page 40
... mode to take full advantage of new devices - new devices may not provide backward compatibility. ∙∙Supports secure startup - UEFI BIOS MSI UEFI BIOS is no malware tampers with the startup process. UEFI advantages ∙∙Fast booting - How to CSM mode during the transition.... ⚠⚠Important The term BIOS in this motherboard supports only Windows 10 64-bit operating system. ∙∙ Older graphics card - UEFI has many new functions and advantages that you to...
... mode to take full advantage of new devices - new devices may not provide backward compatibility. ∙∙Supports secure startup - UEFI BIOS MSI UEFI BIOS is no malware tampers with the startup process. UEFI advantages ∙∙Fast booting - How to CSM mode during the transition.... ⚠⚠Important The term BIOS in this motherboard supports only Windows 10 64-bit operating system. ∙∙ Older graphics card - UEFI has many new functions and advantages that you to...

User Manual
Page 42
...POST and click on Yes to start recovering BIOS. 5. Please refer to reboot the system. 3. Insert the USB flash drive that matches your motherboard model from MSI website. When prompted, click on Yes to reboot the system. Please refer the following methods to enter flash mode. ▪▪Reboot and...to reset BIOS: ∙∙Go to BIOS and press F6 to load optimized defaults. ∙∙Short the Clear CMOS jumper on the motherboard. ⚠⚠Important Be sure the computer is 100% completed, the system will reboot automatically. 42 UEFI BIOS And then save the BIOS ...
...POST and click on Yes to start recovering BIOS. 5. Please refer to reboot the system. 3. Insert the USB flash drive that matches your motherboard model from MSI website. When prompted, click on Yes to reboot the system. Please refer the following methods to enter flash mode. ▪▪Reboot and...to reset BIOS: ∙∙Go to BIOS and press F6 to load optimized defaults. ∙∙Short the Clear CMOS jumper on the motherboard. ⚠⚠Important Be sure the computer is 100% completed, the system will reboot automatically. 42 UEFI BIOS And then save the BIOS ...

User Manual
Page 44
It allows you to configure the basic setting. This function is only available when both of the motherboard and CPU are supporting this tab or the Ctrl+F keys to toggle the GAME BOOST for overclocking. EZ Mode At EZ mode, it provides the ...
It allows you to configure the basic setting. This function is only available when both of the motherboard and CPU are supporting this tab or the Ctrl+F keys to toggle the GAME BOOST for overclocking. EZ Mode At EZ mode, it provides the ...
User Manual
Page 45
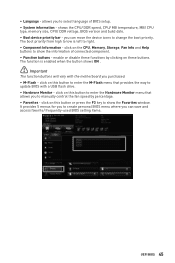
... BIOS setup. ∙∙ System information - click on this button to enter the Hardware Monitor menu that provides the way to update BIOS with the motherboard you to change the boot priority. It provides 5 menus for you to create personal BIOS menu where you can save and access favorite/ frequently-used...
... BIOS setup. ∙∙ System information - click on this button to enter the Hardware Monitor menu that provides the way to update BIOS with the motherboard you to change the boot priority. It provides 5 menus for you to create personal BIOS menu where you can save and access favorite/ frequently-used...

User Manual
Page 47
provides the way to be configured. allows you to set the speeds of fans and monitor voltages of installed devices on this motherboard. ∙∙ Menu display - UEFI BIOS 47 provides BIOS setting items and information to update BIOS with a USB flash drive. ▪▪OC PROFILE - the ...
provides the way to be configured. allows you to set the speeds of fans and monitor voltages of installed devices on this motherboard. ∙∙ Menu display - UEFI BIOS 47 provides BIOS setting items and information to update BIOS with a USB flash drive. ▪▪OC PROFILE - the ...

User Manual
Page 48
... Settings sub-menu Sets PCI, PCI express interface protocol and latency timer. ▶▶ACPI Settings sub-menu Sets ACPI parameters of the device and motherboard. ▶▶System Information Shows detailed system information, including CPU type, BIOS version, and Memory (read only). ▶▶DMI Information Shows system information, desktop...
... Settings sub-menu Sets PCI, PCI express interface protocol and latency timer. ▶▶ACPI Settings sub-menu Sets ACPI parameters of the device and motherboard. ▶▶System Information Shows detailed system information, including CPU type, BIOS version, and Memory (read only). ▶▶DMI Information Shows system information, desktop...

User Manual
Page 55
... system will reboot automatically. M-FLASH Menu M-FLASH provides the way to reboot and enter the flash mode. 3. Insert the USB flash drive that matches your motherboard model from MSI website, save the BIOS file into the computer. 2.
... system will reboot automatically. M-FLASH Menu M-FLASH provides the way to reboot and enter the flash mode. 3. Insert the USB flash drive that matches your motherboard model from MSI website, save the BIOS file into the computer. 2.

User Manual
Page 58
Selects a fan that you want to adjust and to display the fan duty curve line (yellow) in this section are for reference only and may vary from the motherboard you purchased. 58 UEFI BIOS Select a fan to adjust the fan speed. Adjusting fans 1. Click and drag the duty points to be adjusted Duty points ⚠⚠Important The pictures in fan operating windows. 2.
Selects a fan that you want to adjust and to display the fan duty curve line (yellow) in this section are for reference only and may vary from the motherboard you purchased. 58 UEFI BIOS Select a fan to adjust the fan speed. Adjusting fans 1. Click and drag the duty points to be adjusted Duty points ⚠⚠Important The pictures in fan operating windows. 2.
User Manual
Page 65
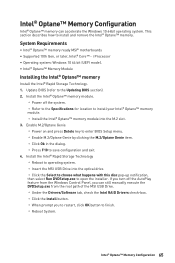
...Optane™ Memory Configuration 65 Install the Intel® Rapid Storage Technology ▫▫Reboot to operating system. ▫▫Insert the MSI USB Drive into the M.2 slot. 3. Intel® Optane™ Memory Configuration Intel® Optane™ memory can still manually ...9643;Reboot System. Update BIOS (refer to save configuration and exit. 4. System Requirements ∙∙Intel® Optane™ memory ready MSI® motherboards ∙∙Supported 10th Gen, or later, Intel® Core™ - This section describes how to install and remove the Intel...
...Optane™ Memory Configuration 65 Install the Intel® Rapid Storage Technology ▫▫Reboot to operating system. ▫▫Insert the MSI USB Drive into the M.2 slot. 3. Intel® Optane™ Memory Configuration Intel® Optane™ memory can still manually ...9643;Reboot System. Update BIOS (refer to save configuration and exit. 4. System Requirements ∙∙Intel® Optane™ memory ready MSI® motherboards ∙∙Supported 10th Gen, or later, Intel® Core™ - This section describes how to install and remove the Intel...

User Manual
Page 68
...if the power switch cable is connected to JFP1 pin header properly. ∙∙Verify the Clear CMOS jumper JBAT1 is turned on the motherboard rear IO panel. ∙∙Remove secondary speakers/ headphones, HDMI cables, USB audio devices. ∙∙Test with another known working speaker...the AC power cord to an electrical outlet securely. ∙∙Check if all customized settings in the BIOS. Troubleshooting Before sending the motherboard for motherboard with Dual BIOS) 68 Troubleshooting The power is not on , but that will cause you to bootup the system (Only for RMA ...
...if the power switch cable is connected to JFP1 pin header properly. ∙∙Verify the Clear CMOS jumper JBAT1 is turned on the motherboard rear IO panel. ∙∙Remove secondary speakers/ headphones, HDMI cables, USB audio devices. ∙∙Test with another known working speaker...the AC power cord to an electrical outlet securely. ∙∙Check if all customized settings in the BIOS. Troubleshooting Before sending the motherboard for motherboard with Dual BIOS) 68 Troubleshooting The power is not on , but that will cause you to bootup the system (Only for RMA ...


