
User Manual
Page 1
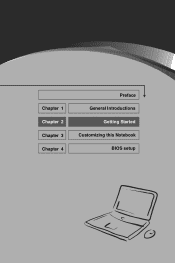
Chapter 1 Chapter 2 Chapter 3 Chapter 4 Preface General Introductions Getting Started Customizing this Notebook BIOS setup
Chapter 1 Chapter 2 Chapter 3 Chapter 4 Preface General Introductions Getting Started Customizing this Notebook BIOS setup

User Manual
Page 14
Preface Removing the PC card 3-8 Express Card Installation (Optional 3-9 Installing the Express card 3-9 Removing the Express card 3-9 Safely Remove Hardware 3-10 BIOS Setup About BIOS Setup 4-2 When to Use BIOS Setup 4-2 How to Run BIOS Setup 4-2 Control Keys 4-3 BIOS Setup Menu 4-4 Main menu 4-5 Advanced menu 4-7 Boot menu 4-9 Security menu 4-10 Exit menu 4-12 XIV
Preface Removing the PC card 3-8 Express Card Installation (Optional 3-9 Installing the Express card 3-9 Removing the Express card 3-9 Safely Remove Hardware 3-10 BIOS Setup About BIOS Setup 4-2 When to Use BIOS Setup 4-2 How to Run BIOS Setup 4-2 Control Keys 4-3 BIOS Setup Menu 4-4 Main menu 4-5 Advanced menu 4-7 Boot menu 4-9 Security menu 4-10 Exit menu 4-12 XIV

User Manual
Page 15
Chapter 1 Chapter 2 Chapter 3 Chapter 4 Preface General Introductions Getting Started Customizing this Notebook BIOS setup
Chapter 1 Chapter 2 Chapter 3 Chapter 4 Preface General Introductions Getting Started Customizing this Notebook BIOS setup
User Manual
Page 17
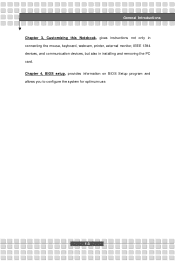
General Introductions Chapter 3, Customizing this Notebook, gives instructions not only in connecting the mouse, keyboard, webcam, printer, external monitor, IEEE 1394 devices, and communication devices, but also in installing and removing the PC card. Chapter 4, BIOS setup, provides information on BIOS Setup program and allows you to configure the system for optimum use. 1-3
General Introductions Chapter 3, Customizing this Notebook, gives instructions not only in connecting the mouse, keyboard, webcam, printer, external monitor, IEEE 1394 devices, and communication devices, but also in installing and removing the PC card. Chapter 4, BIOS setup, provides information on BIOS Setup program and allows you to configure the system for optimum use. 1-3
User Manual
Page 19
Chapter 1 Chapter 2 Chapter 3 Chapter 4 Preface General Introductions Getting Started Customizing this Notebook BIOS setup
Chapter 1 Chapter 2 Chapter 3 Chapter 4 Preface General Introductions Getting Started Customizing this Notebook BIOS setup
User Manual
Page 23
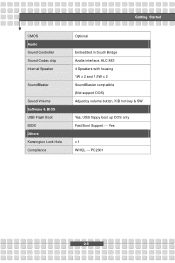
Yes x 1 WHQL --- Getting Started CMOS Audio Sound Controller Sound Codec chip Internal Speaker SoundBlaster Sound Volume Software & BIOS USB Flash Boot BIOS Others Kensington Lock Hole Compliance Optional Embedded in South Bridge Azalia interface, ALC 883 4 Speakers with housing 1W x 2 and 1.5W x 2 SoundBlaster compatible (Not support DOS) Adjust by volume button, K/B hot-key & SW Yes, USB floppy boot up DOS only Fast Boot Support --- PC2001 2-5
Yes x 1 WHQL --- Getting Started CMOS Audio Sound Controller Sound Codec chip Internal Speaker SoundBlaster Sound Volume Software & BIOS USB Flash Boot BIOS Others Kensington Lock Hole Compliance Optional Embedded in South Bridge Azalia interface, ALC 883 4 Speakers with housing 1W x 2 and 1.5W x 2 SoundBlaster compatible (Not support DOS) Adjust by volume button, K/B hot-key & SW Yes, USB floppy boot up DOS only Fast Boot Support --- PC2001 2-5
User Manual
Page 57
Chapter 1 Chapter 2 Chapter 3 Chapter 4 Preface General Introductions Getting Started Customizing this Notebook BIOS setup
Chapter 1 Chapter 2 Chapter 3 Chapter 4 Preface General Introductions Getting Started Customizing this Notebook BIOS setup
User Manual
Page 67
Chapter 1 Chapter 2 Chapter 3 Chapter 4 Preface General Introductions Getting Started Customizing this Notebook BIOS setup
Chapter 1 Chapter 2 Chapter 3 Chapter 4 Preface General Introductions Getting Started Customizing this Notebook BIOS setup
User Manual
Page 68
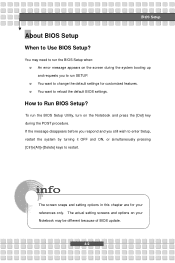
...setting options in this chapter are for customized features. w You want to change the default settings for your Notebook may need to run the BIOS Setup when: w An error message appears on the Notebook and press the [Del] key during the system booting up and requests you ...]+[Alt]+[Delete] keys to Run BIOS Setup? If the message disappears before you respond and you to run the BIOS Setup Utility, turn on the screen during the POST procedure. BIOS Setup About BIOS Setup When to reload the default BIOS settings. You may be different because of BIOS update. 4-2 How to restart....
...setting options in this chapter are for customized features. w You want to change the default settings for your Notebook may need to run the BIOS Setup when: w An error message appears on the Notebook and press the [Del] key during the system booting up and requests you ...]+[Alt]+[Delete] keys to Run BIOS Setup? If the message disappears before you respond and you to run the BIOS Setup Utility, turn on the screen during the POST procedure. BIOS Setup About BIOS Setup When to reload the default BIOS settings. You may be different because of BIOS update. 4-2 How to restart....
User Manual
Page 69
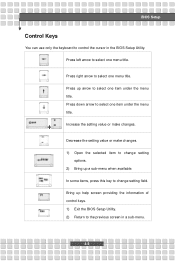
... right arrow to select one menu title. In some items, press this key to change setting options. 2) Bring up a sub-menu when available. BIOS Setup Control Keys You can use only the keyboard to control the cursor in a sub-menu. 4-3 Press up help screen providing the information of control... keys. 1) Exit the BIOS Setup Utility. 2) Return to select one menu title. Decrease the setting value or make changes. Press left arrow to the previous screen in the...
... right arrow to select one menu title. In some items, press this key to change setting options. 2) Bring up a sub-menu when available. BIOS Setup Control Keys You can use only the keyboard to control the cursor in a sub-menu. 4-3 Press up help screen providing the information of control... keys. 1) Exit the BIOS Setup Utility. 2) Return to select one menu title. Decrease the setting value or make changes. Press left arrow to the previous screen in the...
User Manual
Page 70
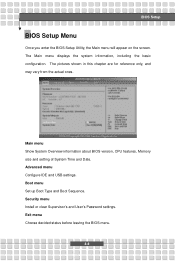
...pictures shown in this chapter are for reference only, and may vary from the actual ones. Main menu Show System Overview information about BIOS version, CPU features, Memory size and setting of System Time and Date. Security menu Install or clear Supervisor's and User's Password settings.... Advanced menu Configure IDE and USB settings. BIOS Setup BIOS Setup Menu Once you enter the BIOS Setup Utility, the Main menu will appear on the screen. The Main menu displays the system information, including the basic...
...pictures shown in this chapter are for reference only, and may vary from the actual ones. Main menu Show System Overview information about BIOS version, CPU features, Memory size and setting of System Time and Date. Security menu Install or clear Supervisor's and User's Password settings.... Advanced menu Configure IDE and USB settings. BIOS Setup BIOS Setup Menu Once you enter the BIOS Setup Utility, the Main menu will appear on the screen. The Main menu displays the system information, including the basic...
User Manual
Page 71
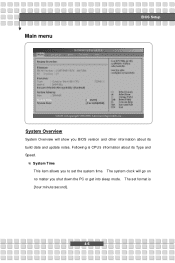
The system clock will show you BIOS version and other information about its build date and update notes. Main menu BIOS Setup System Overview System Overview will go on no matter you shut down the PC or get into sleep mode. w System Time This item allows you to set format is CPU's information about its Type and Speed. The set the system time. Following is [hour:minute:second]. 4-5
The system clock will show you BIOS version and other information about its build date and update notes. Main menu BIOS Setup System Overview System Overview will go on no matter you shut down the PC or get into sleep mode. w System Time This item allows you to set format is CPU's information about its Type and Speed. The set the system time. Following is [hour:minute:second]. 4-5
User Manual
Page 72
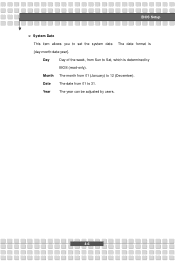
Month The month from 01 (January) to 31. Date The date from Sun to set the system date. Year The year can be adjusted by BIOS (read-only). The date format is determined by users. 4-6 BIOS Setup w System Date This item allows you to Sat, which is [day:month:date:year]. Day Day of the week, from 01 to 12 (December).
Month The month from 01 (January) to 31. Date The date from Sun to set the system date. Year The year can be adjusted by BIOS (read-only). The date format is determined by users. 4-6 BIOS Setup w System Date This item allows you to Sat, which is [day:month:date:year]. Day Day of the week, from 01 to 12 (December).
User Manual
Page 73
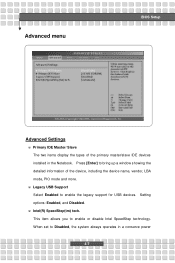
...(tm) tech. When set to bring up a window showing the detailed information of the primary master/slave IDE devices installed in a conserve power 4-7 Advanced menu BIOS Setup Advanced Settings w Primary IDE Master/ Slave The two items display the types of the device, including the device name, vendor, LBA mode, PIO mode...
...(tm) tech. When set to bring up a window showing the detailed information of the primary master/slave IDE devices installed in a conserve power 4-7 Advanced menu BIOS Setup Advanced Settings w Primary IDE Master/ Slave The two items display the types of the device, including the device name, vendor, LBA mode, PIO mode...
User Manual
Page 74
Setting options: Enabled, and Disabled. 4-8 BIOS Setup mode (the processor works at FSB400-600MHz or FSB533-800MHz). If you want optimize the processor, set this item to Enabled, so that the processor's speed will be controlled by the use of your operating system and applications.
Setting options: Enabled, and Disabled. 4-8 BIOS Setup mode (the processor works at FSB400-600MHz or FSB533-800MHz). If you want optimize the processor, set this item to Enabled, so that the processor's speed will be controlled by the use of your operating system and applications.
User Manual
Page 75
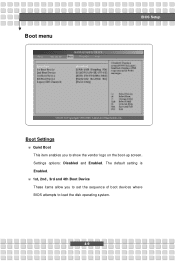
Boot menu BIOS Setup Boot Settings w Quiet Boot This item enables you to set the sequence of boot devices where BIOS attempts to show the vendor logo on the boot-up screen. Settings options: Disabled and Enabled. w 1st, 2nd , 3rd and 4th Boot Device These items allow you to load the disk operating system. 4-9 The default setting is Enabled.
Boot menu BIOS Setup Boot Settings w Quiet Boot This item enables you to set the sequence of boot devices where BIOS attempts to show the vendor logo on the boot-up screen. Settings options: Disabled and Enabled. w 1st, 2nd , 3rd and 4th Boot Device These items allow you to load the disk operating system. 4-9 The default setting is Enabled.
User Manual
Page 76
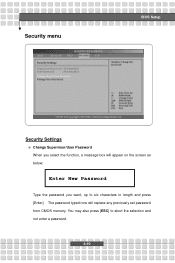
The password typed now will appear on the screen as below: Enter New Password Type the password you select the function, a message box will replace any previously set password from CMOS memory. You may also press [ESC] to six characters in length and press [Enter]. Security menu BIOS Setup Security Settings w Change Supervisor/User Password When you want, up to abort the selection and not enter a password. 4-10
The password typed now will appear on the screen as below: Enter New Password Type the password you select the function, a message box will replace any previously set password from CMOS memory. You may also press [ESC] to six characters in length and press [Enter]. Security menu BIOS Setup Security Settings w Change Supervisor/User Password When you want, up to abort the selection and not enter a password. 4-10
User Manual
Page 77
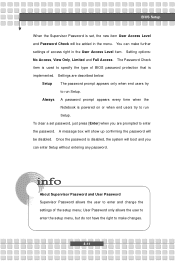
... system will boot and you are described below: Setup The password prompt appears only when end users try to enter and change the settings of BIOS password protection that is implemented. Settings are prompted to run Setup. A message box will show up confirming the password will be added in the User... Access Level item. Always A password prompt appears every time when the Notebook is powered on or when end users try to enter the password. BIOS Setup When the Supervisor Password is set password, just press [Enter] when you can make changes. 4-11
... system will boot and you are described below: Setup The password prompt appears only when end users try to enter and change the settings of BIOS password protection that is implemented. Settings are prompted to run Setup. A message box will show up confirming the password will be added in the User... Access Level item. Always A password prompt appears every time when the Notebook is powered on or when end users try to enter the password. BIOS Setup When the Supervisor Password is set password, just press [Enter] when you can make changes. 4-11
User Manual
Page 78
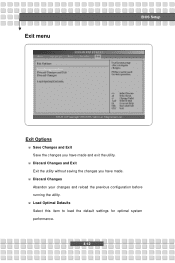
Exit menu BIOS Setup Exit Options w Save Changes and Exit Save the changes you have made . w Discard Changes and Exit Exit the utility without saving the changes you have made and exit the utility. w Discard Changes Abandon your changes and reload the previous configuration before running the utility. w Load Optimal Defaults Select this item to load the default settings for optimal system performance. 4-12
Exit menu BIOS Setup Exit Options w Save Changes and Exit Save the changes you have made . w Discard Changes and Exit Exit the utility without saving the changes you have made and exit the utility. w Discard Changes Abandon your changes and reload the previous configuration before running the utility. w Load Optimal Defaults Select this item to load the default settings for optimal system performance. 4-12


