

User Manual
Page 1
Chapter 1 Chapter 2 Chapter 3 Chapter 4 Preface General Introductions Getting Started Customizing this Notebook BIOS setup G52-N1049X2
Chapter 1 Chapter 2 Chapter 3 Chapter 4 Preface General Introductions Getting Started Customizing this Notebook BIOS setup G52-N1049X2
User Manual
Page 13
w AMI® is a registered trademark of American Megatrends Inc. w PCMCIA and CardBus are registered trademarks of Microsoft Corporation. w Microsoft is a registered trademark of Microsoft Corporation. Windows®98/ME, 2000/XP are registered trademarks of their respective owners. L710 Preface Trademarks All trademarks are the properties of the Personal Notebook Memory Card International Association. Release History Version 1.0 Revision Note First Release Date December, 2005 XIII
w AMI® is a registered trademark of American Megatrends Inc. w PCMCIA and CardBus are registered trademarks of Microsoft Corporation. w Microsoft is a registered trademark of Microsoft Corporation. Windows®98/ME, 2000/XP are registered trademarks of their respective owners. L710 Preface Trademarks All trademarks are the properties of the Personal Notebook Memory Card International Association. Release History Version 1.0 Revision Note First Release Date December, 2005 XIII

User Manual
Page 14
L710 Preface Copyright Notice The material in this guide is given as the Notebook specification and equipment, please ask your local vendor for FAQ, technical guide, driver and software updates, and other information: http://www.msi.com.tw/. Technical Support Visit the MSI website for help. Our products are ...The model you are not sure about these information, such as to make changes without notice. Contact our technical staff at: support@msi.com.tw. Please note that the setting diagrams or values in this guide are under continual improvement and we reserve the right to...
L710 Preface Copyright Notice The material in this guide is given as the Notebook specification and equipment, please ask your local vendor for FAQ, technical guide, driver and software updates, and other information: http://www.msi.com.tw/. Technical Support Visit the MSI website for help. Our products are ...The model you are not sure about these information, such as to make changes without notice. Contact our technical staff at: support@msi.com.tw. Please note that the setting diagrams or values in this guide are under continual improvement and we reserve the right to...
User Manual
Page 17
L710 Preface Customizing this Notebook Connecting the External Devices 3-2 Connecting the Peripheral Devices 3-3 Connecting the Communication Devices 3-6 PC Card Installation 3-7 Installing the PC card 3-7 Removing the PC card 3-8 Express Card Installation 3-9 Installing the Express card 3-9 Removing the Express card 3-9 Safely Remove Hardware 3-10 BIOS Setup About BIOS Setup 4-2 When to Use BIOS Setup 4-2 How to Run BIOS Setup 4-2 Control Keys 4-3 BIOS Setup Menu 4-4 Main menu 4-5 Advanced menu 4-7 Boot menu 4-9 Security menu 4-10 Exit menu 4-12 XVII
L710 Preface Customizing this Notebook Connecting the External Devices 3-2 Connecting the Peripheral Devices 3-3 Connecting the Communication Devices 3-6 PC Card Installation 3-7 Installing the PC card 3-7 Removing the PC card 3-8 Express Card Installation 3-9 Installing the Express card 3-9 Removing the Express card 3-9 Safely Remove Hardware 3-10 BIOS Setup About BIOS Setup 4-2 When to Use BIOS Setup 4-2 How to Run BIOS Setup 4-2 Control Keys 4-3 BIOS Setup Menu 4-4 Main menu 4-5 Advanced menu 4-7 Boot menu 4-9 Security menu 4-10 Exit menu 4-12 XVII
User Manual
Page 18
Chapter 1 Chapter 2 Chapter 3 Chapter 4 Preface General Introductions Getting Started Customizing this Notebook BIOS setup
Chapter 1 Chapter 2 Chapter 3 Chapter 4 Preface General Introductions Getting Started Customizing this Notebook BIOS setup
User Manual
Page 19
... the descriptions of all the accessories included when you have all the accessories of this notebook, the finely designed notebook. L710 General Introductions Congratulations on becoming a new user of this notebook. Chapter 2, Getting Started, provides the specification of this notebook, and introduces the function buttons, quick launch buttons, connectors, LEDs and externals of installing or...
... the descriptions of all the accessories included when you have all the accessories of this notebook, the finely designed notebook. L710 General Introductions Congratulations on becoming a new user of this notebook. Chapter 2, Getting Started, provides the specification of this notebook, and introduces the function buttons, quick launch buttons, connectors, LEDs and externals of installing or...
User Manual
Page 20
L710 General Introductions Chapter 3, Customizing this Notebook, gives instructions not only in connecting the mouse, keyboard, webcam, printer, external monitor, IEEE 1394 devices, and communication devices, but also in installing and removing the PC card. Chapter 4, BIOS setup, provides information on BIOS Setup program and allows you to configure the system for optimum use. 1-3
L710 General Introductions Chapter 3, Customizing this Notebook, gives instructions not only in connecting the mouse, keyboard, webcam, printer, external monitor, IEEE 1394 devices, and communication devices, but also in installing and removing the PC card. Chapter 4, BIOS setup, provides information on BIOS Setup program and allows you to configure the system for optimum use. 1-3

User Manual
Page 21
...function. w Warranty Card w High-capacity Li-ion battery pack w AC adapter and power cord w Phone cable/Phone jack (optional) w Notebook carry bag (optional) These accessories listed above may change without notice. 1-4 If any item contained is damaged or missing, please contact your... local dealer immediately. L710 General Introductions Unpacking First, unpack the shipping carton and check all items carefully. The package should contain the following items: w Notebook w User's Manual or Quick Start Guide w All-in the future.
...function. w Warranty Card w High-capacity Li-ion battery pack w AC adapter and power cord w Phone cable/Phone jack (optional) w Notebook carry bag (optional) These accessories listed above may change without notice. 1-4 If any item contained is damaged or missing, please contact your... local dealer immediately. L710 General Introductions Unpacking First, unpack the shipping carton and check all items carefully. The package should contain the following items: w Notebook w User's Manual or Quick Start Guide w All-in the future.
User Manual
Page 22
Chapter 1 Chapter 2 Chapter 3 Chapter 4 Preface General Introductions Getting Started Customizing this Notebook BIOS setup
Chapter 1 Chapter 2 Chapter 3 Chapter 4 Preface General Introductions Getting Started Customizing this Notebook BIOS setup
User Manual
Page 27
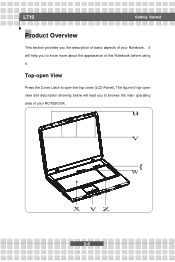
The figure of top-open the top cover (LCD Panel). Top-open View Press the Cover Latch to open view and description showing below will help you to browse the main operating area of your Notebook. It will lead you to know more about the appearance of this Notebook before using it. L710 Getting Started Product Overview This section provides you the description of basic aspects of your NOTEBOOK. u v w{ x yz 2-6
The figure of top-open the top cover (LCD Panel). Top-open View Press the Cover Latch to open view and description showing below will help you to browse the main operating area of your Notebook. It will lead you to know more about the appearance of this Notebook before using it. L710 Getting Started Product Overview This section provides you the description of basic aspects of your NOTEBOOK. u v w{ x yz 2-6
User Manual
Page 28
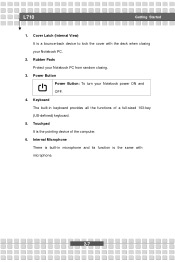
Power Button Power Button: To turn your Notebook PC from random closing your Notebook PC. 2. Keyboard The built-in microphone and its function is a bounce-back device to lock the cover with microphone. 2-7 Internal Microphone There is built-in keyboard provides all the functions of the computer. 6. L710 Getting Started 1. Cover Latch (Internal View) It is the same with the deck when closing . 3. Rubber Pads Protect your Notebook power ON and OFF. 4. Touchpad It is the pointing device of a full-sized 103-key (US-defined) keyboard. 5.
Power Button Power Button: To turn your Notebook PC from random closing your Notebook PC. 2. Keyboard The built-in microphone and its function is a bounce-back device to lock the cover with microphone. 2-7 Internal Microphone There is built-in keyboard provides all the functions of the computer. 6. L710 Getting Started 1. Cover Latch (Internal View) It is the same with the deck when closing . 3. Rubber Pads Protect your Notebook power ON and OFF. 4. Touchpad It is the pointing device of a full-sized 103-key (US-defined) keyboard. 5.
User Manual
Page 29
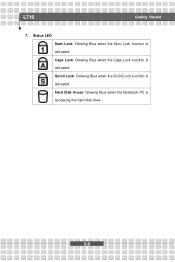
Status LED Num Lock: Glowing Blue when the Num Lock function is accessing the hard disk drive. 2-8 Hard Disk In-use: Glowing Blue when the Notebook PC is activated. Caps Lock: Glowing Blue when the Caps Lock function is activated. L710 Getting Started 7. Scroll Lock: Glowing Blue when the Scroll Lock function is activated.
Status LED Num Lock: Glowing Blue when the Num Lock function is accessing the hard disk drive. 2-8 Hard Disk In-use: Glowing Blue when the Notebook PC is activated. Caps Lock: Glowing Blue when the Caps Lock function is activated. L710 Getting Started 7. Scroll Lock: Glowing Blue when the Scroll Lock function is activated.
User Manual
Page 33
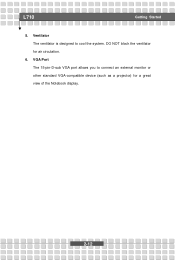
L710 Getting Started 5. Ventilator The ventilator is designed to connect an external monitor or other standard VGA-compatible device (such as a projector) for air circulation. 6. DO NOT block the ventilator for a great view of the Notebook display. 2-12 VGA Port The 15-pin-D-sub VGA port allows you to cool the system.
L710 Getting Started 5. Ventilator The ventilator is designed to connect an external monitor or other standard VGA-compatible device (such as a projector) for air circulation. 6. DO NOT block the ventilator for a great view of the Notebook display. 2-12 VGA Port The 15-pin-D-sub VGA port allows you to cool the system.
User Manual
Page 37
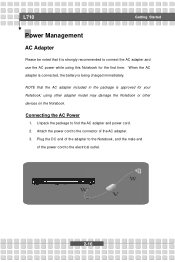
... the power cord to the connector of the AC adapter. 3. using this Notebook for your Notebook; Attach the power cord to the electrical outlet. When the AC adapter is connected, the battery is approved for the first time. w w v 2-16 L710 Getting Started Power Management AC Adapter Please be noted that the AC adapter...
... the power cord to the connector of the AC adapter. 3. using this Notebook for your Notebook; Attach the power cord to the electrical outlet. When the AC adapter is connected, the battery is approved for the first time. w w v 2-16 L710 Getting Started Power Management AC Adapter Please be noted that the AC adapter...
User Manual
Page 38
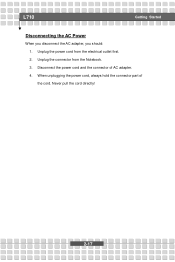
When unplugging the power cord, always hold the connector part of AC adapter. 4. Disconnect the power cord and the connector of the cord. Unplug the connector from the electrical outlet first. 2. Never pull the cord directly! 2-17 Unplug the power cord from the Notebook. 3. L710 Getting Started Disconnecting the AC Power When you disconnect the AC adapter, you should: 1.
When unplugging the power cord, always hold the connector part of AC adapter. 4. Disconnect the power cord and the connector of the cord. Unplug the connector from the electrical outlet first. 2. Never pull the cord directly! 2-17 Unplug the power cord from the Notebook. 3. L710 Getting Started Disconnecting the AC Power When you disconnect the AC adapter, you should: 1.
User Manual
Page 39
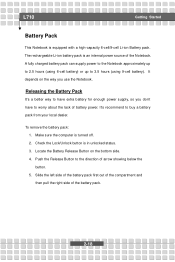
...side of arrow showing below the button. 5. A fully charged battery pack can supply power to the Notebook approximately up to 2.5 hours (using 6-cell battery) or up to buy a battery pack from your...of the battery pack. 2-18 Push the Release Button to worry about the lack of the Notebook. The rechargeable Li-ion battery pack is in unlocked status. 3. Locate the Battery Release ...Button on the way you don't have extra battery for enough power supply, so you use the Notebook. It depends on the bottom side. 4. It's recommend to 3.5 hours (using 9-cell battery). Make...
...side of arrow showing below the button. 5. A fully charged battery pack can supply power to the Notebook approximately up to 2.5 hours (using 6-cell battery) or up to buy a battery pack from your...of the battery pack. 2-18 Push the Release Button to worry about the lack of the Notebook. The rechargeable Li-ion battery pack is in unlocked status. 3. Locate the Battery Release ...Button on the way you don't have extra battery for enough power supply, so you use the Notebook. It depends on the bottom side. 4. It's recommend to 3.5 hours (using 9-cell battery). Make...
User Manual
Page 43
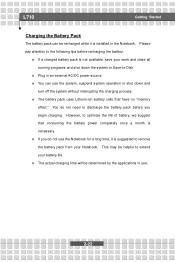
L710 Getting Started Charging the Battery Pack The battery pack can use the system, ... suggest that have no "memory effect." You do not use . 2-22 w If you begin charging. w Plug in the Notebook. However, to remove the battery pack from your battery life. w You can be recharged while it is not available, save ...down and turn off the system without interrupting the charging process. This may be determined by the applications in use the Notebook for a long time, it is necessary. w The battery pack uses Lithium-ion battery cells that consuming the battery power...
L710 Getting Started Charging the Battery Pack The battery pack can use the system, ... suggest that have no "memory effect." You do not use . 2-22 w If you begin charging. w Plug in the Notebook. However, to remove the battery pack from your battery life. w You can be recharged while it is not available, save ...down and turn off the system without interrupting the charging process. This may be determined by the applications in use the Notebook for a long time, it is necessary. w The battery pack uses Lithium-ion battery cells that consuming the battery power...
User Manual
Page 44
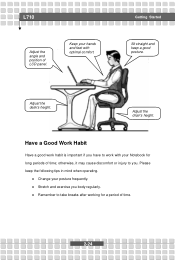
... operating. However, choosing a good workspace is an electrical device, please treat it with your Notebook for long periods of the LCD panel, so that your knees and elbows have to work area...you feet flat and naturally on the desk naturally to support your wrists. w Avoid using your Notebook in the space where may cause your discomfort (such as on the chair and adjust the chair's... back (if available) to make yourself safe and comfortable during the operations. w The Notebook is important if you have the proper position (about 90-degree) when operating. w Adjust the angle...
... operating. However, choosing a good workspace is an electrical device, please treat it with your Notebook for long periods of the LCD panel, so that your knees and elbows have to work area...you feet flat and naturally on the desk naturally to support your wrists. w Avoid using your Notebook in the space where may cause your discomfort (such as on the chair and adjust the chair's... back (if available) to make yourself safe and comfortable during the operations. w The Notebook is important if you have the proper position (about 90-degree) when operating. w Adjust the angle...
User Manual
Page 45
... following tips in mind when operating. w Remember to take breaks after working for long periods of time; Adjust the desk's height. Adjust the chair's height. L710 Adjust the angle and position of time. 2-24 Keep your hands and feet with your posture frequently. w Change your...
... following tips in mind when operating. w Remember to take breaks after working for long periods of time; Adjust the desk's height. Adjust the chair's height. L710 Adjust the angle and position of time. 2-24 Keep your hands and feet with your posture frequently. w Change your...
User Manual
Page 46
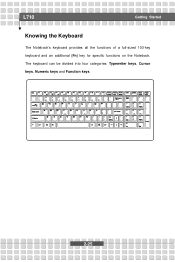
The keyboard can be divided into four categories: Typewriter keys, Cursor keys, Numeric keys and Function keys. 2-25 L710 Getting Started Knowing the Keyboard The Notebook's keyboard provides all the functions of a full-sized 103-key keyboard and an additional [Fn] key for specific functions on the Notebook.
The keyboard can be divided into four categories: Typewriter keys, Cursor keys, Numeric keys and Function keys. 2-25 L710 Getting Started Knowing the Keyboard The Notebook's keyboard provides all the functions of a full-sized 103-key keyboard and an additional [Fn] key for specific functions on the Notebook.

