

Quick Start Guide
Page 3
... How to Use User Scenario with Keyboard FN keys 22 General Settings...23 Game Highlights...24 Interface Overview...25 MSI Companion...26 Control tab...26 Display tab...27 Mystic Light ...28 Function Overview...28 Customizing personal LED Light Effect 29 Ambient Link...30 Network Requirements 30 Philips Hue Setup (optional 30 Nanoleaf Setup (optional 30 3 Content Copyright and Trademarks Notice 5 Revision History 5 Introduction...6 Login and Register 6 Create an...
... How to Use User Scenario with Keyboard FN keys 22 General Settings...23 Game Highlights...24 Interface Overview...25 MSI Companion...26 Control tab...26 Display tab...27 Mystic Light ...28 Function Overview...28 Customizing personal LED Light Effect 29 Ambient Link...30 Network Requirements 30 Philips Hue Setup (optional 30 Nanoleaf Setup (optional 30 3 Content Copyright and Trademarks Notice 5 Revision History 5 Introduction...6 Login and Register 6 Create an...

Quick Start Guide
Page 4
... use iOS Screen Mirroring 47 System Diagnosis...48 Battery Master...48 Battery Calibration...49 System Diagnosis...52 Performance Analysis...54 Hardware Diagnosis...56 Gaming Gear...59 Hardware Monitoring 60 Support...61 Live Update...61 Live Update...61 Microsoft APP...62 System Info...63 Service...65 Trouble Shooting and Knowledge Base 65 MSI Recovery...66 Go to WinPE to Use MSI Recovery 66 Create a MSI Rescue USB disk 67 Create a Customize Image Backup 70 Recovering...
... use iOS Screen Mirroring 47 System Diagnosis...48 Battery Master...48 Battery Calibration...49 System Diagnosis...52 Performance Analysis...54 Hardware Diagnosis...56 Gaming Gear...59 Hardware Monitoring 60 Support...61 Live Update...61 Live Update...61 Microsoft APP...62 System Info...63 Service...65 Trouble Shooting and Knowledge Base 65 MSI Recovery...66 Go to WinPE to Use MSI Recovery 66 Create a MSI Rescue USB disk 67 Create a Customize Image Backup 70 Recovering...

Quick Start Guide
Page 10
Move the mouse cursor to meet your personal needs. 10 In Feature Sets page, feel free to select, install or uninstall any MSI features listed to the [Feature Sets] icon at the upper right corner and click on it. 2. Feature Sets -- Experience the convenience that MSI Center brings to choose your favorite features in Feature Sets page. Choose Your Features Within the latest MSI Center, you are able to you! 1. Simply install or update your own style and features.
Move the mouse cursor to meet your personal needs. 10 In Feature Sets page, feel free to select, install or uninstall any MSI features listed to the [Feature Sets] icon at the upper right corner and click on it. 2. Feature Sets -- Experience the convenience that MSI Center brings to choose your favorite features in Feature Sets page. Choose Your Features Within the latest MSI Center, you are able to you! 1. Simply install or update your own style and features.

Quick Start Guide
Page 12
Mystic Light: Show Hotkey Lighting or Game Sense on Per Key RGB Keyboard for the best visual experience. 3. True Color: Switch True Color to ON or OFF in the game for you a superior gaming experience. System Performance: Switch to Extreme Performance mode, free up memory and prioritize your game to review or share. *Be noted, for palm resistance. 4. Gaming Mode MSI Gaming Mode provides...
Mystic Light: Show Hotkey Lighting or Game Sense on Per Key RGB Keyboard for the best visual experience. 3. True Color: Switch True Color to ON or OFF in the game for you a superior gaming experience. System Performance: Switch to Extreme Performance mode, free up memory and prioritize your game to review or share. *Be noted, for palm resistance. 4. Gaming Mode MSI Gaming Mode provides...

Quick Start Guide
Page 18
If [User Priority] mode is set to drag a specified App from SW List into Priority List. 5. Drag and drop the App into Priority List at the background. 2. Right click on the icon and hold the mouse button. Before using Smart Priority, make sure that the function SWITCH is selected, users are allowed to [ON], and all the Apps shown in the Priority List, they will...
If [User Priority] mode is set to drag a specified App from SW List into Priority List. 5. Drag and drop the App into Priority List at the background. 2. Right click on the icon and hold the mouse button. Before using Smart Priority, make sure that the function SWITCH is selected, users are allowed to [ON], and all the Apps shown in the Priority List, they will...

Quick Start Guide
Page 20
... between performance and battery. • Silent: A Silent mode that lowers the fan noise. • Super Battery: A Super Battery mode that boosts the highest performance for basic needs. 3. Select a proper User Scenario according to your own settings. 20 Go to make your needs. • Smart Auto: Switch to setup the Fan Speed by selecting [Advanced], and adjust the Fan Speed. 4. Follow the on-screen instructions to MSI Center [Features > User Scenario]. 2.
... between performance and battery. • Silent: A Silent mode that lowers the fan noise. • Super Battery: A Super Battery mode that boosts the highest performance for basic needs. 3. Select a proper User Scenario according to your own settings. 20 Go to make your needs. • Smart Auto: Switch to setup the Fan Speed by selecting [Advanced], and adjust the Fan Speed. 4. Follow the on-screen instructions to MSI Center [Features > User Scenario]. 2.

Quick Start Guide
Page 23
... model. 1. General Settings Go to MSI Center [Features > General Settings] and you can enable/disable some general settings in unplugged to prolong battery life. 7. HDR: Enable or disable the steaming HDR video function. 6. Display Power Saver: To lower the panel refresh rate when the power the in this page. WebCam: Enable or disable WebCam function 4. GPU Switch: Select MSHybrid Graphics Mode or Discrete Graphics Mode or Intergrated Graphics Mode. 5. USB Power Share: Enable or disable USB Power Share function. 8. Windows Key: Enable or disable Windows Key on the keyboard...
... model. 1. General Settings Go to MSI Center [Features > General Settings] and you can enable/disable some general settings in unplugged to prolong battery life. 7. HDR: Enable or disable the steaming HDR video function. 6. Display Power Saver: To lower the panel refresh rate when the power the in this page. WebCam: Enable or disable WebCam function 4. GPU Switch: Select MSHybrid Graphics Mode or Discrete Graphics Mode or Intergrated Graphics Mode. 5. USB Power Share: Enable or disable USB Power Share function. 8. Windows Key: Enable or disable Windows Key on the keyboard...
Quick Start Guide
Page 28
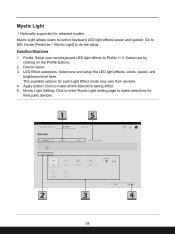
... Profile buttons. 2. Apply button: Click to make selections for each Light Effect mode may vary from devices. 4. Mystic Light Setting: Click to enter Mystic Light setting page to do the setup. Mystic Light allows users to Profile 1~3. Profile: Setup your own keyboard LED light effects to control keyboard LED light effects easier and quicker. Select one and setup the LED light effects, colors, speed, and brightness level here. The available options for third party devices. 28 Go to MSI...
... Profile buttons. 2. Apply button: Click to make selections for each Light Effect mode may vary from devices. 4. Mystic Light Setting: Click to enter Mystic Light setting page to do the setup. Mystic Light allows users to Profile 1~3. Profile: Setup your own keyboard LED light effects to control keyboard LED light effects easier and quicker. Select one and setup the LED light effects, colors, speed, and brightness level here. The available options for third party devices. 28 Go to MSI...

Quick Start Guide
Page 30
... re-enable these once setup is broadcasting a 2.4GHz network. 2. iOS Requirements: • iOS 9.0 or higher • Signed into iCould using WPA/WPA2 security. 3. Connect it will automatically power up , please forget your Hue bridge and add lights in setting up . 2. Network Requirements 1. Make sure your Hue bridge and it to complete the link setup. You can be disabled once the Light Panels are connected in...
... re-enable these once setup is broadcasting a 2.4GHz network. 2. iOS Requirements: • iOS 9.0 or higher • Signed into iCould using WPA/WPA2 security. 3. Connect it will automatically power up , please forget your Hue bridge and add lights in setting up . 2. Network Requirements 1. Make sure your Hue bridge and it to complete the link setup. You can be disabled once the Light Panels are connected in...

Quick Start Guide
Page 31
... 10 seconds until the LED turns on and steady. 4. Plug in your Light Panels will be connected to one Wifi network at a time. Release the two buttons, the LED stays on, and the controller remains on , and the controller starts flashing. 3. The following instructions will help users to enter Ambient Link control panel. 31 Enter Ambient Link Control Panel Go to MSI Center [Features > Ambient Link] to reset the Light Panels, so that during previous...
... 10 seconds until the LED turns on and steady. 4. Plug in your Light Panels will be connected to one Wifi network at a time. Release the two buttons, the LED stays on, and the controller remains on , and the controller starts flashing. 3. The following instructions will help users to enter Ambient Link control panel. 31 Enter Ambient Link Control Panel Go to MSI Center [Features > Ambient Link] to reset the Light Panels, so that during previous...

Quick Start Guide
Page 59
Connect MSI gaming gear to install necessary drivers, if needed. 4. Follow the on the device button to the devices connected. 1. Move the mouse cursor to the detected devices shown on this page, and click on -screen instructions to your notebook. You are connected to MSI Center [Features > Gaming Gear] 3. Go to your notebook. 2. Gaming Gear This page will only be available when MSI gaming gear or supported third-party devices are allowed to setup specific options to enter its setting page. 59
Connect MSI gaming gear to install necessary drivers, if needed. 4. Follow the on the device button to the devices connected. 1. Move the mouse cursor to the detected devices shown on this page, and click on -screen instructions to your notebook. You are connected to MSI Center [Features > Gaming Gear] 3. Go to your notebook. 2. Gaming Gear This page will only be available when MSI gaming gear or supported third-party devices are allowed to setup specific options to enter its setting page. 59

Quick Start Guide
Page 65
Go to get more information at MSI official website. 65 Move the mose cursor to click on [More] to MSI Center [Support > Service]. Users can find a list of frequently asked questions and answers, giving them possible instructions to solve basic situations. Service Trouble Shooting and Knowledge Base In Trouble Shooting and Knowledge Base page, user can search for related information by searching for the keywords in the search toolbar.
Go to get more information at MSI official website. 65 Move the mose cursor to click on [More] to MSI Center [Support > Service]. Users can find a list of frequently asked questions and answers, giving them possible instructions to solve basic situations. Service Trouble Shooting and Knowledge Base In Trouble Shooting and Knowledge Base page, user can search for related information by searching for the keywords in the search toolbar.

User Manual
Page 4
... How to Use the Touchpad 3-16 About HDD and SSD 3-17 About M.2 SSD Slot...3-17 How to Connect the Internet in Windows OS 3-18 Wireless LAN...3-18 Wired LAN...3-20 How to Set Up Bluetooth Connection in Windows OS 3-25 Activating Bluetooth Connection 3-25 How to Connect External Devices 3-28 How to Use USB Power Share Function (optional 3-29 Video: How to Use RAID Function (optional 3-30 Video: How to Use F3 Recovery on MSI notebook preloaded system (optional)........3-31 Video: How to Use Backup and System Restore with "MSI Center Pro" (optional)....3-32 1-4
... How to Use the Touchpad 3-16 About HDD and SSD 3-17 About M.2 SSD Slot...3-17 How to Connect the Internet in Windows OS 3-18 Wireless LAN...3-18 Wired LAN...3-20 How to Set Up Bluetooth Connection in Windows OS 3-25 Activating Bluetooth Connection 3-25 How to Connect External Devices 3-28 How to Use USB Power Share Function (optional 3-29 Video: How to Use RAID Function (optional 3-30 Video: How to Use F3 Recovery on MSI notebook preloaded system (optional)........3-31 Video: How to Use Backup and System Restore with "MSI Center Pro" (optional)....3-32 1-4
User Manual
Page 10
.../support/ for the detailed information about the acquisition of Replaceable Parts Please be noticed that you contact the authorized dealer or service center for product service information. Acquisition of spare parts. 1-10 Do not attempt to upgrade or replace any further information on the models users purchased. Upgrade and Warranty Please note that certain components, such as memory modules, HDD, SSD, ODD, and Bluetooth/WiFi...
.../support/ for the detailed information about the acquisition of Replaceable Parts Please be noticed that you contact the authorized dealer or service center for product service information. Acquisition of spare parts. 1-10 Do not attempt to upgrade or replace any further information on the models users purchased. Upgrade and Warranty Please note that certain components, such as memory modules, HDD, SSD, ODD, and Bluetooth/WiFi...
User Manual
Page 23
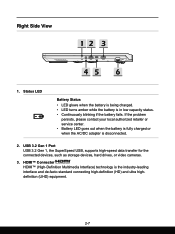
USB 3.2 Gen 1 Port USB 3.2 Gen 1, the SuperSpeed USB, supports high-speed data transfer for the connected devices, such as storage devices, hard drives, or video cameras. 3. Right Side View 1. HDMI™ Connector HDMI™ (High-Definition Multimedia Interface) technology is disconnected. 2. If the problem persists, please contact your local authorized retailer or service center. • Battery LED goes out when the battery is fully charged or when the AC/DC adapter is...
USB 3.2 Gen 1 Port USB 3.2 Gen 1, the SuperSpeed USB, supports high-speed data transfer for the connected devices, such as storage devices, hard drives, or video cameras. 3. Right Side View 1. HDMI™ Connector HDMI™ (High-Definition Multimedia Interface) technology is disconnected. 2. If the problem persists, please contact your local authorized retailer or service center. • Battery LED goes out when the battery is fully charged or when the AC/DC adapter is...

User Manual
Page 30
... Lock LED indicator, located on : Quick FN Launch Keys enabled. Webcam • Press to turn ON/ OFF the Webcam function on F1 to learn the function status. LED on the ESC keycap, to F12, has a built-in MSI Center. 2-14 Microphone • Press to enable or disable the microphone function. • Microphone is equipped with an easy single press. • Users are allowed to enable or disable the touchpad function. Introductions Enable Quick Fn Launch Keys • This notebook...
... Lock LED indicator, located on : Quick FN Launch Keys enabled. Webcam • Press to turn ON/ OFF the Webcam function on F1 to learn the function status. LED on the ESC keycap, to F12, has a built-in MSI Center. 2-14 Microphone • Press to enable or disable the microphone function. • Microphone is equipped with an easy single press. • Users are allowed to enable or disable the touchpad function. Introductions Enable Quick Fn Launch Keys • This notebook...

User Manual
Page 32
... the second screen from the selections of PC screen only, Duplicate, Extend, and Second screen only. 2-16 Users will automatically detect the external monitor connected. Crosshair • Enable or disable the Crosshair function, provided by MSI + Center. • To use this function, it is required to turn OFF the screen. Media Switch + Use both keys to switch PLAY/ PAUSE of the notebook. Introductions Cooler Boost Use both keys to maximize the fan speed to...
... the second screen from the selections of PC screen only, Duplicate, Extend, and Second screen only. 2-16 Users will automatically detect the external monitor connected. Crosshair • Enable or disable the Crosshair function, provided by MSI + Center. • To use this function, it is required to turn OFF the screen. Media Switch + Use both keys to switch PLAY/ PAUSE of the notebook. Introductions Cooler Boost Use both keys to maximize the fan speed to...

User Manual
Page 40
... the different version of hardware and system settings that manages how your needs. 8. Choose or Customize a Power Plan 1. Open up [All Control Panel Items] window. Change settings for the plan selected in Windows OS * For selected models with performance. Power plans can modify settings for reference only, they may be varied depending on -screen instructions to continue. 5. Select [Power Options] to finish the configurations. 3-6 Click on [Restore plan defaults]. 9. A power plan is selected...
... the different version of hardware and system settings that manages how your needs. 8. Choose or Customize a Power Plan 1. Open up [All Control Panel Items] window. Change settings for the plan selected in Windows OS * For selected models with performance. Power plans can modify settings for reference only, they may be varied depending on -screen instructions to continue. 5. Select [Power Options] to finish the configurations. 3-6 Click on [Restore plan defaults]. 9. A power plan is selected...
User Manual
Page 44
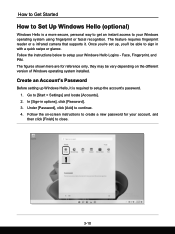
... [Password], click [Add] to [Start > Settings] and locate [Accounts]. 2. Create an Account's Password Before setting up , you 're set up Windows Hello, it . How to Get Started How to Set Up Windows Hello (optional) Windows Hello is required to setup the account's password. 1. Go to continue. 4. The feature requires fingerprint reader or a infrared camera that supports it is a more secure, personal way to get an instant access to your Windows operating system using...
... [Password], click [Add] to [Start > Settings] and locate [Accounts]. 2. Create an Account's Password Before setting up , you 're set up Windows Hello, it . How to Get Started How to Set Up Windows Hello (optional) Windows Hello is required to setup the account's password. 1. Go to continue. 4. The feature requires fingerprint reader or a infrared camera that supports it is a more secure, personal way to get an instant access to your Windows operating system using...

User Manual
Page 63
... connect AC power to the notebook before using this function under AC or DC mode in AC mode under default settings; USB Power Share function will only be optionally supported USB Power Share function via Type-A USB ports, providing portable charging power output for reference only. 3-29 Users are for various USB devices, such as AC/ DC mode is always suggested to use the official authorized cable to perform this function. 2. therefore, it may be available in BIOS settings; How to Use USB Power...
... connect AC power to the notebook before using this function under AC or DC mode in AC mode under default settings; USB Power Share function will only be optionally supported USB Power Share function via Type-A USB ports, providing portable charging power output for reference only. 3-29 Users are for various USB devices, such as AC/ DC mode is always suggested to use the official authorized cable to perform this function. 2. therefore, it may be available in BIOS settings; How to Use USB Power...


