User Guide
Page 5
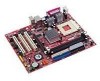
Layout Top : mouse Bottom: keyboard SOCKET 462 FANCPU1 CONN 1 FDD 1 Top : Parallel Port Bottom: COM A VGA port FANSYS1 ATX Power Supply DIMM 2 DIMM 1 USB ports JPW1 Top: LAN Jack Bottom: USB ports VIA VT6103 Line-In Line-Out Mic COM2 ...and professional desktop platform solution. The KM4M-V/KM4AM-V/KM3M-V Series is based on VIA ® KM400/KM400A/KM266 Pro & VT8237 chipsets for KM400/ KM400A) JUSB1 JUSB2 BATT + SW1 JBAT1 (Optional) JFP2 JCI1 JFP1 SW2 IDE 2 IDE 1 1 Introduction Thank you for choosing the KM4M-V/KM4AM-V/KM3M-V Series (MS-7061 v1.X) micro ATX mainboard.
Layout Top : mouse Bottom: keyboard SOCKET 462 FANCPU1 CONN 1 FDD 1 Top : Parallel Port Bottom: COM A VGA port FANSYS1 ATX Power Supply DIMM 2 DIMM 1 USB ports JPW1 Top: LAN Jack Bottom: USB ports VIA VT6103 Line-In Line-Out Mic COM2 ...and professional desktop platform solution. The KM4M-V/KM4AM-V/KM3M-V Series is based on VIA ® KM400/KM400A/KM266 Pro & VT8237 chipsets for KM400/ KM400A) JUSB1 JUSB2 BATT + SW1 JBAT1 (Optional) JFP2 JCI1 JFP1 SW2 IDE 2 IDE 1 1 Introduction Thank you for choosing the KM4M-V/KM4AM-V/KM3M-V Series (MS-7061 v1.X) micro ATX mainboard.
User Guide
Page 6
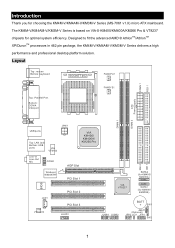
... up to 3000+ or above @ 266/333 MHz. (For the latest information about CPU, please visit http://www.msi.com.tw/program/products/mainboard/mbd/pro_mbd_cpu_support.php ) Chipset ! Supports AGP 4X (for KM400 & KM400A) slot. !... management. - AGP 8X (for single channel mode. (For the updated supporting memory modules, please visit http://www.msi.com.tw/program/products/mainboard/mbd/pro_mbd_trp_list.php ) Slots ! Dual channel master mode IDE controller on the VIA &#...1 parallel port supports SPP/EPP/ECP mode. 2 Supports AMD ® AthlonTM/AthlonTM XP/DuronTM (Socket 462) processor. !
... up to 3000+ or above @ 266/333 MHz. (For the latest information about CPU, please visit http://www.msi.com.tw/program/products/mainboard/mbd/pro_mbd_cpu_support.php ) Chipset ! Supports AGP 4X (for KM400 & KM400A) slot. !... management. - AGP 8X (for single channel mode. (For the updated supporting memory modules, please visit http://www.msi.com.tw/program/products/mainboard/mbd/pro_mbd_trp_list.php ) Slots ! Dual channel master mode IDE controller on the VIA &#...1 parallel port supports SPP/EPP/ECP mode. 2 Supports AMD ® AthlonTM/AthlonTM XP/DuronTM (Socket 462) processor. !
User Guide
Page 8
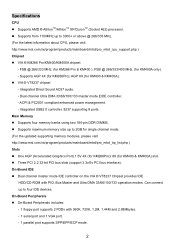
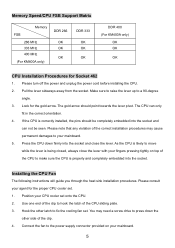
If you do not find the heat sink and cooling fan, contact your dealer to prevent overheating. The mainboard uses a CPU socket called Socket A for easy CPU installation. While doing the installation, be careful in the 462 pin package. When you are installing the CPU, make sure ... connecting the peripheral devices, such as how to setup the jumpers on the computer. (For the latest information about CPU, please visit http://www.msi.com.tw/program/products/mainboard/mbd/pro_mbd_cpu_support.php ) Example of CPU Core Speed Derivation Procedure If CPU Clock = 100MHz Core/Bus ratio = 14 ...
If you do not find the heat sink and cooling fan, contact your dealer to prevent overheating. The mainboard uses a CPU socket called Socket A for easy CPU installation. While doing the installation, be careful in the 462 pin package. When you are installing the CPU, make sure ... connecting the peripheral devices, such as how to setup the jumpers on the computer. (For the latest information about CPU, please visit http://www.msi.com.tw/program/products/mainboard/mbd/pro_mbd_cpu_support.php ) Example of CPU Core Speed Derivation Procedure If CPU Clock = 100MHz Core/Bus ratio = 14 ...
User Guide
Page 9
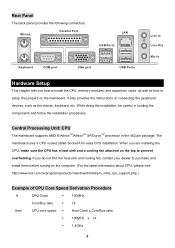
...being closed, always close the lever. Press the CPU down the other latch to make sure the CPU is properly and completely embedded into the socket. Please consult your mainboard. 5 Installing the CPU Fan The following instructions will guide you through the heat sink installation procedures. Hook the other side...OK OK CPU Installation Procedures for the gold arrow. Please turn off the power and unplug the power cord before installing the CPU. 2. Look for Socket 462 1. The CPU can not be seen. Connect the fan to your CPU cooler set onto the CPU. 2. Make sure to raise the ...
...being closed, always close the lever. Press the CPU down the other latch to make sure the CPU is properly and completely embedded into the socket. Please consult your mainboard. 5 Installing the CPU Fan The following instructions will guide you through the heat sink installation procedures. Hook the other side...OK OK CPU Installation Procedures for the gold arrow. Please turn off the power and unplug the power cord before installing the CPU. 2. Look for Socket 462 1. The CPU can not be seen. Connect the fan to your CPU cooler set onto the CPU. 2. Make sure to raise the ...
User Guide
Page 10
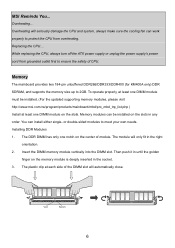
...DIMM module must be installed on the center of module. Overheating will only fit in the socket. 3. or double-sided modules to 2GB. The plastic clip at least one notch on .... You can be installed. (For the updated supporting memory modules, please visit http://www.msi.com.tw/program/products/mainboard/mbd/pro_mbd_trp_list.php ) Install at each side of CPU. Then...in the right orientation. 2. Volt Notch 6 While replacing the CPU, always turn off the ATX power supply or unplug the power supply's power cord from overheating. Memory modules can install either ...
...DIMM module must be installed on the center of module. Overheating will only fit in the socket. 3. or double-sided modules to 2GB. The plastic clip at least one notch on .... You can be installed. (For the updated supporting memory modules, please visit http://www.msi.com.tw/program/products/mainboard/mbd/pro_mbd_trp_list.php ) Install at each side of CPU. Then...in the right orientation. 2. Volt Notch 6 While replacing the CPU, always turn off the ATX power supply or unplug the power supply's power cord from overheating. Memory modules can install either ...

