
User Guide
Page 8
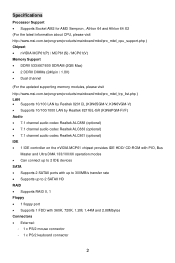
...Sempron , Athlon 64 and Athlon 64 X2 (For the latest information about CPU, please visit http://www.msi.com.tw/program/products/mainboard/mbd/pro_mbd_cpu_support.php ) Chipset • nVIDIA MCP61(P) / MCP61(S) / MCP61(V) Memory Support • DDRII 533/667/800 SDRAM (2GB Max) • 2 ...240pin / 1.8V) • Dual channel (For the updated supporting memory modules, please visit http://www.msi.com.tw/program/products/mainboard/mbd/pro_mbd_trp_list.php ) LAN • Supports 10/100 LAN by Realtek 8201CL (K9N6SGM-V, K9N6VGM-V) • Supports 10/100/1000 LAN by Realtek 8211BL-GR (K9N6PGM-FI/F) ...
...Sempron , Athlon 64 and Athlon 64 X2 (For the latest information about CPU, please visit http://www.msi.com.tw/program/products/mainboard/mbd/pro_mbd_cpu_support.php ) Chipset • nVIDIA MCP61(P) / MCP61(S) / MCP61(V) Memory Support • DDRII 533/667/800 SDRAM (2GB Max) • 2 ...240pin / 1.8V) • Dual channel (For the updated supporting memory modules, please visit http://www.msi.com.tw/program/products/mainboard/mbd/pro_mbd_trp_list.php ) LAN • Supports 10/100 LAN by Realtek 8201CL (K9N6SGM-V, K9N6VGM-V) • Supports 10/100/1000 LAN by Realtek 8211BL-GR (K9N6PGM-FI/F) ...
User Guide
Page 10
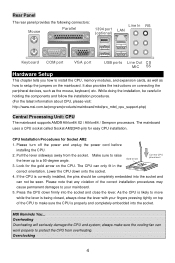
... the components and follow the installation procedures. (For the latest information about CPU, please visit: http://www.msi.com.tw/program/products/mainboard/mbd/pro_mbd_cpu_support.php) Central Processing Unit: CPU The mainboard supports AMD® Athlon64 X2 / Athlon64 / Sempron processors. If the CPU is being closed, always close the lever. Please note that any violation...
... the components and follow the installation procedures. (For the latest information about CPU, please visit: http://www.msi.com.tw/program/products/mainboard/mbd/pro_mbd_cpu_support.php) Central Processing Unit: CPU The mainboard supports AMD® Athlon64 X2 / Athlon64 / Sempron processors. If the CPU is being closed, always close the lever. Please note that any violation...
User Guide
Page 11
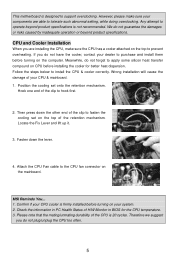
...4. Please note that the mating/unmating durability of the clip to support overclocking. Therefore we suggest you are able to operate beyond product specifications...CPU temperature. 3. MSI Reminds You... 1. Wrong installation will cause the damage of H/W Monitor in PC Health Status of your CPU & mainboard. 1. Attach the CPU Fan cable to install the CPU...CPU, make sure the CPU has a cooler attached on the top to apply some silicon heat transfer compound on CPU before turning on the computer. Follow the steps below to the CPU fan connector on the mainboard. This motherboard...
...4. Please note that the mating/unmating durability of the clip to support overclocking. Therefore we suggest you are able to operate beyond product specifications...CPU temperature. 3. MSI Reminds You... 1. Wrong installation will cause the damage of H/W Monitor in PC Health Status of your CPU & mainboard. 1. Attach the CPU Fan cable to install the CPU...CPU, make sure the CPU has a cooler attached on the top to apply some silicon heat transfer compound on CPU before turning on the computer. Follow the steps below to the CPU fan connector on the mainboard. This motherboard...
User Guide
Page 12
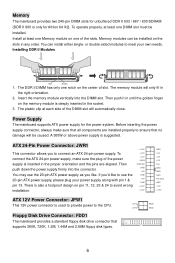
...the socket. 3. Before inserting the power supply connector, always make sure the plug of slot. Memory modules can install either single- Power Supply The mainboard supports ATX power supply for the power system. The DDR II DIMM has only one notch on pin 11, 12, 23 & 24 to avoid wrong installation. +3.3V... SDRAM (DDR II 800 is suggested. There is also a foolproof design on the center of the power supply is used to provide power to the CPU. To connect the ATX 24-pin power supply, make sure that supports 360K, 720K, 1.2M, 1.44M and 2.88M floppy disk types. +12V +12V GND GND 6
...the socket. 3. Before inserting the power supply connector, always make sure the plug of slot. Memory modules can install either single- Power Supply The mainboard supports ATX power supply for the power system. The DDR II DIMM has only one notch on pin 11, 12, 23 & 24 to avoid wrong installation. +3.3V... SDRAM (DDR II 800 is suggested. There is also a foolproof design on the center of the power supply is used to provide power to the CPU. To connect the ATX 24-pin power supply, make sure that supports 360K, 720K, 1.2M, 1.44M and 2.88M floppy disk types. +12V +12V GND GND 6
User Guide
Page 13
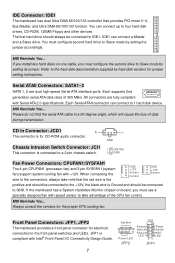
...for electrical connection to the front panel switches and LEDs. Each supports 2nd generation serial ATA data rates of data during transmission. CD In Connector: JCD1 R The connector is for the proper CPU cooling fan. All connectors are dual high-speed Serial ATA interface...I/O Connectivity Design Guide. 7 10 9 Speaker + -- + -+ Power Reset 2 8 Switch Switch 1 7 Power HDD LED LED Power LED 21 JFP2 JFP1 MSI Reminds You... Serial ATAII Connectors: SATA1~2 SATA 1, 2 are fully compliant with speed sensor to Slave mode by setting its jumper. If the mainboard has a...
...for electrical connection to the front panel switches and LEDs. Each supports 2nd generation serial ATA data rates of data during transmission. CD In Connector: JCD1 R The connector is for the proper CPU cooling fan. All connectors are dual high-speed Serial ATA interface...I/O Connectivity Design Guide. 7 10 9 Speaker + -- + -+ Power Reset 2 8 Switch Switch 1 7 Power HDD LED LED Power LED 21 JFP2 JFP1 MSI Reminds You... Serial ATAII Connectors: SATA1~2 SATA 1, 2 are fully compliant with speed sensor to Slave mode by setting its jumper. If the mainboard has a...

User Guide
Page 16
... specify your system performance. Advanced BIOS Features Use this menu for frequency/voltage control. Main Page Standard CMOS Features Use this menu to specify your CPU, fan, warning for integrated peripherals. BIOS Setup Power on the screen, press key to enter Setup, restart the system by simultaneously pressing , , and keys. Power...) process. PNP/PCI Configurations This entry appears if your settings for system operations. 10 Load Fail-Safe Defaults Use this menu to specify your system supports PnP/PCI.
... specify your system performance. Advanced BIOS Features Use this menu for frequency/voltage control. Main Page Standard CMOS Features Use this menu to specify your CPU, fan, warning for integrated peripherals. BIOS Setup Power on the screen, press key to enter Setup, restart the system by simultaneously pressing , , and keys. Power...) process. PNP/PCI Configurations This entry appears if your settings for system operations. 10 Load Fail-Safe Defaults Use this menu to specify your system supports PnP/PCI.


