
User Guide
Page 34
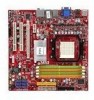
...settings for the expansion card to 2.0 GB/s transfer rate. The PCI Express x 8 supports up to the PCI bus pins as jumpers, switches or BIOS configuration. Meanwhile, read the documentation for the expansion card, such as follows: PCI Slot 1 PCI Slot 2 Order 1 INT X# INT W# Order 2... Interrupt Request Routing The IRQ, acronym of interrupt request line and pronounced I-R-Q, are typically connected to 4.0 GB/s transfer rate. MS-7508 Mainboard Slots PCI-E (Peripheral Component Interconnect-Express) Slot The PCI Express slot supports the PCI Express interface expansion card.
...settings for the expansion card to 2.0 GB/s transfer rate. The PCI Express x 8 supports up to the PCI bus pins as jumpers, switches or BIOS configuration. Meanwhile, read the documentation for the expansion card, such as follows: PCI Slot 1 PCI Slot 2 Order 1 INT X# INT W# Order 2... Interrupt Request Routing The IRQ, acronym of interrupt request line and pronounced I-R-Q, are typically connected to 4.0 GB/s transfer rate. MS-7508 Mainboard Slots PCI-E (Peripheral Component Interconnect-Express) Slot The PCI Express slot supports the PCI Express interface expansion card.
User Guide
Page 36
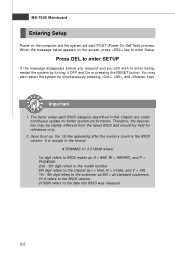
.... Important 1. Upon boot-up, the 1st line appearing after the memory count is usually in this BIOS was released. 3-2 MS-7508 Mainboard Entering Setup Power on the screen, press key to enter Setup. Therefore, the description may also restart the system by turning it... OFF and On or pressing the RESET button. V1.0 refers to the BIOS version. 013008 refers to enter Setup, restart the system by simultaneously pressing , ...
.... Important 1. Upon boot-up, the 1st line appearing after the memory count is usually in this BIOS was released. 3-2 MS-7508 Mainboard Entering Setup Power on the screen, press key to enter Setup. Therefore, the description may also restart the system by turning it... OFF and On or pressing the RESET button. V1.0 refers to the BIOS version. 013008 refers to enter Setup, restart the system by simultaneously pressing , ...
User Guide
Page 38
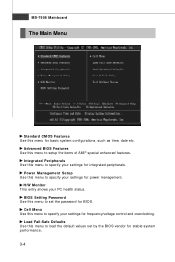
...load the default values set the password for BIOS. H/W Monitor This entry shows your settings for frequency/voltage control and overclocking. Load Fail-Safe Defaults Use this menu to specify your settings for integrated peripherals. MS-7508 Mainboard The Main Menu Standard CMOS Features ...Use this menu to set by the BIOS vendor for stable system performance. 3-4 BIOS Setting Password Use this menu for basic system configurations, such as time,...
...load the default values set the password for BIOS. H/W Monitor This entry shows your settings for frequency/voltage control and overclocking. Load Fail-Safe Defaults Use this menu to specify your settings for integrated peripherals. MS-7508 Mainboard The Main Menu Standard CMOS Features ...Use this menu to set by the BIOS vendor for stable system performance. 3-4 BIOS Setting Password Use this menu for basic system configurations, such as time,...
User Guide
Page 40
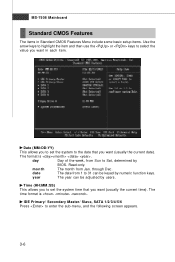
... (usually the current time). date The date from Sun to Sat, determined by BIOS. Time (HH:MM :SS) This allows you to 31 can be keyed by users. year The year can be adjusted by numeric function keys. MS-7508 Mainboard Standard CMOS Features The items in each item. day Day of the...
... (usually the current time). date The date from Sun to Sat, determined by BIOS. Time (HH:MM :SS) This allows you to 31 can be keyed by users. year The year can be adjusted by numeric function keys. MS-7508 Mainboard Standard CMOS Features The items in each item. day Day of the...

User Guide
Page 42
MS-7508 Mainboard System Information Press to enter the sub-menu, and the following screen appears. This sub-menu shows the CPU information, BIOS version and memory status of your system (read only). 3-8
MS-7508 Mainboard System Information Press to enter the sub-menu, and the following screen appears. This sub-menu shows the CPU information, BIOS version and memory status of your system (read only). 3-8
User Guide
Page 48
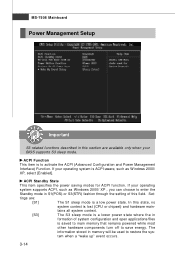
MS-7508 Mainboard Power Management Setup Important S3-related functions described in this section are : [S1] The S1 sleep mode is to restore the system when a "wake ...(POS) or S3(STR) fashion through the setting of system configuration and open applications/files is lost (CPU or chipset) and hardware main- If your BIOS supports S3 sleep mode. The information stored in formation of this state, no system context is saved to main memory that remains powered while most...
MS-7508 Mainboard Power Management Setup Important S3-related functions described in this section are : [S1] The S1 sleep mode is to restore the system when a "wake ...(POS) or S3(STR) fashion through the setting of system configuration and open applications/files is lost (CPU or chipset) and hardware main- If your BIOS supports S3 sleep mode. The information stored in formation of this state, no system context is saved to main memory that remains powered while most...

User Guide
Page 58
... up confirming the password will appear on the screen: Type the password, up to six characters in length, and press . Retype the password and press . MS-7508 Mainboard BIOS Setting Password W hen you select this function, a message as below will be disabled. You may also press to confirm the password. To clear a set...
... up confirming the password will appear on the screen: Type the password, up to six characters in length, and press . Retype the password and press . MS-7508 Mainboard BIOS Setting Password W hen you select this function, a message as below will be disabled. You may also press to confirm the password. To clear a set...

User Guide
Page 86
... that you have set up . 3. Use the arrow keys to select the array that you want to wipe out all the data from the RAID BIOS, the next step is to wipe out all its contents then press C. 5. MS-7508 Mainboard Completing the RAID BIOS Setup 1. After assigning your RAID array disks, press F7.
... that you have set up . 3. Use the arrow keys to select the array that you want to wipe out all the data from the RAID BIOS, the next step is to wipe out all its contents then press C. 5. MS-7508 Mainboard Completing the RAID BIOS Setup 1. After assigning your RAID array disks, press F7.
User Guide
Page 104
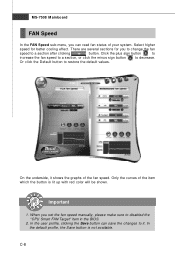
C-8 Or click the Default button to disabled the "CPU Smart FAN Target" item in the BIOS. 2. When you set the fan speed manually, please make sure to restore the default values. Select higher speed for you to change the fan speed ... fan speed to a section, or click the minus sign button to decrease. Only the curves of the item which the button is not available. Important 1. MS-7508 Mainboard FAN Speed In the FAN Speed sub-menu, you can save the changes to it shows the graphs of the fan speed.
C-8 Or click the Default button to disabled the "CPU Smart FAN Target" item in the BIOS. 2. When you set the fan speed manually, please make sure to restore the default values. Select higher speed for you to change the fan speed ... fan speed to a section, or click the minus sign button to decrease. Only the curves of the item which the button is not available. Important 1. MS-7508 Mainboard FAN Speed In the FAN Speed sub-menu, you can save the changes to it shows the graphs of the fan speed.


