
User Guide
Page 4
... instructions carefully. 2. Lay this User's Manual for technical guide, BIOS updates, driver updates, and other information: http://www.msi.com.tw & http://www.msi. Do not cover the openings. 6. fore connecting the equipment to moisture. Do not place anything over the power cord. 8. h The equipment has dropped and damaged. iv com.tw/program/service/faq/faq/esc_faq_list.php h Contact our technical staff at: support@msi...
... instructions carefully. 2. Lay this User's Manual for technical guide, BIOS updates, driver updates, and other information: http://www.msi.com.tw & http://www.msi. Do not cover the openings. 6. fore connecting the equipment to moisture. Do not place anything over the power cord. 8. h The equipment has dropped and damaged. iv com.tw/program/service/faq/faq/esc_faq_list.php h Contact our technical staff at: support@msi...
User Guide
Page 5
...Recommended Memory Combination List 2-8 Installing DDR Modules 2-9 Power Supply 2-10 ATX 20-Pin Power Connector: ATX1 2-10 ATX 12V Power Connector: JPW1 2-10 Important Notification about Power Issue 2-11 Back Panel ...2-12 Mouse Connector (Green) / Keyboard Connector (Purple 2-12 IEEE1394 Port (Optional 2-12 Serial Port Connector 2-13 USB Connectors 2-13 LAN (RJ-45) Jack 2-14 Audio Port Connectors 2-14 Parallel Port Connector: LPT1 2-15 Connectors ...2-16 Floppy Disk Drive Connector: FDD1 2-16 Fan Power Connectors: CPUFAN1 / SFAN1 / SFAN2 / NBFAN1 2-16 Hard Disk Connectors: IDE1...
...Recommended Memory Combination List 2-8 Installing DDR Modules 2-9 Power Supply 2-10 ATX 20-Pin Power Connector: ATX1 2-10 ATX 12V Power Connector: JPW1 2-10 Important Notification about Power Issue 2-11 Back Panel ...2-12 Mouse Connector (Green) / Keyboard Connector (Purple 2-12 IEEE1394 Port (Optional 2-12 Serial Port Connector 2-13 USB Connectors 2-13 LAN (RJ-45) Jack 2-14 Audio Port Connectors 2-14 Parallel Port Connector: LPT1 2-15 Connectors ...2-16 Floppy Disk Drive Connector: FDD1 2-16 Fan Power Connectors: CPUFAN1 / SFAN1 / SFAN2 / NBFAN1 2-16 Hard Disk Connectors: IDE1...
User Guide
Page 6
...4-5 Software Access Point 4-6 Terminology 4-6 Access Point Mode 4-7 WLAN Card Mode 4-8 Live Update ...4-9 MEGA STICK ...4-10 Basic Function 4-10 Non-Unicode programs supported 4-12 Core Center (for AMD K8 Processor 4-14 vi BIOS Setup 3-1 Entering Setup ...3-2 Selecting the First Boot Device 3-2 Control Keys 3-3 Getting Help 3-3 The Main Menu 3-4 Standard CMOS Features 3-6 Advanced BIOS Features 3-8 Advanced Chipset Features 3-11 Integrated Peripherals 3-12 Power Management Setup 3-17 PNP/PCI Configurations 3-20 H/W Monitor ...3-22 Cell Menu ...3-23 Load Fail-Safe/Optimized...
...4-5 Software Access Point 4-6 Terminology 4-6 Access Point Mode 4-7 WLAN Card Mode 4-8 Live Update ...4-9 MEGA STICK ...4-10 Basic Function 4-10 Non-Unicode programs supported 4-12 Core Center (for AMD K8 Processor 4-14 vi BIOS Setup 3-1 Entering Setup ...3-2 Selecting the First Boot Device 3-2 Control Keys 3-3 Getting Help 3-3 The Main Menu 3-4 Standard CMOS Features 3-6 Advanced BIOS Features 3-8 Advanced Chipset Features 3-11 Integrated Peripherals 3-12 Power Management Setup 3-17 PNP/PCI Configurations 3-20 H/W Monitor ...3-22 Cell Menu ...3-23 Load Fail-Safe/Optimized...
User Guide
Page 7
... Driver & Utility 6-1 Driver Installation 6-2 NVIDIA nForce3 System Driver 6-2 Realtek AC97 Audio Driver 6-5 Utility Installation 6-6 vii Installation of RAID Configurations 5-2 RAID Configuration 5-3 Basic Configuration Instructions 5-3 Setting Up the NVRAID BIOS 5-3 NVIDIA RAID Untility Installation 5-7 Installing the RAID Driver (for bootable RAID Array 5-7 Installing the NVIDIA RAID Software Under Windows (for Non-bootable RAID Array 5-8 Initializing and Using the Disk Array 5-9 RAID Drives Management 5-11 Viewing RAID Array Configurations 5-11 Setting Up a Spare RAID...
... Driver & Utility 6-1 Driver Installation 6-2 NVIDIA nForce3 System Driver 6-2 Realtek AC97 Audio Driver 6-5 Utility Installation 6-6 vii Installation of RAID Configurations 5-2 RAID Configuration 5-3 Basic Configuration Instructions 5-3 Setting Up the NVRAID BIOS 5-3 NVIDIA RAID Untility Installation 5-7 Installing the RAID Driver (for bootable RAID Array 5-7 Installing the NVIDIA RAID Software Under Windows (for Non-bootable RAID Array 5-8 Initializing and Using the Disk Array 5-9 RAID Drives Management 5-11 Viewing RAID Array Configurations 5-11 Setting Up a Spare RAID...
User Guide
Page 9
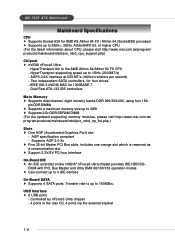
... slot. MS-7025 ATX Mainboard Mainboard Specifications CPU h Supports Socket-939 for four drives - Dual Fast ATA-133 IDE controllers Main Memory h Supports dual channel, eight memory banks DDR 266/333/400, using four 184- Controlled by nForce3 Ultra chipset - 4 ports in the rear I/O, 4 ports via the external bracket 1-2 AGP3.0 8X interface at 533 MT/s (million transfers per second) - ROM with PIO, Bus Master and Ultra DMA 66/100/133 operation modes h Can connect up to 4 IDE devices On-Board SATA h Supports 4 SATA ports...
... slot. MS-7025 ATX Mainboard Mainboard Specifications CPU h Supports Socket-939 for four drives - Dual Fast ATA-133 IDE controllers Main Memory h Supports dual channel, eight memory banks DDR 266/333/400, using four 184- Controlled by nForce3 Ultra chipset - 4 ports in the rear I/O, 4 ports via the external bracket 1-2 AGP3.0 8X interface at 533 MT/s (million transfers per second) - ROM with PIO, Bus Master and Ultra DMA 66/100/133 operation modes h Can connect up to 4 IDE devices On-Board SATA h Supports 4 SATA ports...
User Guide
Page 10
h Supports boot from LAN, USB Device 1.1 & 2.0, and SATA HDD. 1-3 Getting Started NV RAID (Software) h Supports up to 4 SATA and 4 ATA133 Hard drives - RAID function available for ATA133+SATA H/D drives LAN h Supports dual LAN jacks - 1st LAN supports 10/100/1000 Fast Ethernet by Marvell 88E1111 or Realtek 8201B/CL PHY - 2nd LAN supports 10/100/1000 Fast Ethernet by Realtek ALC850 (7.1 ch H/W audio) - Transfer rate is supported - Direct Sound AC97 audio - 7.1 Channel output - 1 CD-In On-Board Peripherals h On-Board Peripherals include: - 1 floppy port supports 1 FDD...
h Supports boot from LAN, USB Device 1.1 & 2.0, and SATA HDD. 1-3 Getting Started NV RAID (Software) h Supports up to 4 SATA and 4 ATA133 Hard drives - RAID function available for ATA133+SATA H/D drives LAN h Supports dual LAN jacks - 1st LAN supports 10/100/1000 Fast Ethernet by Marvell 88E1111 or Realtek 8201B/CL PHY - 2nd LAN supports 10/100/1000 Fast Ethernet by Realtek ALC850 (7.1 ch H/W audio) - Transfer rate is supported - Direct Sound AC97 audio - 7.1 Channel output - 1 CD-In On-Board Peripherals h On-Board Peripherals include: - 1 floppy port supports 1 FDD...
User Guide
Page 20
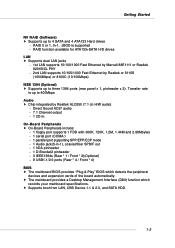
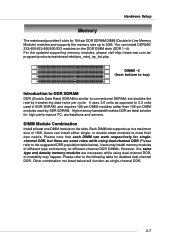
... the updated supporting memory modules, please visit http://www.msi.com.tw/ program/products/mainboard/mbd/pro_mbd_trp_list.php. Hardware Setup Memory The mainboard provides 4 slots for 184-pin DDR SDRAM DIMM (Double In-Line Memory Module) modules and supports the memory size up to a maximum size of different type and density on different-channel DDR DIMMs. However, the same type and density memory modules are some rules while using dual-channel DDR...
... the updated supporting memory modules, please visit http://www.msi.com.tw/ program/products/mainboard/mbd/pro_mbd_trp_list.php. Hardware Setup Memory The mainboard provides 4 slots for 184-pin DDR SDRAM DIMM (Double In-Line Memory Module) modules and supports the memory size up to a maximum size of different type and density on different-channel DDR DIMMs. However, the same type and density memory modules are some rules while using dual-channel DDR...

User Guide
Page 38
... jumpers, switches or BIOS configuration. The slot supports 8x/4x AGP card. PCI Slots PCI Interrupt Request Routing The IRQ, acronym of 3D graphics. Meanwhile, read the documentation for the expansion card to make sure that you unplug the power supply first. Hardware Setup Slots The mainboard provides one AGP slot and five 32-bit PCI bus slots. AGP (Accelerated Graphics Port) Slot The AGP slot allows you to directly access main memory. The orange PCI slot (PCI5) also works as follows: PCI Slot 1 PCI Slot 2 PCI Slot 3 PCI Slot 4 PCI Slot...
... jumpers, switches or BIOS configuration. The slot supports 8x/4x AGP card. PCI Slots PCI Interrupt Request Routing The IRQ, acronym of 3D graphics. Meanwhile, read the documentation for the expansion card to make sure that you unplug the power supply first. Hardware Setup Slots The mainboard provides one AGP slot and five 32-bit PCI bus slots. AGP (Accelerated Graphics Port) Slot The AGP slot allows you to directly access main memory. The orange PCI slot (PCI5) also works as follows: PCI Slot 1 PCI Slot 2 PCI Slot 3 PCI Slot 4 PCI Slot...
User Guide
Page 40
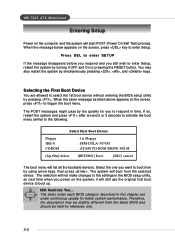
... by using arrow keys, then press . Select First Boot Device Floppy IDE-0 CDROM : 1st Floppy : IBM-DTLA-307038 : ATAPI CD-ROM DRIVE 40X M [Up/Dn] Select [RETURN] Boot [ESC] cancel The boot menu will boot from by turning it will start POST (Power On Self Test) process. Selecting the First Boot Device You are under each BIOS category described in this chapter are allowed to trigger the boot menu. MS-7025 ATX Mainboard Entering Setup Power on...
... by using arrow keys, then press . Select First Boot Device Floppy IDE-0 CDROM : 1st Floppy : IBM-DTLA-307038 : ATAPI CD-ROM DRIVE 40X M [Up/Dn] Select [RETURN] Boot [ESC] cancel The boot menu will boot from by turning it will start POST (Power On Self Test) process. Selecting the First Boot Device You are under each BIOS category described in this chapter are allowed to trigger the boot menu. MS-7025 ATX Mainboard Entering Setup Power on...
User Guide
Page 44
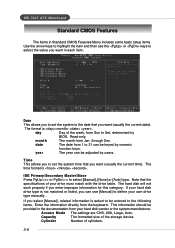
MS-7025 ATX Mainboard Standard CMOS Features The items in Standard CMOS Features Menu includes some basic setup items. Use the arrow keys to highlight the item and then use [Manual] to define your own drive type manually. Read-only. The hard disk will not work properly if you want in the documentation from the keyboard. day Day of the storage device. through Dec. If you want (usually the current...
MS-7025 ATX Mainboard Standard CMOS Features The items in Standard CMOS Features Menu includes some basic setup items. Use the arrow keys to highlight the item and then use [Manual] to define your own drive type manually. Read-only. The hard disk will not work properly if you want in the documentation from the keyboard. day Day of the storage device. through Dec. If you want (usually the current...
User Guide
Page 48
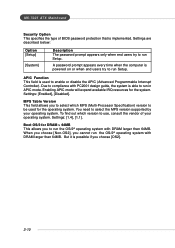
...], you to select which version to use, consult the vendor of BIOS password protection that is used for the system. Settings are described below: Option [Setup] [System] Description The password prompt appears only when end users try to enable or disable the APIC (Advanced Programmable Interrupt Controller). Settings: [1.4], [1.1]. MS-7025 ATX Mainboard Security Option This specifies the type of your operating system. Boot OS/2 for DRAM > 64MB This allows you...
...], you to select which version to use, consult the vendor of BIOS password protection that is used for the system. Settings are described below: Option [Setup] [System] Description The password prompt appears only when end users try to enable or disable the APIC (Advanced Programmable Interrupt Controller). Settings: [1.4], [1.1]. MS-7025 ATX Mainboard Security Option This specifies the type of your operating system. Boot OS/2 for DRAM > 64MB This allows you...
User Guide
Page 49
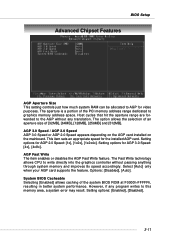
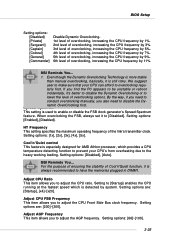
... 3.0 Speed / AGP 2.0 Speed AGP 3.0 Speed or AGP 2.0 Speed appears depending on the AGP card installed on the mainboard. This item sets an appropriate speed for AGP 3.0 Speed: [4x], [4x8x]. Setting options for video purposes. System BIOS Cacheable Selecting [Enabled] allows caching of the system BIOS ROM at F0000h-FFFFFh, resulting in better system performance. Select [Auto] only when your AGP card supports the feature. Options: [Disabled], [Auto]. BIOS Setup Advanced Chipset Features AGP Aperture Size This setting controls just...
... 3.0 Speed / AGP 2.0 Speed AGP 3.0 Speed or AGP 2.0 Speed appears depending on the AGP card installed on the mainboard. This item sets an appropriate speed for AGP 3.0 Speed: [4x], [4x8x]. Setting options for video purposes. System BIOS Cacheable Selecting [Enabled] allows caching of the system BIOS ROM at F0000h-FFFFFh, resulting in better system performance. Select [Auto] only when your AGP card supports the feature. Options: [Disabled], [Auto]. BIOS Setup Advanced Chipset Features AGP Aperture Size This setting controls just...
User Guide
Page 51
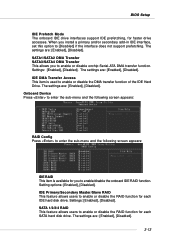
... is used to [Disabled] if the interface does not support prefetching. SATA 1/2/3/4 RAID This feature allows users to enable or disable the RAID function for you to enable/disable the onboard IDE RAID function. When you install a primary and/or secondary add-in IDE interface, set this option to enable or disable the DMA transfer function of the IDE Hard Drive. IDE DMA Transfer Access This item is available for each SATA hard disk drive. Setting options: [Enabled], [Disabled]. Settings: [Enabled], [Disabled]. BIOS Setup IDE Prefetch Mode The onboard IDE drive interfaces support IDE...
... is used to [Disabled] if the interface does not support prefetching. SATA 1/2/3/4 RAID This feature allows users to enable or disable the RAID function for you to enable/disable the onboard IDE RAID function. When you install a primary and/or secondary add-in IDE interface, set this option to enable or disable the DMA transfer function of the IDE Hard Drive. IDE DMA Transfer Access This item is available for each SATA hard disk drive. Setting options: [Enabled], [Disabled]. Settings: [Enabled], [Disabled]. BIOS Setup IDE Prefetch Mode The onboard IDE drive interfaces support IDE...
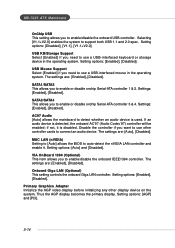
User Guide
Page 52
USB Mouse Support Select [Enabled] if you need to use a USB-interfaced keyboard or storage device in the operating system. SATA3/SATA4 This allows you to enable or disable onchip Serial-ATA controller 1 & 2. if not, it . MAC LAN (nVIDIA) Setting to [Auto] allows the BIOS to connect an audio device. Primary Graphics Adapter Initialize the AGP video display before initializing any other controller cards to auto-detect the nVIDIA LAN controller and enable it is used. USB KB/Storage Support Select [Enabled] if you...
USB Mouse Support Select [Enabled] if you need to use a USB-interfaced keyboard or storage device in the operating system. SATA3/SATA4 This allows you to enable or disable onchip Serial-ATA controller 1 & 2. if not, it . MAC LAN (nVIDIA) Setting to [Auto] allows the BIOS to connect an audio device. Primary Graphics Adapter Initialize the AGP video display before initializing any other controller cards to auto-detect the nVIDIA LAN controller and enable it is used. USB KB/Storage Support Select [Enabled] if you...
User Guide
Page 60
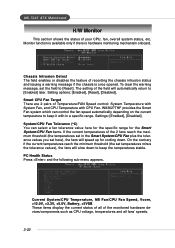
... the following sub-menu appears. To clear the warning message, set temperatures minus the tolerance values), the fans will automatically return to [Reset]. Chassis Intrusion Detect The field enables or disables the feature of the field will slow down . MS-7025 ATX Mainboard H/W Monitor This section shows the status of the monitored hardware devices/components such as CPU voltage, temperatures and all fans' speeds. 3-22 The setting of recording the...
... the following sub-menu appears. To clear the warning message, set temperatures minus the tolerance values), the fans will automatically return to [Reset]. Chassis Intrusion Detect The field enables or disables the feature of the field will slow down . MS-7025 ATX Mainboard H/W Monitor This section shows the status of the monitored hardware devices/components such as CPU voltage, temperatures and all fans' speeds. 3-22 The setting of recording the...
User Guide
Page 61
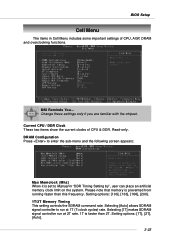
...]. 1T/2T Memory Timing This setting controls the SDRAM command rate. BIOS Setup Cell Menu The items in "DDR Timing Setting by", user can place an artificial memory clock limit on the system. Current CPU / DDR Clock These two items show the current clocks of CPU, AGP, DRAM and overclocking functions. MSI Reminds You... Setting options: [1T], [2T], [Auto]. 3-23 Change these settings only if you are familiar with the chipset. Selecting [1T...
...]. 1T/2T Memory Timing This setting controls the SDRAM command rate. BIOS Setup Cell Menu The items in "DDR Timing Setting by", user can place an artificial memory clock limit on the system. Current CPU / DDR Clock These two items show the current clocks of CPU, AGP, DRAM and overclocking functions. MSI Reminds You... Setting options: [1T], [2T], [Auto]. 3-23 Change these settings only if you are familiar with the chipset. Selecting [1T...
User Guide
Page 62
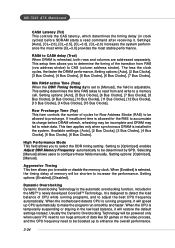
... Timing Setting by SPD. High Performance Mode This field allows you to configure these fields manually. It is running programs, and to adjust the best CPU frequency automatically. This setup item allows you to enable or disable the memory clock. Setting options: [Optimized], [Manual]. When the motherboard detects CPU is designed to detect the load balance of the transition from and write to a memory cell. Usually the Dynamic Overclocking Technology will...
... Timing Setting by SPD. High Performance Mode This field allows you to configure these fields manually. It is running programs, and to adjust the best CPU frequency automatically. This setup item allows you to enable or disable the memory clock. Setting options: [Optimized], [Manual]. When the motherboard detects CPU is designed to detect the load balance of the transition from and write to a memory cell. Usually the Dynamic Overclocking Technology will...
User Guide
Page 63
... memories plugged in DIMM1. Cool'n'Quiet control This feature is especially designed for AMD Athlon processor, which is used to overclocking regularly first. BIOS Setup Setting options: [Disabled] [Private] [Sergeant] [Captain] [Colonel] [General] [Commander] Disable Dynamic Overclocking. 1st level of overclocking, increasing the CPU frequency by 1%. 2nd level of overclocking, increasing the CPU frequency by 3%. 3rd level of overclocking, increasing the CPU frequency by 5%. 4th level of overclocking, increasing the CPU frequency by 7%. 5th level of overclocking...
... memories plugged in DIMM1. Cool'n'Quiet control This feature is especially designed for AMD Athlon processor, which is used to overclocking regularly first. BIOS Setup Setting options: [Disabled] [Private] [Sergeant] [Captain] [Colonel] [General] [Commander] Disable Dynamic Overclocking. 1st level of overclocking, increasing the CPU frequency by 1%. 2nd level of overclocking, increasing the CPU frequency by 3%. 3rd level of overclocking, increasing the CPU frequency by 5%. 4th level of overclocking, increasing the CPU frequency by 7%. 5th level of overclocking...
User Guide
Page 75
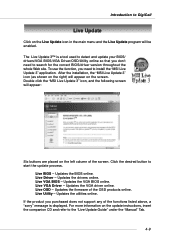
... Update Guide" under the "Manual" Tab. 4-9 Updates the drivers online. Updates the utilities online. To use the function, you purchased does not support any of the functions listed above, a "sorry" message is a tool used to detect and update your BIOS/ drivers/VGA BIOS/VGA Driver/OSD/Utility online so that you don't need to install the "MSI Live Update 3" application. Live VGA BIOS - If the product you need to search for the correct BIOS/driver version throughout...
... Update Guide" under the "Manual" Tab. 4-9 Updates the drivers online. Updates the utilities online. To use the function, you purchased does not support any of the functions listed above, a "sorry" message is a tool used to detect and update your BIOS/ drivers/VGA BIOS/VGA Driver/OSD/Utility online so that you don't need to install the "MSI Live Update 3" application. Live VGA BIOS - If the product you need to search for the correct BIOS/driver version throughout...
User Guide
Page 93
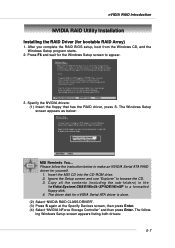
... instruction below : MSI Reminds You... nVIDIA RAID Introduction NVIDIA RAID Utility Installation Installing the RAID Driver (for nVIDIA Serial ATA driver is done. (2) Select "NVIDIA RAID CLASS DRIVER". (3) Press S again at the Specify Devices screen, then press Enter. (4) Select "NVIDIA NForce Storage Controller" and then press Enter. Press F6 and wait for the Windows Setup screen to make an NVIDIA Serial ATA RAID driver for yourself. 1. Insert the MSI CD into the CD-ROM drive. 2. Ignore the Setup screen and use...
... instruction below : MSI Reminds You... nVIDIA RAID Introduction NVIDIA RAID Utility Installation Installing the RAID Driver (for nVIDIA Serial ATA driver is done. (2) Select "NVIDIA RAID CLASS DRIVER". (3) Press S again at the Specify Devices screen, then press Enter. (4) Select "NVIDIA NForce Storage Controller" and then press Enter. Press F6 and wait for the Windows Setup screen to make an NVIDIA Serial ATA RAID driver for yourself. 1. Insert the MSI CD into the CD-ROM drive. 2. Ignore the Setup screen and use...


