

User Manual
Page 4
... eller en tilsvarende type anbefalt av apparatfabrikanten. Vaihda paristo ainoastaan valmistajan suosittelemaan tyyppiin. Mettre au rebut les batteries usages conformément aux instructions du fabricant. (Norwegian) ADVARSEL: Eksplosjonsfare ved feilaktig skifte av batteri. Brukte batterier kasseres I henhold til fabrikantens instruksjoner. Ersatz nur durch denselben oder einen vom Hersteller empfohlenen gleich-wertigen Typ...
... eller en tilsvarende type anbefalt av apparatfabrikanten. Vaihda paristo ainoastaan valmistajan suosittelemaan tyyppiin. Mettre au rebut les batteries usages conformément aux instructions du fabricant. (Norwegian) ADVARSEL: Eksplosjonsfare ved feilaktig skifte av batteri. Brukte batterier kasseres I henhold til fabrikantens instruksjoner. Ersatz nur durch denselben oder einen vom Hersteller empfohlenen gleich-wertigen Typ...
User Manual
Page 5
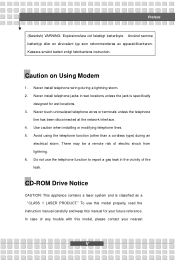
... vid felaktigt batteribyte. Never touch uninsulated telephone wires or terminals unless the telephone line has been disconnected at the network interface. 4. Kassera använt batteri enligt fabrikantens instruction. In case of any trouble with this manual for wet locations. 3. Avoid using the telephone function (other than a cordless type) during a lightning...
... vid felaktigt batteribyte. Never touch uninsulated telephone wires or terminals unless the telephone line has been disconnected at the network interface. 4. Kassera använt batteri enligt fabrikantens instruction. In case of any trouble with this manual for wet locations. 3. Avoid using the telephone function (other than a cordless type) during a lightning...
User Manual
Page 7
...w Liquid has penetrated into the opening that could damage the equipment or cause an electrical shock. 12. To prevent explosion caused by improper battery replacement, use the same or equivalent type of the following situations arises, get it work according to moisture. VII w The equipment was ...dropped and damaged. Never pour any of battery recommended by a service personnel: w The power cord or plug is damaged. If any liquid into the equipment. All cautions and warnings ...
...w Liquid has penetrated into the opening that could damage the equipment or cause an electrical shock. 12. To prevent explosion caused by improper battery replacement, use the same or equivalent type of the following situations arises, get it work according to moisture. VII w The equipment was ...dropped and damaged. Never pour any of battery recommended by a service personnel: w The power cord or plug is damaged. If any liquid into the equipment. All cautions and warnings ...

User Manual
Page 12
Preface Table of Content Preface Regulations Information II FCC-B Radio Frequency Interference Statement II FCC Conditions III Safety Guideline for Using Lithium Battery IV Caution on Using Modem V CD-ROM Drive Notice V Macrovision Notice VI Safety Instructions VI WEEE Statement VIII Trademarks ...XI Release History XI Introductions How to Use This Manual 1-2 Unpacking ...1-4 XII
Preface Table of Content Preface Regulations Information II FCC-B Radio Frequency Interference Statement II FCC Conditions III Safety Guideline for Using Lithium Battery IV Caution on Using Modem V CD-ROM Drive Notice V Macrovision Notice VI Safety Instructions VI WEEE Statement VIII Trademarks ...XI Release History XI Introductions How to Use This Manual 1-2 Unpacking ...1-4 XII

User Manual
Page 13
Preface Getting Started Specification ...2-2 Product Overview 2-6 Top-open View 2-6 Front View 2-9 Right-side View 2-12 Left-side View 2-14 Rear View 2-15 Bottom View 2-16 Power Management 2-18 AC Adapter 2-18 Battery Pack 2-20 Using the Battery Pack 2-23 Basic Operations 2-25 Safety and Comfort Tips 2-25 Have a Good Work Habit 2-26 Knowing the Keyboard 2-27 Knowing the Touchpad 2-32 About Hard Disk Drive 2-36 Using the Optical Storage 2-37 XIII
Preface Getting Started Specification ...2-2 Product Overview 2-6 Top-open View 2-6 Front View 2-9 Right-side View 2-12 Left-side View 2-14 Rear View 2-15 Bottom View 2-16 Power Management 2-18 AC Adapter 2-18 Battery Pack 2-20 Using the Battery Pack 2-23 Basic Operations 2-25 Safety and Comfort Tips 2-25 Have a Good Work Habit 2-26 Knowing the Keyboard 2-27 Knowing the Touchpad 2-32 About Hard Disk Drive 2-36 Using the Optical Storage 2-37 XIII

User Manual
Page 16
... the accessories included when you a delightful and professional experience in using this notebook. Also, this chapter instructs the correct procedure of installing or uninstalling the battery pack, and the brief ideas on how to operate this notebook. 1-2 How to Use This Manual This User's Manual provides instructions and illustrations on how...
... the accessories included when you a delightful and professional experience in using this notebook. Also, this chapter instructs the correct procedure of installing or uninstalling the battery pack, and the brief ideas on how to operate this notebook. 1-2 How to Use This Manual This User's Manual provides instructions and illustrations on how...

User Manual
Page 18
... or missing, please contact your local dealer immediately. General Introductions Unpacking First, unpack the shipping carton and check all items carefully. w High-capacity Li-ion battery pack w AC adapter and power cord w Phone cable/Phone jack (optional) w Notebook carry bag (optional) These accessories listed above may change without notice. 1-4 Also, keep...
... or missing, please contact your local dealer immediately. General Introductions Unpacking First, unpack the shipping carton and check all items carefully. w High-capacity Li-ion battery pack w AC adapter and power cord w Phone cable/Phone jack (optional) w Notebook carry bag (optional) These accessories listed above may change without notice. 1-4 Also, keep...

User Manual
Page 21
Getting Started AC Adapter Battery Type Storage HDD form factor Optical Device I/O Port Monitor(VGA) USB Mic-In Line-In Headphone Out/ SPDIF Out Internal Microphone RJ11 RJ45 IEEE 1394 Consumer Infrared DVB-T port TV-Out Card Reader Express Card slot Webcam Webcam 90W, 19 Volt 6 cells(Li-ion) (standard) (4400mAH) / 9 cells (Li-ion) (optional) (7200mAH) 2.5" 9.5mm High, 5400rpm DVD super multi, light scribe, HD DVD 15 pin D-Sub x 1 x 3 (USB version 2.0) x 1 x 1 x 1 x 1 x 1 x 1 x 1 x 1 x 1 (Optional) x 1 (HDMI) XD/ MMC/MS 3-in-1 card reader x 1 x 1 1.3 Mega Pixel 2-3
Getting Started AC Adapter Battery Type Storage HDD form factor Optical Device I/O Port Monitor(VGA) USB Mic-In Line-In Headphone Out/ SPDIF Out Internal Microphone RJ11 RJ45 IEEE 1394 Consumer Infrared DVB-T port TV-Out Card Reader Express Card slot Webcam Webcam 90W, 19 Volt 6 cells(Li-ion) (standard) (4400mAH) / 9 cells (Li-ion) (optional) (7200mAH) 2.5" 9.5mm High, 5400rpm DVD super multi, light scribe, HD DVD 15 pin D-Sub x 1 x 3 (USB version 2.0) x 1 x 1 x 1 x 1 x 1 x 1 x 1 x 1 x 1 (Optional) x 1 (HDMI) XD/ MMC/MS 3-in-1 card reader x 1 x 1 1.3 Mega Pixel 2-3

User Manual
Page 28
...external audio device. Connect the Center and Subwoofer speakers here 4. w Glowing blue when Bluetooth function is recommended to replace a new battery. w Glowing orange when the battery is in low battery status. w Blinking orange if the battery fails and it is enabled. w LED goes out when the system is being charged. Status LED... Battery Status w Glowing green when the battery is turned off. w Glowing green and blue at the same time when Wireless LAN and Bluetooth function are both 2-10 Getting Started ...
...external audio device. Connect the Center and Subwoofer speakers here 4. w Glowing blue when Bluetooth function is recommended to replace a new battery. w Glowing orange when the battery is in low battery status. w Blinking orange if the battery fails and it is enabled. w LED goes out when the system is being charged. Status LED... Battery Status w Glowing green when the battery is turned off. w Glowing green and blue at the same time when Wireless LAN and Bluetooth function are both 2-10 Getting Started ...

User Manual
Page 33
... the computer to connect a LAN cable for security. 6. DO NOT block the ventilator for the notebook. 4. Rear View 1 Getting Started 2 3 4 5 6 1. Battery Pack (Rear View) This notebook will be powered by the battery pack when the AC adapter is designed to connect an FJ-11 telephone line through this connector. Ventilator The ventilator...
... the computer to connect a LAN cable for security. 6. DO NOT block the ventilator for the notebook. 4. Rear View 1 Getting Started 2 3 4 5 6 1. Battery Pack (Rear View) This notebook will be powered by the battery pack when the AC adapter is designed to connect an FJ-11 telephone line through this connector. Ventilator The ventilator...

User Manual
Page 34
Battery Release Button It is positioned on lock status. Battery Lock/Unlock Button Battery cannot be moved when the button is a bounce-back device as a preparation for releasing the battery pack. Once the button is pushed to unlock position, the battery is removable. 2-16 Bottom View 1 2 3 Getting Started 5 4 1. Press it with one hand and pull the battery pack carefully with the other. 2.
Battery Release Button It is positioned on lock status. Battery Lock/Unlock Button Battery cannot be moved when the button is a bounce-back device as a preparation for releasing the battery pack. Once the button is pushed to unlock position, the battery is removable. 2-16 Bottom View 1 2 3 Getting Started 5 4 1. Press it with one hand and pull the battery pack carefully with the other. 2.

User Manual
Page 35
Getting Started 3. DO NOT block the ventilator for air circulation. 2-17 Battery Pack This notebook will be powered by the battery pack when the AC adapter is designed to cool the system. Stereo Speaker Make high quality sound blaster with stereo system and Hi-Fi function supported. 5. Ventilator The ventilator is disconnected. 4.
Getting Started 3. DO NOT block the ventilator for air circulation. 2-17 Battery Pack This notebook will be powered by the battery pack when the AC adapter is designed to cool the system. Stereo Speaker Make high quality sound blaster with stereo system and Hi-Fi function supported. 5. Ventilator The ventilator is disconnected. 4.

User Manual
Page 36
... male end of the AC adapter. 3. Plug the DC end of the adapter to the electrical outlet. 3 3 2 2-18 When the AC adapter is connected, the battery is strongly recommended to find the AC adapter and power cord. 2. Getting Started Power Management AC Adapter Please be noted that the AC adapter included...
... male end of the AC adapter. 3. Plug the DC end of the adapter to the electrical outlet. 3 3 2 2-18 When the AC adapter is connected, the battery is strongly recommended to find the AC adapter and power cord. 2. Getting Started Power Management AC Adapter Please be noted that the AC adapter included...

User Manual
Page 38
...: 1. Make sure the Notebook is equipped with a high-capacity 6-cell or 9-cell Li-ion Battery pack. Please contact your local dealer for standard battery pack. Slide the left side of the battery pack first out of the compartment and then pull the right side of power supply. Check the ...Lock/Unlock button is an internal power source of arrow showing below the button. 5. The rechargeable Li-ion battery pack is in reserve to the direction of the notebook. Locate the Battery Release Button on the bottom side. 4. Push the Release Button to avoid this notebook from lacking of the...
...: 1. Make sure the Notebook is equipped with a high-capacity 6-cell or 9-cell Li-ion Battery pack. Please contact your local dealer for standard battery pack. Slide the left side of the battery pack first out of the compartment and then pull the right side of power supply. Check the ...Lock/Unlock button is an internal power source of arrow showing below the button. 5. The rechargeable Li-ion battery pack is in reserve to the direction of the notebook. Locate the Battery Release Button on the bottom side. 4. Push the Release Button to avoid this notebook from lacking of the...
User Manual
Page 39
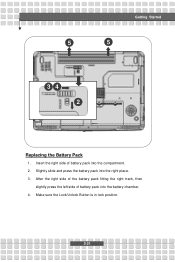
After the right side of the battery pack fitting the right track, then slightly press the left side of battery pack into the compartment. 2. Slightly slide and press the battery pack into the battery chamber. 4. Make sure the Lock/Unlock Button is in lock position. 2-21 Insert the right side of battery pack into the right place. 3. Getting Started 5 5 3 4 2 Replacing the Battery Pack 1.
After the right side of the battery pack fitting the right track, then slightly press the left side of battery pack into the compartment. 2. Slightly slide and press the battery pack into the battery chamber. 4. Make sure the Lock/Unlock Button is in lock position. 2-21 Insert the right side of battery pack into the right place. 3. Getting Started 5 5 3 4 2 Replacing the Battery Pack 1.

User Manual
Page 40
Getting Started 1 Warning 1. Do not try to recycle the unused battery pack. 2-22 Please follow your local laws and regulations to disassemble THE BATTERY PACK. 2.
Getting Started 1 Warning 1. Do not try to recycle the unused battery pack. 2-22 Please follow your local laws and regulations to disassemble THE BATTERY PACK. 2.

User Manual
Page 41
... fire or explosion, which could cause serious injury. w Do not temper with your area. w Do not use rusty or damaged batteries. w Dispose of battery. If the battery power is critical to temperatures above +60° C (+140° F). w Turn off the system if you won't be...w Disable unneeded settings or remove idle peripherals to help optimizing battery life and avoid a sudden power loss. w Do not disassemble, short-circuit or incinerate batteries or store them away from children. Conserving Battery Power Efficient battery power is not managed well, the saved data and customized ...
... fire or explosion, which could cause serious injury. w Do not temper with your area. w Do not use rusty or damaged batteries. w Dispose of battery. If the battery power is critical to temperatures above +60° C (+140° F). w Turn off the system if you won't be...w Disable unneeded settings or remove idle peripherals to help optimizing battery life and avoid a sudden power loss. w Do not disassemble, short-circuit or incinerate batteries or store them away from children. Conserving Battery Power Efficient battery power is not managed well, the saved data and customized ...

User Manual
Page 42
..."memory effect." However, to the following tips before you do not use the Notebook for a long time, it is suggested to extend your battery life. You do not need to -Disk. w The actual charging time will be determined by the applications in an external AC/DC power source..., suspend system operation or shut down the system or Save-to discharge the battery pack before recharging the battery: w If a charged battery pack is necessary. w If you begin charging. This may be helpful to remove the battery pack from your Notebook. w You can be recharged while it is installed...
..."memory effect." However, to the following tips before you do not use the Notebook for a long time, it is suggested to extend your battery life. You do not need to -Disk. w The actual charging time will be determined by the applications in an external AC/DC power source..., suspend system operation or shut down the system or Save-to discharge the battery pack before recharging the battery: w If a charged battery pack is necessary. w If you begin charging. This may be helpful to remove the battery pack from your Notebook. w You can be recharged while it is installed...


