

User Manual
Page 69
... users precisely. Cursor Movement Area This pressure-sensitive area of the touchpad, allows you to place your finger on and control the cursor on the screen by moving one of your notebook allows users to perform various actions with multi-finger taps and gestures while operating the notebook, and is capable...
... users precisely. Cursor Movement Area This pressure-sensitive area of the touchpad, allows you to place your finger on and control the cursor on the screen by moving one of your notebook allows users to perform various actions with multi-finger taps and gestures while operating the notebook, and is capable...

User Manual
Page 70
3-26 Enabling the Smart Pad Getting Started + Smart Pad Press and hold the Fn button, and then press the F3 button repeatedly to the instructions of Smart Pad by double clicking the Smart Pad icon ( the screen. ) on the lower right side of Brief Usages to the Smart Pad For the further information on how to use the Smart Pad function specifically, please refer to enable or disable the Smart Pad function recurrently.
3-26 Enabling the Smart Pad Getting Started + Smart Pad Press and hold the Fn button, and then press the F3 button repeatedly to the instructions of Smart Pad by double clicking the Smart Pad icon ( the screen. ) on the lower right side of Brief Usages to the Smart Pad For the further information on how to use the Smart Pad function specifically, please refer to enable or disable the Smart Pad function recurrently.

User Manual
Page 72
...; Touch the touchpad with two fingers and remain both fingers on the touchpad. Š Move two fingers to close each other to Zoom In the screen. Š Move two fingers away each other to Zoom Out the screen. Š Scrolling a page vertically. Š Scrolling a page horizontally. Š Zoom In/ Out the...
...; Touch the touchpad with two fingers and remain both fingers on the touchpad. Š Move two fingers to close each other to Zoom In the screen. Š Move two fingers away each other to Zoom Out the screen. Š Scrolling a page vertically. Š Scrolling a page horizontally. Š Zoom In/ Out the...

User Manual
Page 73
... with three fingers and remain the fingers on the touchpad. Š Move the three fingers to the Left on the touchpad to Page-up the screen. Š Touch the touchpad with three fingers and remain the fingers on the touchpad. Š Move the three fingers to the Right on the touchpad...
... with three fingers and remain the fingers on the touchpad. Š Move the three fingers to the Left on the touchpad to Page-up the screen. Š Touch the touchpad with three fingers and remain the fingers on the touchpad. Š Move the three fingers to the Right on the touchpad...

User Manual
Page 90
... for customized features. Š You want to change the default settings for your Notebook may be different because of BIOS update. The actual setting screens and options on your references only. How to restart. If the message disappears before you respond and you still wish to enter Setup, either restart...turning it OFF and ON, or simultaneously pressing [Ctrl]+[Alt]+[Delete] keys to Run BIOS Setup? To run the BIOS Setup Utility, turn on the screen during the system booting up and is requested to Use BIOS Setup? BIOS Setup 4-2 About BIOS Setup When to run the BIOS Setup when: &#...
... for customized features. Š You want to change the default settings for your Notebook may be different because of BIOS update. The actual setting screens and options on your references only. How to restart. If the message disappears before you respond and you still wish to enter Setup, either restart...turning it OFF and ON, or simultaneously pressing [Ctrl]+[Alt]+[Delete] keys to Run BIOS Setup? To run the BIOS Setup Utility, turn on the screen during the system booting up and is requested to Use BIOS Setup? BIOS Setup 4-2 About BIOS Setup When to run the BIOS Setup when: &#...
User Manual
Page 91
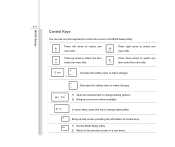
... arrow to change setting options. 2) Bring up a sub-menu when available. Press left arrow to select one item under the menu title. Press up help screen providing the information of control keys. 1) Exit the BIOS Setup Utility. 2) Return to control the cursor in a sub-menu. Increase the setting value or make... to change setting field. Bring up arrow to select one menu title. 4-3 Control Keys BIOS Setup You can use only the keyboard to the previous screen in the BIOS Setup Utility.
... arrow to change setting options. 2) Bring up a sub-menu when available. Press left arrow to select one item under the menu title. Press up help screen providing the information of control keys. 1) Exit the BIOS Setup Utility. 2) Return to control the cursor in a sub-menu. Increase the setting value or make... to change setting field. Bring up arrow to select one menu title. 4-3 Control Keys BIOS Setup You can use only the keyboard to the previous screen in the BIOS Setup Utility.
User Manual
Page 92
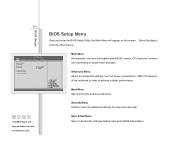
... the password settings for reference only. BIOS Setup BIOS Setup Menu Once you enter the BIOS Setup Utility, the Main Menu will appear on the screen. Boot Menu Set up boot type and boot sequence. Save & Exit Menu Save or discard the changes before leaving the BIOS Setup Menu. Select the...
... the password settings for reference only. BIOS Setup BIOS Setup Menu Once you enter the BIOS Setup Utility, the Main Menu will appear on the screen. Boot Menu Set up boot type and boot sequence. Save & Exit Menu Save or discard the changes before leaving the BIOS Setup Menu. Select the...

User Manual
Page 98
When the Supervisor Password is selected, a message box shall appear on the screen as Change Supervisor Password item above. Select User Password to give or to abandon password setting same as below: Enter New Password Type a maximum of ...
When the Supervisor Password is selected, a message box shall appear on the screen as Change Supervisor Password item above. Select User Password to give or to abandon password setting same as below: Enter New Password Type a maximum of ...


