

User Manual
Page 4
Preface 1-4 ExpressCard Installation...3-37 Removing the ExpressCard 3-37 Installing the ExpressCard ...3-37 Components Replacement and Upgrade 3-39 BIOS Setup About BIOS Setup...4-2 When to Use BIOS Setup...4-2 How to Run BIOS Setup...4-2 Control Keys ...4-3 BIOS Setup Menu...4-4 Main menu...4-5 Advanced menu...4-7 Security menu...4-8 Boot menu ...4-10 Exit menu...4-11
Preface 1-4 ExpressCard Installation...3-37 Removing the ExpressCard 3-37 Installing the ExpressCard ...3-37 Components Replacement and Upgrade 3-39 BIOS Setup About BIOS Setup...4-2 When to Use BIOS Setup...4-2 How to Run BIOS Setup...4-2 Control Keys ...4-3 BIOS Setup Menu...4-4 Main menu...4-5 Advanced menu...4-7 Security menu...4-8 Boot menu ...4-10 Exit menu...4-11
User Manual
Page 25
... ship the unit in -one application disk, containing the full version of user's manual, drivers, utilities, and optional recovery function, etc.. Introductions Chapter 4, BIOS Setup, provides information on BIOS Setup program and allows you need to configure the system for optimum use. If any item contained is damaged or missing, please contact...
... ship the unit in -one application disk, containing the full version of user's manual, drivers, utilities, and optional recovery function, etc.. Introductions Chapter 4, BIOS Setup, provides information on BIOS Setup program and allows you need to configure the system for optimum use. If any item contained is damaged or missing, please contact...
User Manual
Page 29
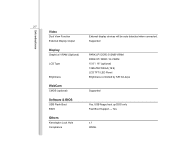
Supported Display Graphics/ VRAM (Optional) LCD Type Brightness PARK LP/ DDR3 512MB VRAM PARK XT/ DDR3 1G VRAM 15.6" / 16" (optional) 1366x768 WXGA (16:9) LCD TFT/ LED Panel Brightness controlled by K/B hot-keys WebCam CMOS (optional) Supported Software & BIOS USB Flash Boot BIOS Yes, USB floppy boot up DOS only Fast Boot Support --- Yes Others Kensington Lock Hole Compliance x 1 WHQL Introductions 2-7 Video Dual View Function External Display Output External display devices will be auto detected when connected.
Supported Display Graphics/ VRAM (Optional) LCD Type Brightness PARK LP/ DDR3 512MB VRAM PARK XT/ DDR3 1G VRAM 15.6" / 16" (optional) 1366x768 WXGA (16:9) LCD TFT/ LED Panel Brightness controlled by K/B hot-keys WebCam CMOS (optional) Supported Software & BIOS USB Flash Boot BIOS Yes, USB floppy boot up DOS only Fast Boot Support --- Yes Others Kensington Lock Hole Compliance x 1 WHQL Introductions 2-7 Video Dual View Function External Display Output External display devices will be auto detected when connected.
User Manual
Page 84
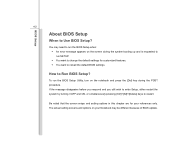
... Utility, turn on the notebook and press the [Del] key during the system booting up and is requested to run the BIOS Setup when: Š An error message appears on your Notebook may need to run SETUP. Š You want to restart. Be noted that the screen ... are for customized features. Š You want to change the default settings for your references only. BIOS Setup 4-2 About BIOS Setup When to Run BIOS Setup? You may be different because of BIOS update. How to Use BIOS Setup? If the message disappears before you respond and you still wish to enter Setup, either restart...
... Utility, turn on the notebook and press the [Del] key during the system booting up and is requested to run the BIOS Setup when: Š An error message appears on your Notebook may need to run SETUP. Š You want to restart. Be noted that the screen ... are for customized features. Š You want to change the default settings for your references only. BIOS Setup 4-2 About BIOS Setup When to Run BIOS Setup? You may be different because of BIOS update. How to Use BIOS Setup? If the message disappears before you respond and you still wish to enter Setup, either restart...
User Manual
Page 85
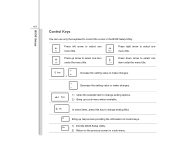
... items, press this key to change setting options. 2) Bring up help screen providing the information of control keys. 1) Exit the BIOS Setup Utility. 2) Return to the previous screen in the BIOS Setup Utility. Press down arrow to select one item under the menu title. Press right arrow to select one menu title.... Bring up a sub-menu when available. Press left arrow to select one menu title. 4-3 Control Keys BIOS Setup You can use only the keyboard to control the cursor in a sub-menu.
... items, press this key to change setting options. 2) Bring up help screen providing the information of control keys. 1) Exit the BIOS Setup Utility. 2) Return to the previous screen in the BIOS Setup Utility. Press down arrow to select one item under the menu title. Press right arrow to select one menu title.... Bring up a sub-menu when available. Press left arrow to select one menu title. 4-3 Control Keys BIOS Setup You can use only the keyboard to control the cursor in a sub-menu.
User Manual
Page 86
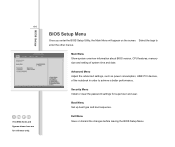
..., memory size and setting of the notebook in order to enter the other menus. Security Menu Install or clear the password settings for reference only. BIOS Setup BIOS Setup Menu Once you enter the BIOS Setup Utility, the Main Menu will appear on the screen. Select the tags to achieve a better performance. 4-4 The... BIOS items and figures shown here are for supervisor and user. Boot Menu Set up boot type and boot sequence. Advanced Menu Adjust the advanced settings, ...
..., memory size and setting of the notebook in order to enter the other menus. Security Menu Install or clear the password settings for reference only. BIOS Setup BIOS Setup Menu Once you enter the BIOS Setup Utility, the Main Menu will appear on the screen. Select the tags to achieve a better performance. 4-4 The... BIOS items and figures shown here are for supervisor and user. Boot Menu Set up boot type and boot sequence. Advanced Menu Adjust the advanced settings, ...
User Manual
Page 87
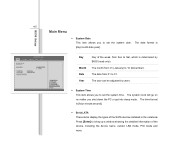
BIOS Setup 4-5 Main Menu Š System Date This item allows you to 31. The system clock will go on no matter you to bring up a window .... Day Month Date Year Day of the week, from 01 (January) to Sat, which is [day:month:date:year]. The year can be adjusted by BIOS (read-only).
BIOS Setup 4-5 Main Menu Š System Date This item allows you to 31. The system clock will go on no matter you to bring up a window .... Day Month Date Year Day of the week, from 01 (January) to Sat, which is [day:month:date:year]. The year can be adjusted by BIOS (read-only).
User Manual
Page 88
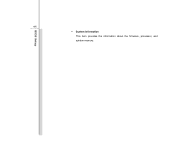
BIOS Setup 4-6 Š System Information This item provides the information about the firmware, processor, and system memory.
BIOS Setup 4-6 Š System Information This item provides the information about the firmware, processor, and system memory.
User Manual
Page 89
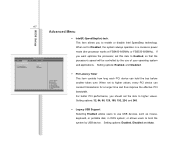
... allows you should set to use of your operating system and applications. Setting options: Enabled, and Disabled. :Select Screen :Select Item Enter: Select +/-: Change Opt. 4-7 BIOS Setup Main Advanced BISO SETUP UTILITY Security Boot Exit Intel (R) Speedstep (tm) PCI Latency Timer Legacy USB Support [Enabled] [64] [Enabled] Advanced Menu Š Intel...
... allows you should set to use of your operating system and applications. Setting options: Enabled, and Disabled. :Select Screen :Select Item Enter: Select +/-: Change Opt. 4-7 BIOS Setup Main Advanced BISO SETUP UTILITY Security Boot Exit Intel (R) Speedstep (tm) PCI Latency Timer Legacy USB Support [Enabled] [64] [Enabled] Advanced Menu Š Intel...
User Manual
Page 90
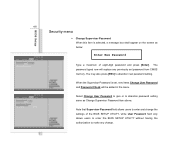
... and press [Enter]. When the Supervisor Password is selected, a message box shall appear on the screen as Change Supervisor Password item above. BIOS Setup 4-8 Security menu Š Change Supervisor Password When this item is set password from CMOS memory. The password typed now will be added... Select Change User Password to give or to abandon password setting same as below: Enter New Password Type a maximum of the BIOS SETUP UTILITY, while User Password field only allows users to enter the BIOS SETUP UTILITY without having the authorization to abandon new password setting.
... and press [Enter]. When the Supervisor Password is selected, a message box shall appear on the screen as Change Supervisor Password item above. BIOS Setup 4-8 Security menu Š Change Supervisor Password When this item is set password from CMOS memory. The password typed now will be added... Select Change User Password to give or to abandon password setting same as below: Enter New Password Type a maximum of the BIOS SETUP UTILITY, while User Password field only allows users to enter the BIOS SETUP UTILITY without having the authorization to abandon new password setting.
User Manual
Page 91
... 4-9 The Password Check item is used to specify the type of BIOS password protection that when Supervisor Password has been cleared, User Password will boot and user can enter setup without entering password. To clear a set Supervisor ... Change Supervisor Password/ Change User Password field when you are described below: Setup The password is powered on or when users try to access to BIOS SETUP UTILITY. Please note that is disabled, the system will be disabled. Always The password is required every time when the Notebook is required only...
... 4-9 The Password Check item is used to specify the type of BIOS password protection that when Supervisor Password has been cleared, User Password will boot and user can enter setup without entering password. To clear a set Supervisor ... Change Supervisor Password/ Change User Password field when you are described below: Setup The password is powered on or when users try to access to BIOS SETUP UTILITY. Please note that is disabled, the system will be disabled. Always The password is required every time when the Notebook is required only...
User Manual
Page 92
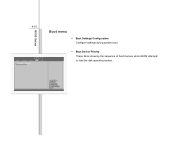
BIOS Setup 4-10 Boot menu Š Boot Settings Configuration Configure settings during system boot. Š Boot Device Priority These items showing the sequence of boot devices where BIOS attempts to load the disk operating system.
BIOS Setup 4-10 Boot menu Š Boot Settings Configuration Configure settings during system boot. Š Boot Device Priority These items showing the sequence of boot devices where BIOS attempts to load the disk operating system.
User Manual
Page 93
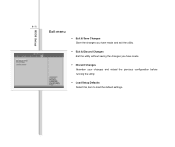
BIOS Setup 4-11 Exit menu Š Exit & Save Changes Save the changes you have made and exit the utility. Š Exit & Discard Changes Exit the utility without saving the changes you have made. Š Discard Changes Abandon your changes and reload the previous configuration before running the utility. Š Load Setup Defaults Select this item to load the default settings.
BIOS Setup 4-11 Exit menu Š Exit & Save Changes Save the changes you have made and exit the utility. Š Exit & Discard Changes Exit the utility without saving the changes you have made. Š Discard Changes Abandon your changes and reload the previous configuration before running the utility. Š Load Setup Defaults Select this item to load the default settings.


