
User Guide
Page 3
... on a reliable flat surface before setting it . iii Alternatively, please try the following situations arises, get the equipment checked by service personnel: ◯ The power cord or plug is at : http://support.msi.com Safety Instructions ■ Always read the safety instructions carefully. ■ Keep this User's Manual for technical guide, BIOS updates, driver updates, and other information: http://www.msi.com/service/download ◙ Contact our technical...
... on a reliable flat surface before setting it . iii Alternatively, please try the following situations arises, get the equipment checked by service personnel: ◯ The power cord or plug is at : http://support.msi.com Safety Instructions ■ Always read the safety instructions carefully. ■ Keep this User's Manual for technical guide, BIOS updates, driver updates, and other information: http://www.msi.com/service/download ◙ Contact our technical...
User Guide
Page 9
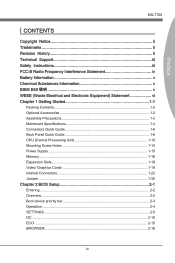
...v BSMI EMI v WEEE (Waste Electrical and Electronic Equipment) Statement vi Chapter 1 Getting Started 1-1 Packing Contents 1-2 Optional Accessories 1-2 Assembly Precautions 1-3 Mainboard Specifications 1-4 Connectors Quick Guide 1-6 Back Panel Quick Guide 1-8 CPU (Central Processing Unit 1-10 Mounting Screw Holes 1-14 Power Supply 1-15 Memory 1-16 Expansion Slots 1-18 Video/ Graphics Cards 1-19 Internal Connectors 1-22 Jumper 1-30 Chapter 2 BIOS Setup 2-1 Entering 2-2 Overview 2-2 Boot device priority bar 2-3 Operation 2-4 SETTINGS 2-5 OC 2-10 ECO 2-15 BROWSER 2-16 ix
...v BSMI EMI v WEEE (Waste Electrical and Electronic Equipment) Statement vi Chapter 1 Getting Started 1-1 Packing Contents 1-2 Optional Accessories 1-2 Assembly Precautions 1-3 Mainboard Specifications 1-4 Connectors Quick Guide 1-6 Back Panel Quick Guide 1-8 CPU (Central Processing Unit 1-10 Mounting Screw Holes 1-14 Power Supply 1-15 Memory 1-16 Expansion Slots 1-18 Video/ Graphics Cards 1-19 Internal Connectors 1-22 Jumper 1-30 Chapter 2 BIOS Setup 2-1 Entering 2-2 Overview 2-2 Boot device priority bar 2-3 Operation 2-4 SETTINGS 2-5 OC 2-10 ECO 2-15 BROWSER 2-16 ix

User Guide
Page 15
... port - 4x USB 2.0 ports - 2x USB 3.0 ports - 1x LAN port - 1x HDMI port**, supporting a maximum resolution of 1920x1200 - 1x VGA port** - 1x DVI-D port**, supporting a maximum resolution of 1920x1200 - 6x audio ports (**This mainboard supports dual-display function by any two onboard graphics output ports (HDMI+DVI,DVI+VGA or VGA+HDMI)). ■ On-Board - 2x USB 2.0 connectors - 1x USB 3.0 connector - 1x TPM Module connector - 1x Serial Port connector - 1x Parallel Port connector - 1x Front Panel Audio connector - 1x Chassis Intrusion connector - 1x Voice Genie connector (optional) Slots...
... port - 4x USB 2.0 ports - 2x USB 3.0 ports - 1x LAN port - 1x HDMI port**, supporting a maximum resolution of 1920x1200 - 1x VGA port** - 1x DVI-D port**, supporting a maximum resolution of 1920x1200 - 6x audio ports (**This mainboard supports dual-display function by any two onboard graphics output ports (HDMI+DVI,DVI+VGA or VGA+HDMI)). ■ On-Board - 2x USB 2.0 connectors - 1x USB 3.0 connector - 1x TPM Module connector - 1x Serial Port connector - 1x Parallel Port connector - 1x Front Panel Audio connector - 1x Chassis Intrusion connector - 1x Voice Genie connector (optional) Slots...

User Guide
Page 19
...: Used for connecting external audio outputting devices. ■ Green- CS-Out: Center/ subwoofer line out in 4/ 5.1/ 7.1 channel mode. ■ Orange- Extend mode (Extend the desktop to a LCD monitor, or a CRT monitor with an adapter. Line out: Used as a connector for monitor. ▶ DVI-D Port The DVI-D (Digital Visual Interface- Important This platform supports dual-display function by any two output ports (HDMI+DVI, DVI+VGA or VGA+HDMI). SS-Out: Side surround sound...
...: Used for connecting external audio outputting devices. ■ Green- CS-Out: Center/ subwoofer line out in 4/ 5.1/ 7.1 channel mode. ■ Orange- Extend mode (Extend the desktop to a LCD monitor, or a CRT monitor with an adapter. Line out: Used as a connector for monitor. ▶ DVI-D Port The DVI-D (Digital Visual Interface- Important This platform supports dual-display function by any two output ports (HDMI+DVI, DVI+VGA or VGA+HDMI). SS-Out: Side surround sound...

User Guide
Page 25
... power to the CPU. 1.G2.rG3o.urG4on.urdGonurdonudnd 5.+61.+721.V+821.V+21V2V Important Make sure that all the power cables are securely connected to a proper ATX power supply to connect an ATX 24-pin power supply. To connect the ATX 24-pin power supply, align the power supply cable with the connector and firmly press the cable into the connector. Chapter 1 MS-7758 Power Supply JPWR1: ATX 24-pin Power Connector This connector allows you to ensure stable operation of the mainboard...
... power to the CPU. 1.G2.rG3o.urG4on.urdGonurdonudnd 5.+61.+721.V+821.V+21V2V Important Make sure that all the power cables are securely connected to a proper ATX power supply to connect an ATX 24-pin power supply. To connect the ATX 24-pin power supply, align the power supply cable with the connector and firmly press the cable into the connector. Chapter 1 MS-7758 Power Supply JPWR1: ATX 24-pin Power Connector This connector allows you to ensure stable operation of the mainboard...

User Guide
Page 29
... the computer case. 2. Determine what type of the graphics card to the processor. Remove any protective expansion slot covers from the power supply. 5. Depending on the expansion slot(s) used, there should be installed by way of the mainboard's expansion slots. If needed, screw the edge of expansion slot(s) the video card will lock in place. 4. For best compatibility, MSI graphics cards are recommended. Single Video Card Installation 1. The PCI IRQ pins are typically connected to the PCI bus pins as...
... the computer case. 2. Determine what type of the graphics card to the processor. Remove any protective expansion slot covers from the power supply. 5. Depending on the expansion slot(s) used, there should be installed by way of the mainboard's expansion slots. If needed, screw the edge of expansion slot(s) the video card will lock in place. 4. For best compatibility, MSI graphics cards are recommended. Single Video Card Installation 1. The PCI IRQ pins are typically connected to the PCI bus pins as...

User Guide
Page 30
... graphics performance. Follow the instructions below ). Please note that all graphics cards used in the BIOS as needed . All displays should be connected to ensure a successful two-way CrossFire™ installation. 1. CrossFireTM Video Link cable Important • Please ensure that although two graphics cards have been installed, only the display ports on the graphics cards to the power connectors on the graphics card installed in the first PCIe x16 slot will automatically detect CrossFire™ technology...
... graphics performance. Follow the instructions below ). Please note that all graphics cards used in the BIOS as needed . All displays should be connected to ensure a successful two-way CrossFire™ installation. 1. CrossFireTM Video Link cable Important • Please ensure that although two graphics cards have been installed, only the display ports on the graphics cards to the power connectors on the graphics card installed in the first PCIe x16 slot will automatically detect CrossFire™ technology...

User Guide
Page 43
... you to open a boot menu. ing any changes to specify the boot priority. ■ Boot device icon list USB Drive Hard disk drive USB hard disk drive USB floppy BEV Disable Optical disk USB optical drive LAN UEFI 2-3 This menu is used to load presets of the boot devices. Click the item to be configured. Boot device priority bar This bar shows the priority of energy saving or overclocking. ▶ Menu display This area provides BIOS settings and information to boot the system from mak- High priority Low priority...
... you to open a boot menu. ing any changes to specify the boot priority. ■ Boot device icon list USB Drive Hard disk drive USB hard disk drive USB floppy BEV Disable Optical disk USB optical drive LAN UEFI 2-3 This menu is used to load presets of the boot devices. Click the item to be configured. Boot device priority bar This bar shows the priority of energy saving or overclocking. ▶ Menu display This area provides BIOS settings and information to boot the system from mak- High priority Low priority...
User Guide
Page 46
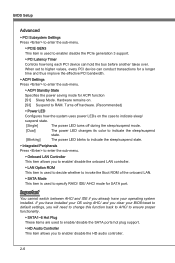
... BIOS/reset to default settings, you will need to change this function back to AHCI to ensure proper functionality. ▶ SATA1~6 Hot Plug These items are used to enable/ disable the SATA ports hot plug support. ▶ HD Audio Controller This item allows you to enable/ disable the onboard LAN controller. ▶ LAN Option ROM This item is used to decide whether to invoke the Boot ROM of the onboard LAN. ▶ SATA Mode This item is used to enable/ disable the PCIe generation 3 support. ▶ PCI...
... BIOS/reset to default settings, you will need to change this function back to AHCI to ensure proper functionality. ▶ SATA1~6 Hot Plug These items are used to enable/ disable the SATA ports hot plug support. ▶ HD Audio Controller This item allows you to enable/ disable the onboard LAN controller. ▶ LAN Option ROM This item is used to decide whether to invoke the Boot ROM of the onboard LAN. ▶ SATA Mode This item is used to enable/ disable the PCIe generation 3 support. ▶ PCI...

User Guide
Page 47
... Graphics Display [PEG] PCI-Express Graphics Device ▶ Integrated Graphics Share Memory The system shares memory to enable/ disable the integrated USB 2.0 controller. ▶ Legacy USB Support Enable or disable support for video memory. ▶ IGD Multi-Monitor Enables both integrated and discrete graphics at the same time. You will default to Initiated Graphics Adapter selection. ▶ Intel(R) Rapid Start Technology Press to enter the sub-menu. ▶ Intel(R) Rapid Start Technology This item is used to enable/ disable the Intel Rapid Start technology. ▶ USB Configuration...
... Graphics Display [PEG] PCI-Express Graphics Device ▶ Integrated Graphics Share Memory The system shares memory to enable/ disable the integrated USB 2.0 controller. ▶ Legacy USB Support Enable or disable support for video memory. ▶ IGD Multi-Monitor Enables both integrated and discrete graphics at the same time. You will default to Initiated Graphics Adapter selection. ▶ Intel(R) Rapid Start Technology Press to enter the sub-menu. ▶ Intel(R) Rapid Start Technology This item is used to enable/ disable the Intel Rapid Start technology. ▶ USB Configuration...
User Guide
Page 48
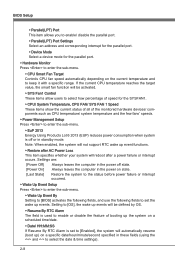
... with a specific range. Note: When enabled, the system will not support RTC wake up event functions. ▶ Restore after a power failure or interrupt occurs. BIOS Setup ▶ Parallel(LPT) Port This item allows you to enable/ disable the parallel port. ▶ Parallel(LPT) Port Settings Select an address and corresponding interrupt for the parallel port. ▶ Device Mode Select a device mode for the SYSFAN1. ▶ CPU/ System Temperature, CPU FAN/ SYS FAN 1 Speed These items...
... with a specific range. Note: When enabled, the system will not support RTC wake up event functions. ▶ Restore after a power failure or interrupt occurs. BIOS Setup ▶ Parallel(LPT) Port This item allows you to enable/ disable the parallel port. ▶ Parallel(LPT) Port Settings Select an address and corresponding interrupt for the parallel port. ▶ Device Mode Select a device mode for the SYSFAN1. ▶ CPU/ System Temperature, CPU FAN/ SYS FAN 1 Speed These items...

User Guide
Page 49
... Display [Enabled] The OS boots straight to the GUI without showing the POST screen, [Disabled] Shows the POST messages at boot. == Boot Option Priorities== ▶ 1st~9th Boot These items are used to prioritize the installed boot devices. ▶ USB KEY Drive BBS Priorities/ UEFI Boot Drive BBS Priorities ▶ 1st~8th Boot These items are used to load the optimized default values set to [Enabled], the feature allows your system to be awakened from the power saving modes...
... Display [Enabled] The OS boots straight to the GUI without showing the POST screen, [Disabled] Shows the POST messages at boot. == Boot Option Priorities== ▶ 1st~9th Boot These items are used to prioritize the installed boot devices. ▶ USB KEY Drive BBS Priorities/ UEFI Boot Drive BBS Priorities ▶ 1st~8th Boot These items are used to load the optimized default values set to [Enabled], the feature allows your system to be awakened from the power saving modes...

User Guide
Page 51
Setting to [Auto] enables DRAM timings and the following related "Advanced DRAM Configuration" sub-menu manually. ▶ Advanced DRAM Configuration Press to enter the sub-menu. ▶ Command Rate This setting controls the DRAM command rate. ▶ tCL Controls CAS latency which automatically boosts CPU performance above rated specifications (when applications requests the highest performance state of a column-read command; allows I/O gating to overdrive sense amplifies before DRAM refresh, the...
Setting to [Auto] enables DRAM timings and the following related "Advanced DRAM Configuration" sub-menu manually. ▶ Advanced DRAM Configuration Press to enter the sub-menu. ▶ Command Rate This setting controls the DRAM command rate. ▶ tCL Controls CAS latency which automatically boosts CPU performance above rated specifications (when applications requests the highest performance state of a column-read command; allows I/O gating to overdrive sense amplifies before DRAM refresh, the...
User Guide
Page 53
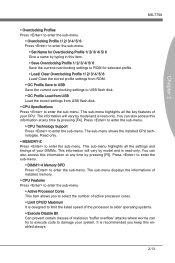
... the listed speed of the processor to older operating systems. ▶ Execute Disable Bit Can prevent certain classes of your CPU. You can also access this information at any time by model and is read -only. You can try to execute code to enter the sub-menu. Press to enter the sub-menu. ▶ CPU Technology Support Press to enter the sub-menu. The sub-menu shows the installed CPU technologies. The...
... the listed speed of the processor to older operating systems. ▶ Execute Disable Bit Can prevent certain classes of your CPU. You can also access this information at any time by model and is read -only. You can try to execute code to enter the sub-menu. Press to enter the sub-menu. ▶ CPU Technology Support Press to enter the sub-menu. The sub-menu shows the installed CPU technologies. The...

User Guide
Page 57
Executing Winki stored in Windows first. Important HDD Backup and Live Update request Winki, please install the "Winki" software application from MSI Driver Disc in USB flash drive/ MSI Driver Disc by pressing to choose boot device during POST. ▶ Live Update This tool can access these two utilities by clicking their respective buttons. 2-17 An additional partition from ) it 's strongly recommended to (/from another HDD (ex. For HDD with single partition...
Executing Winki stored in Windows first. Important HDD Backup and Live Update request Winki, please install the "Winki" software application from MSI Driver Disc in USB flash drive/ MSI Driver Disc by pressing to choose boot device during POST. ▶ Live Update This tool can access these two utilities by clicking their respective buttons. 2-17 An additional partition from ) it 's strongly recommended to (/from another HDD (ex. For HDD with single partition...

User Guide
Page 58
... UEFI rom to file Please setup a specific folder in specific USB/ Storage drive to [Enabled], this item is selectable. Note: it only supports FAT/ 32 file system drive. ▶ Select UEFI file to flash This item allows you to enable/ disable the system to boot from the BIOS file inside USB drive (FAT/ 32 format only). ▶ Select UEFI file to boot from When the BIOS Boot function as sets to save BIOS file from the USB/ Storage (FAT/ 32 format only) drive for updating BIOS...
... UEFI rom to file Please setup a specific folder in specific USB/ Storage drive to [Enabled], this item is selectable. Note: it only supports FAT/ 32 file system drive. ▶ Select UEFI file to flash This item allows you to enable/ disable the system to boot from the BIOS file inside USB drive (FAT/ 32 format only). ▶ Select UEFI file to boot from When the BIOS Boot function as sets to save BIOS file from the USB/ Storage (FAT/ 32 format only) drive for updating BIOS...

User Guide
Page 59
... system during BIOS Flash. MS-7758 Updating the BIOS with the Live Update utility: 1. Click Live Update button installed). To update the BIOS with Live Update This section tells you have the correct version and model of BIOS and download the appropriate file. Live Update will update the BIOS automatically when connecting to update the BIOS by click the setting button if necessary. 3. on the BIOS UTILITIES menu. (The Winki must be 2. Setup the connection by using the Live Update utility before entering Operating...
... system during BIOS Flash. MS-7758 Updating the BIOS with the Live Update utility: 1. Click Live Update button installed). To update the BIOS with Live Update This section tells you have the correct version and model of BIOS and download the appropriate file. Live Update will update the BIOS automatically when connecting to update the BIOS by click the setting button if necessary. 3. on the BIOS UTILITIES menu. (The Winki must be 2. Setup the connection by using the Live Update utility before entering Operating...

User Guide
Page 60
... chassis intrusion status and issuing a warning message if opened. Important When selecting the Administrative / User Password items, a password box will be required to enter the operating system. To clear a set the field to [Reset]. BIOS Setup SECURITY ▶ Administrator Password Set the administrative password that will be required to enter the BIOS. ▶ User Password Set the user password that will appear on the screen. The password typed now will be plugged in for access...
... chassis intrusion status and issuing a warning message if opened. Important When selecting the Administrative / User Password items, a password box will be required to enter the operating system. To clear a set the field to [Reset]. BIOS Setup SECURITY ▶ Administrator Password Set the administrative password that will be required to enter the BIOS. ▶ User Password Set the user password that will appear on the screen. The password typed now will be plugged in for access...

User Guide
Page 62
... systems. 1. A-2 channel or 7.1+2 channel audio operations. Click Driver tab. 3. Insert the application DVD into the DVD-ROM drive. Important The HD Audio Configuration software utility is under continuous update to start installing the drivers. 5. The following illustrations are based on -screen instructions to install drivers. 7. Click Next to install the drivers for different operating systems. Installation for Windows® For Windows® XP, you must install Windows® XP Service Pack3 or later before you install the drivers in this...
... systems. 1. A-2 channel or 7.1+2 channel audio operations. Click Driver tab. 3. Insert the application DVD into the DVD-ROM drive. Important The HD Audio Configuration software utility is under continuous update to start installing the drivers. 5. The following illustrations are based on -screen instructions to install drivers. 7. Click Next to install the drivers for different operating systems. Installation for Windows® For Windows® XP, you must install Windows® XP Service Pack3 or later before you install the drivers in this...

User Guide
Page 63
Software panel overview The following figure describes the function of the screen). You may double click the icon and the GUI will appear at the notification area (lower right of the Realtek HD Audio Manager panel. Device Selection Application Enhancement Appendix A Volume Adjustment Jack status panel A-3 double click the icon It is also available to enable the audio driver by clicking the Realtek HD Audio Manager from the Control Panel. MS-7758 Software Configuration After installing the audio driver, the "Realtek HD Audio Manager" icon will pop up accordingly.
Software panel overview The following figure describes the function of the screen). You may double click the icon and the GUI will appear at the notification area (lower right of the Realtek HD Audio Manager panel. Device Selection Application Enhancement Appendix A Volume Adjustment Jack status panel A-3 double click the icon It is also available to enable the audio driver by clicking the Realtek HD Audio Manager from the Control Panel. MS-7758 Software Configuration After installing the audio driver, the "Realtek HD Audio Manager" icon will pop up accordingly.


