User Guide
Page 2
... FAQ, technical guide, BIOS updates, driver updates, and other information: http://www.msi.com/service/download/ ◙ Contact our technical staff at: http://support.msi.com/ ii Alternatively, please try the following help resources for further guidance. ◙ Visit the MSI website for PCB 4.X ... or local distributor. Our products are trademarks of Apple Inc. Trademarks All trademarks are the properties of their respective owners. ■ MSI® is registered trademark of Micro-Star Int'l Co.,Ltd. ■ NVIDIA® is registered trademark of NVIDIA Corporation. ■...
... FAQ, technical guide, BIOS updates, driver updates, and other information: http://www.msi.com/service/download/ ◙ Contact our technical staff at: http://support.msi.com/ ii Alternatively, please try the following help resources for further guidance. ◙ Visit the MSI website for PCB 4.X ... or local distributor. Our products are trademarks of Apple Inc. Trademarks All trademarks are the properties of their respective owners. ■ MSI® is registered trademark of Micro-Star Int'l Co.,Ltd. ■ NVIDIA® is registered trademark of NVIDIA Corporation. ■...
User Guide
Page 8
... Components Guide 2-2 Screw Holes 2-3 CPU (Central Processing Unit 2-4 Memory 2-7 Power Supply 2-9 Back Panel 2-10 Connectors 2-12 Jumpers 2-17 Slots 2-18 LED Status Indicators 2-19 Chapter 3 BIOS Setup 3-1 Entering Setup 3-2 The Menu Bar 3-4 Main Menu 3-5 Advanced 3-6 Overclocking 3-11 M-Flash 3-17 Security 3-18 Green Power 3-20 Boot 3-21 Save & Exit 3-22 viii
... Components Guide 2-2 Screw Holes 2-3 CPU (Central Processing Unit 2-4 Memory 2-7 Power Supply 2-9 Back Panel 2-10 Connectors 2-12 Jumpers 2-17 Slots 2-18 LED Status Indicators 2-19 Chapter 3 BIOS Setup 3-1 Entering Setup 3-2 The Menu Bar 3-4 Main Menu 3-5 Advanced 3-6 Overclocking 3-11 M-Flash 3-17 Security 3-18 Green Power 3-20 Boot 3-21 Save & Exit 3-22 viii
User Guide
Page 28
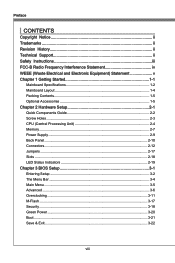
...~6 (6Gb/s) supported by SB950 Important Please do not fold the Serial ATA cable into 90-degree angle. To clear the warning, you must enter the BIOS utility and clear the record. 2-12 1.C2.IGNTroRuUnd Chassis Intrusion Connector: JCI1 This connector connects to one Serial ATA device. * The MB layout in this...
...~6 (6Gb/s) supported by SB950 Important Please do not fold the Serial ATA cable into 90-degree angle. To clear the warning, you must enter the BIOS utility and clear the record. 2-12 1.C2.IGNTroRuUnd Chassis Intrusion Connector: JCI1 This connector connects to one Serial ATA device. * The MB layout in this...

User Guide
Page 34
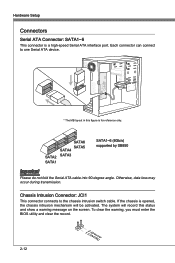
PCI Interrupt Request Routing The IRQ, acronym of interrupt request line and pronounced I-R-Q, are typically connected to the PCI bus pins as jumpers, switches or BIOS configuration. Meanwhile, read the documentation for the expansion card to the microprocessor. Hardware Setup Slots PCIe (Peripheral Component Interconnect Express) Slot The PCIe slot supports ...
PCI Interrupt Request Routing The IRQ, acronym of interrupt request line and pronounced I-R-Q, are typically connected to the PCI bus pins as jumpers, switches or BIOS configuration. Meanwhile, read the documentation for the expansion card to the microprocessor. Hardware Setup Slots PCIe (Peripheral Component Interconnect Express) Slot The PCIe slot supports ...
User Guide
Page 37
Chapter 3 BIOS Setup This chapter provides information on the screen during the system booting up, and requests you to change the default settings for optimum use. You may need to run the Setup program when: ■ An error message appears on the BIOS Setup program and allows you to run SETUP. ■ You want to configure the system for customized features.
Chapter 3 BIOS Setup This chapter provides information on the screen during the system booting up, and requests you to change the default settings for optimum use. You may need to run the Setup program when: ■ An error message appears on the BIOS Setup program and allows you to run SETUP. ■ You want to configure the system for customized features.

User Guide
Page 38
.... • Upon boot-up, the 1st line appearing after the memory count is usually in the format: E7640AMS.xxx 050511 where: 1st digit refers to BIOS type as E = EFI 2nd - 5th digit refers to the model number. 6th digit refers to the chipset as I = Intel, N = nVidia, A = AMD and V = VIA. 7th -... the message disappears before you respond and you still wish to enter Setup, restart the system by simultaneously pressing , , and keys. It is the BIOS version. Therefore, the description may also restart the system by turning it OFF and On or pressing the RESET button. When the message below appears...
.... • Upon boot-up, the 1st line appearing after the memory count is usually in the format: E7640AMS.xxx 050511 where: 1st digit refers to BIOS type as E = EFI 2nd - 5th digit refers to the model number. 6th digit refers to the chipset as I = Intel, N = nVidia, A = AMD and V = VIA. 7th -... the message disappears before you respond and you still wish to enter Setup, restart the system by simultaneously pressing , , and keys. It is the BIOS version. Therefore, the description may also restart the system by turning it OFF and On or pressing the RESET button. When the message below appears...

User Guide
Page 39
General Help The BIOS setup program provides a General Help screen. If you find a right pointer symbol (as shown in the right view) appears to the left of certain fields ...
General Help The BIOS setup program provides a General Help screen. If you find a right pointer symbol (as shown in the right view) appears to the left of certain fields ...

User Guide
Page 40
...Use this menu for basic system configurations, such as time, date etc. ▶ Advanced Use this menu to setup the items of the BIOS special enhanced features, integrated peripherals, power management and PC health status. ▶ Overclocking Use this menu to specify your settings for frequency/voltage... control and overclocking. ▶ M-Flash Use this menu to read/ flash the BIOS from storage drive (FAT/ FAT32 format only). ▶ Security Use this menu to set supervisor and user passwords. ▶ Green Power Use ...
...Use this menu for basic system configurations, such as time, date etc. ▶ Advanced Use this menu to setup the items of the BIOS special enhanced features, integrated peripherals, power management and PC health status. ▶ Overclocking Use this menu to specify your settings for frequency/voltage... control and overclocking. ▶ M-Flash Use this menu to read/ flash the BIOS from storage drive (FAT/ FAT32 format only). ▶ Security Use this menu to set supervisor and user passwords. ▶ Green Power Use ...

User Guide
Page 41
... current date). The format is . ▶ SATA Port1~6 Press to the SATA connectors on the mainboard. ▶ System Information This area shows the CPU information, BIOS version and memory status of installed SATA device. Important SATA Port1~6 are appearing when you want (usually the current time). The time format is . [day... the sub-menu. through Dec. [date] The date from 1 to 31 can be keyed by numeric function keys. [year] The year can be adjusted by BIOS.
... current date). The format is . ▶ SATA Port1~6 Press to the SATA connectors on the mainboard. ▶ System Information This area shows the CPU information, BIOS version and memory status of installed SATA device. Important SATA Port1~6 are appearing when you want (usually the current time). The time format is . [day... the sub-menu. through Dec. [date] The date from 1 to 31 can be keyed by numeric function keys. [year] The year can be adjusted by BIOS.

User Guide
Page 42
BIOS Setup Advanced ▶ PCI Subsystem Settings Press to indicate the sleep/suspend state. 3-6 When set the item to higher values. ▶ ACPI Settings Press to ...
BIOS Setup Advanced ▶ PCI Subsystem Settings Press to indicate the sleep/suspend state. 3-6 When set the item to higher values. ▶ ACPI Settings Press to ...

User Guide
Page 44
... the sub-menu. ▶ Serial (COM) Port0 This item allows you to South Bridge. Set to [SB] if you to select the USB 2.0 source chip. BIOS Setup ▶ Onboard USB 3.0 Controller This item allows you to enable/ disable the onboard USB 3.0 controller. ▶ High-Speed USB link This item allows you...
... the sub-menu. ▶ Serial (COM) Port0 This item allows you to South Bridge. Set to [SB] if you to select the USB 2.0 source chip. BIOS Setup ▶ Onboard USB 3.0 Controller This item allows you to enable/ disable the onboard USB 3.0 controller. ▶ High-Speed USB link This item allows you...

User Guide
Page 46
... wake up the system on PCI or PCIE device. ▶ Resume From S3 by OS. ▶ Resume By RTC Alarm The field is detected. 3-10 BIOS Setup ▶ Wake Up Event Setup Press to enter the sub-menu. ▶ Wake Up Event By Setting to... [BIOS] activates the following fields, and use the following fields to RAM) sleep state. ▶ Resume From S3 by PS/2 Mouse/ Keyboard These items determine whether ...
... wake up the system on PCI or PCIE device. ▶ Resume From S3 by OS. ▶ Resume By RTC Alarm The field is detected. 3-10 BIOS Setup ▶ Wake Up Event Setup Press to enter the sub-menu. ▶ Wake Up Event By Setting to... [BIOS] activates the following fields, and use the following fields to RAM) sleep state. ▶ Resume From S3 by PS/2 Mouse/ Keyboard These items determine whether ...

User Guide
Page 48
... DRAM refresh, refreshing may fail to [Auto], the system will detect the DRAM Frequency automatically. ▶ Adjusted DRAM Frequency It shows the adjusted Memory frequency. BIOS Setup ▶ DRAM Frequency This item is allowed for Row Address Strobe (RAS) to be incomplete and DRAM may be allowed to precharge. The less...
... DRAM refresh, refreshing may fail to [Auto], the system will detect the DRAM Frequency automatically. ▶ Adjusted DRAM Frequency It shows the adjusted Memory frequency. BIOS Setup ▶ DRAM Frequency This item is allowed for Row Address Strobe (RAS) to be incomplete and DRAM may be allowed to precharge. The less...

User Guide
Page 49
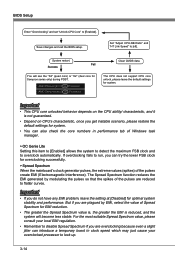
.... Please refer to set the memory timings for memory channel 1/ 2. ▶ DCT Unganged Mode This feature is an important parameter for CPU core unlocked in BIOS setup. 3-13 It allows system to access multiple banks simultaneously. ▶ HT Link Speed This item allows you can set the Hyper-Transport Link speed...
.... Please refer to set the memory timings for memory channel 1/ 2. ▶ DCT Unganged Mode This feature is an important parameter for CPU core unlocked in BIOS setup. 3-13 It allows system to access multiple banks simultaneously. ▶ HT Link Speed This item allows you can set the Hyper-Transport Link speed...
User Guide
Page 50
..., leave the setting at [Disabled] for system. Fail Success You will become less stable. Important • If you are reduced to overclock automatically. System restart. BIOS Setup Enter "Overclocking" and set "Unlock CPU Core" to [x8]. AMD Phenom(tm) II X4 Processor AMD Sempron(tm) II X2 Processor Clear CMOS data... the default settings for optimal system stability and performance. Set "Adjust CPU-NB Ratio" and "HT Link Speed" to [Enabled]. Save changes and exit the BIOS setup.
..., leave the setting at [Disabled] for system. Fail Success You will become less stable. Important • If you are reduced to overclock automatically. System restart. BIOS Setup Enter "Overclocking" and set "Unlock CPU Core" to [x8]. AMD Phenom(tm) II X4 Processor AMD Sempron(tm) II X2 Processor Clear CMOS data... the default settings for optimal system stability and performance. Set "Adjust CPU-NB Ratio" and "HT Link Speed" to [Enabled]. Save changes and exit the BIOS setup.

User Guide
Page 52
...; CPU Features Press to double confirm that: • Run BIOS Setup, and select Cell Menu. Important To ensure that Cool'n'Quiet function is required to enter the sub-menu. ▶ AMD Cool'n'Quiet The Cool'n'...
...; CPU Features Press to double confirm that: • Run BIOS Setup, and select Cell Menu. Important To ensure that Cool'n'Quiet function is required to enter the sub-menu. ▶ AMD Cool'n'Quiet The Cool'n'...

User Guide
Page 53
...9654; Select one file to Boot When the BIOS Boot function as sets to select particular BIOS file from the USB/ Storage (FAT/ 32 format only) drive for updating BIOS. 3-17 And the system will boot from selected BIOS file. ▶ Save BIOS to storage Please setup a specific folder in specific... USB/ Storage drive to select particular BIOS file from BIOS ROM chip data. This item allows to save BIOS file from the USB/ Storage ...
...9654; Select one file to Boot When the BIOS Boot function as sets to select particular BIOS file from the USB/ Storage (FAT/ 32 format only) drive for updating BIOS. 3-17 And the system will boot from selected BIOS file. ▶ Save BIOS to storage Please setup a specific folder in specific... USB/ Storage drive to select particular BIOS file from BIOS ROM chip data. This item allows to save BIOS file from the USB/ Storage ...

User Guide
Page 54
... to enter it every time you will be disabled. When a user password has been set, you try to enter BIOS Setup. ▶ User Password This item is used to set the administrator password. BIOS Setup Security ▶ Administrator Password This item is used to enable/ disable USB drive as a key. 3-18 When...
... to enter it every time you will be disabled. When a user password has been set, you try to enter BIOS Setup. ▶ User Password This item is used to set the administrator password. BIOS Setup Security ▶ Administrator Password This item is used to enable/ disable USB drive as a key. 3-18 When...
User Guide
Page 56
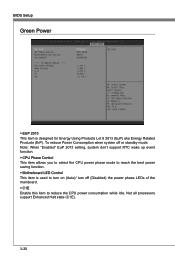
... the best power saving function. ▶ Motherboard LED Control This item is designed for Energy Using Products Lot 6 2013 (EuP) aka Energy Related Products (ErP). BIOS Setup Green Power ▶ EUP 2013 This item is used to turn on (Auto)/ turn off or standby mode.
... the best power saving function. ▶ Motherboard LED Control This item is designed for Energy Using Products Lot 6 2013 (EuP) aka Energy Related Products (ErP). BIOS Setup Green Power ▶ EUP 2013 This item is used to turn on (Auto)/ turn off or standby mode.

User Guide
Page 58
Save & Exit ▶ Discard Changes and Exit Use this item to abandon all changes and exit setup. ▶ Save Changes and Reboot Use this item to save changes and reset the system. ▶ Save Changes Use this item to save changes. ▶ Discard Changes Use this item to abandon all changes. ▶ Restore Defaults Use this item to load the optimized default values set by the BIOS vendor. == Boot Override == The installed storage devices will appear on this menu, you can select one of them be a boot device. ▶ Built-in EFI Shell Use this item to enter the EFI Shell.
Save & Exit ▶ Discard Changes and Exit Use this item to abandon all changes and exit setup. ▶ Save Changes and Reboot Use this item to save changes and reset the system. ▶ Save Changes Use this item to save changes. ▶ Discard Changes Use this item to abandon all changes. ▶ Restore Defaults Use this item to load the optimized default values set by the BIOS vendor. == Boot Override == The installed storage devices will appear on this menu, you can select one of them be a boot device. ▶ Built-in EFI Shell Use this item to enter the EFI Shell.


