
User Guide
Page 6
... Clear CMOS Jumper: JBAT1 2-22 Slots 2-23 AGP (Accelerated Graphics Port) Slot 2-23 PCI (Peripheral Component Interconnect) Slots 2-23 PCI Interrupt Request Routing 2-23 Chapter 3. BIOS Setup 3-1 Entering Setup 3-2 Control Keys 3-2 Getting Help 3-3 The Main Menu 3-4 Standard CMOS Features 3-6 Advanced...
... Clear CMOS Jumper: JBAT1 2-22 Slots 2-23 AGP (Accelerated Graphics Port) Slot 2-23 PCI (Peripheral Component Interconnect) Slots 2-23 PCI Interrupt Request Routing 2-23 Chapter 3. BIOS Setup 3-1 Entering Setup 3-2 Control Keys 3-2 Getting Help 3-3 The Main Menu 3-4 Standard CMOS Features 3-6 Advanced...
User Guide
Page 7
... SiS964 SATA RAID 4-1 Introduction 4-2 System Requirement 4-2 RAID Basics 4-2 Performance hints and recommend setting 4-2 RAID 0 (Striping array 4-3 RAID 1 (Mirror array 4-3 JBOD (Spanning array 4-3 System BIOS Setup 4-4 BIOS Configuration 4-5 Starting BIOS Utility 4-5 Create a RAID 0 (Stripe) Array for performance 4-8 Create a RAID 1 (Mirror) Array for performance 4-12 Create a JBOD Array for performance 4-16 Delete a RAID array 4-18...
... SiS964 SATA RAID 4-1 Introduction 4-2 System Requirement 4-2 RAID Basics 4-2 Performance hints and recommend setting 4-2 RAID 0 (Striping array 4-3 RAID 1 (Mirror array 4-3 JBOD (Spanning array 4-3 System BIOS Setup 4-4 BIOS Configuration 4-5 Starting BIOS Utility 4-5 Create a RAID 0 (Stripe) Array for performance 4-8 Create a RAID 1 (Mirror) Array for performance 4-12 Create a JBOD Array for performance 4-16 Delete a RAID array 4-18...

User Guide
Page 11
....1 Standard BIOS h 4MB Award BIOS with AC97 2.3 Spec - Comply with PNP BIOS, ACPI, SMBIOS 2.3, Green and Boot Block. Mounting h 9 mounting holes. 1-3 Meets PC2001 audio performance requirement - Can support SPDIF out via a 3-pin SPDIF-Out pinheader. h Realtek 8201BL LAN PHY. h Provides DMI 2.0, WFM 2.0, WOL, WOR, chassis intrusion, and SMBus for system management. Dimension h Micro-ATX Form...
....1 Standard BIOS h 4MB Award BIOS with AC97 2.3 Spec - Comply with PNP BIOS, ACPI, SMBIOS 2.3, Green and Boot Block. Mounting h 9 mounting holes. 1-3 Meets PC2001 audio performance requirement - Can support SPDIF out via a 3-pin SPDIF-Out pinheader. h Realtek 8201BL LAN PHY. h Provides DMI 2.0, WFM 2.0, WOL, WOR, chassis intrusion, and SMBus for system management. Dimension h Micro-ATX Form...
User Guide
Page 28
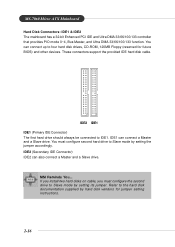
... also connect a Master and a Slave drive. MSI Reminds You... IDE2 IDE1 IDE1 (Primary IDE Connector) The first hard drive should always be connected to four hard disk drives, CD-ROM, 120MB Floppy (reserved for jumper setting instructions. 2-16 MS-7060 Micro ATX Mainboard Hard Disk Connectors: IDE1 & IDE2 The ... If you install two hard disks on cable, you must configure second hard drive to Slave mode by hard disk vendors for future BIOS) and other devices. You must configure the second drive to Slave mode by setting the jumper accordingly. These connectors support the provided ...
... also connect a Master and a Slave drive. MSI Reminds You... IDE2 IDE1 IDE1 (Primary IDE Connector) The first hard drive should always be connected to four hard disk drives, CD-ROM, 120MB Floppy (reserved for jumper setting instructions. 2-16 MS-7060 Micro ATX Mainboard Hard Disk Connectors: IDE1 & IDE2 The ... If you install two hard disks on cable, you must configure second hard drive to Slave mode by hard disk vendors for future BIOS) and other devices. You must configure the second drive to Slave mode by setting the jumper accordingly. These connectors support the provided ...

User Guide
Page 31
...® Front Panel I/O Connectivity Design Guide. If the Chassis is open, the switch will record this status. To clear the warning, you must enter the BIOS setting and clear the status. Do not use. JFP2 Pin Definition PIN SIGNAL 1 GND 3 SLED 5 PLED 7 NC PIN SIGNAL 2 SPK- 4 BUZ+ 6 BUZ- 8 SPK+ 2-19 Hardware...
...® Front Panel I/O Connectivity Design Guide. If the Chassis is open, the switch will record this status. To clear the warning, you must enter the BIOS setting and clear the status. Do not use. JFP2 Pin Definition PIN SIGNAL 1 GND 3 SLED 5 PLED 7 NC PIN SIGNAL 2 SPK- 4 BUZ+ 6 BUZ- 8 SPK+ 2-19 Hardware...

User Guide
Page 35
... to meet your needs. AGP is an interface specification designed for the graphics controller to the PCI bus INT A# ~ INT D# pins as jumpers, switches or BIOS configuration. Hardware Setup Slots The motherboard provides one AGP slot, three 32-bit PCI bus slots.
... to meet your needs. AGP is an interface specification designed for the graphics controller to the PCI bus INT A# ~ INT D# pins as jumpers, switches or BIOS configuration. Hardware Setup Slots The motherboard provides one AGP slot, three 32-bit PCI bus slots.
User Guide
Page 36
... reference only. 2. Therefore, the description may need to run SETUP. ” You want to configure the system for customized features. V1.1 refers to the BIOS version. 040104 refers to the customer, MS=all standard customers. MSI Reminds You... 1. While booting up , and requests you to change the default settings for optimum use...
... reference only. 2. Therefore, the description may need to run SETUP. ” You want to configure the system for customized features. V1.1 refers to the BIOS version. 040104 refers to the customer, MS=all standard customers. MSI Reminds You... 1. While booting up , and requests you to change the default settings for optimum use...

User Guide
Page 38
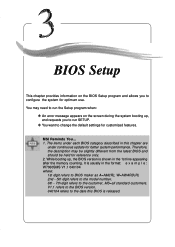
...for reference only. 3-3 The on-line description of the highlighted setup function is the Main Menu. General Help The BIOS setup program provides a General Help screen. MSI Reminds You... BIOS Setup Getting Help After entering the Setup menu, the first menu you want to return to the main menu, just... press . The Help screen lists the appropriate keys to exit the Help screen. You can be launched from the latest BIOS and should be...
...for reference only. 3-3 The on-line description of the highlighted setup function is the Main Menu. General Help The BIOS setup program provides a General Help screen. MSI Reminds You... BIOS Setup Getting Help After entering the Setup menu, the first menu you want to return to the main menu, just... press . The Help screen lists the appropriate keys to exit the Help screen. You can be launched from the latest BIOS and should be...
User Guide
Page 39
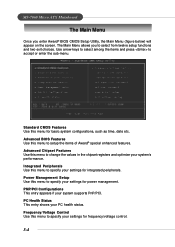
MS-7060 Micro ATX Mainboard The Main Menu Once you to select from twelve setup functions and two exit choices. Power Management Setup Use this menu to specify your .../Voltage Control Use this menu to specify your system's performance. The Main Menu allows you enter Award® BIOS CMOS Setup Utility, the Main Menu (figure below) will appear on the screen. Advanced BIOS Features Use this menu for frequency/voltage control. 3-4 Standard CMOS Features Use this menu to accept or enter...
MS-7060 Micro ATX Mainboard The Main Menu Once you to select from twelve setup functions and two exit choices. Power Management Setup Use this menu to specify your .../Voltage Control Use this menu to specify your system's performance. The Main Menu allows you enter Award® BIOS CMOS Setup Utility, the Main Menu (figure below) will appear on the screen. Advanced BIOS Features Use this menu for frequency/voltage control. 3-4 Standard CMOS Features Use this menu to accept or enter...

User Guide
Page 40
Set Supervisor Password Use this menu to set User Password. Save & Exit Setup Save changes to CMOS and exit setup. Set User Password Use this menu to set Supervisor Password. Exit Without Saving Abandon all changes and exit setup. 3-5 Load Optimized Defaults Use this menu to load factory default settings into the BIOS for the best system performance, but the system stability may be affected. BIOS Setup Load Fail-Safe Defaults Use this menu to load the BIOS values for stable system performance operations.
Set Supervisor Password Use this menu to set User Password. Save & Exit Setup Save changes to CMOS and exit setup. Set User Password Use this menu to set Supervisor Password. Exit Without Saving Abandon all changes and exit setup. 3-5 Load Optimized Defaults Use this menu to load factory default settings into the BIOS for the best system performance, but the system stability may be affected. BIOS Setup Load Fail-Safe Defaults Use this menu to load the BIOS values for stable system performance operations.

User Guide
Page 41
... includes no, one or more than one setup items. Use the arrow keys to highlight the item and then use [Manual] to Sat, determined by BIOS. Read-only. The month from Sun to define your own drive type manually. 3-6 through Dec. Time The time format is not matched or listed,... are divided into 11 categories. The year can be adjusted by numeric function keys. If your drive must match with the drive table. MS-7060 Micro ATX Mainboard Standard CMOS Features The items in each item. The date from 1 to select [Manual], [None] or [Auto] type. IDE Primary/Secondary Master/Slave ...
... includes no, one or more than one setup items. Use the arrow keys to highlight the item and then use [Manual] to Sat, determined by BIOS. Read-only. The month from Sun to define your own drive type manually. 3-6 through Dec. Time The time format is not matched or listed,... are divided into 11 categories. The year can be adjusted by numeric function keys. If your drive must match with the drive table. MS-7060 Micro ATX Mainboard Standard CMOS Features The items in each item. The date from 1 to select [Manual], [None] or [Auto] type. IDE Primary/Secondary Master/Slave ...
User Guide
Page 42
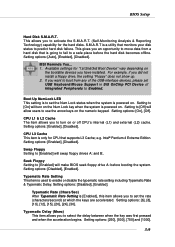
...). 3-7 Halt On The setting determines whether the system will stop for a keyboard error. All, But Keyboard The system doesn't stop if an error is detected. BIOS Setup If you to set the type of floppy drives installed. Landing Zone Cylinder location of the landing zone.
...). 3-7 Halt On The setting determines whether the system will stop for a keyboard error. All, But Keyboard The system doesn't stop if an error is detected. BIOS Setup If you to set the type of floppy drives installed. Landing Zone Cylinder location of the landing zone.

User Guide
Page 43
... Protection The item is [Enabled] and any attempt to boot from other device if the system fails to write data into this area is made, BIOS will skip some check items. Setting options: [Disabled], [Enabled]. Boot Sequence Press and the following sub-menu appears: 1st/2nd/3rd Boot Device...beep. If the function is to set the sequence of boot devices where BIOS attempts to show the company logo on the full screen at boot. [Disabled] Shows the POST messages at boot. MS-7060 Micro ATX Mainboard Advanced BIOS Features Quick Boot Setting the item to [Enabled] allows the system to ...
... Protection The item is [Enabled] and any attempt to boot from other device if the system fails to write data into this area is made, BIOS will skip some check items. Setting options: [Disabled], [Enabled]. Boot Sequence Press and the following sub-menu appears: 1st/2nd/3rd Boot Device...beep. If the function is to set the sequence of boot devices where BIOS attempts to show the company logo on the full screen at boot. [Disabled] Shows the POST messages at boot. MS-7060 Micro ATX Mainboard Advanced BIOS Features Quick Boot Setting the item to [Enabled] allows the system to ...
User Guide
Page 44
...On], [Off]. Setting options: [Auto], [Enabled], [Disabled]. Setting to [Off] will allow users to [Enabled] will make BIOS seek floppy drive A: before the hard disk becomes offline. Intel® Pentium 4 Extreme Edition. Typematic Rate Setting This item is powered...safe place before booting the system. CPU L1 & L2 Cache The item allows you have installed. e.g. BIOS Setup Hard Disk S.M.A.R.T. Available settings for the hard disks. Setting options: [Enabled], [Disabled]. MSI Reminds You... 1. Setting options: [Enabled], [Disabled]. Setting options: [250], [500], [750]...
...On], [Off]. Setting options: [Auto], [Enabled], [Disabled]. Setting to [Off] will allow users to [Enabled] will make BIOS seek floppy drive A: before the hard disk becomes offline. Intel® Pentium 4 Extreme Edition. Typematic Rate Setting This item is powered...safe place before booting the system. CPU L1 & L2 Cache The item allows you have installed. e.g. BIOS Setup Hard Disk S.M.A.R.T. Available settings for the hard disks. Setting options: [Enabled], [Disabled]. MSI Reminds You... 1. Setting options: [Enabled], [Disabled]. Setting options: [250], [500], [750]...
User Guide
Page 45
...: [Enabled], [Disabled]. Enabling APIC mode will increase the system performance. MS-7060 Micro ATX Mainboard Security Option This specifies the type of BIOS password protection that supports HT Technology and has it is possible if you choose [Yes...you cannot run the OS/2® operating system with HT Technology; *Chipset: A chipset that supports HT Technology; *BIOS: A BIOS that is implemented. But it enabled; *OS: Only Microsoft® Windows 2000 and XP can support HT technology...[Disabled] the Intel Hyper Threading CPU function. Setting options: [1.4], [1.1]. MSI Reminds You...
...: [Enabled], [Disabled]. Enabling APIC mode will increase the system performance. MS-7060 Micro ATX Mainboard Security Option This specifies the type of BIOS password protection that supports HT Technology and has it is possible if you choose [Yes...you cannot run the OS/2® operating system with HT Technology; *Chipset: A chipset that supports HT Technology; *BIOS: A BIOS that is implemented. But it enabled; *OS: Only Microsoft® Windows 2000 and XP can support HT technology...[Disabled] the Intel Hyper Threading CPU function. Setting options: [1.4], [1.1]. MSI Reminds You...

User Guide
Page 46
.../Timing Control Press and the following sub-menu appears: Current CPU/DRAM/DDR Frequency These items allow you are dependent on the sys tem design. BIOS Setup Advanced Chipset Features MSI Reminds You... Change these settings only if you to view the current CPU/DRAM/DDR frequency.
.../Timing Control Press and the following sub-menu appears: Current CPU/DRAM/DDR Frequency These items allow you are dependent on the sys tem design. BIOS Setup Advanced Chipset Features MSI Reminds You... Change these settings only if you to view the current CPU/DRAM/DDR frequency.

User Guide
Page 48
... the CPU to write directly to AGP for video memory, from [16] to [128] MB. OnChip AGP Control Press and the following sub-menu appears: BIOS Setup AGP Aperture Size This setting controls just how much system RAM can be allocated to the graphics card without any translation. Setting options:[100MHz...
... the CPU to write directly to AGP for video memory, from [16] to [128] MB. OnChip AGP Control Press and the following sub-menu appears: BIOS Setup AGP Aperture Size This setting controls just how much system RAM can be allocated to the graphics card without any translation. Setting options:[100MHz...
User Guide
Page 49
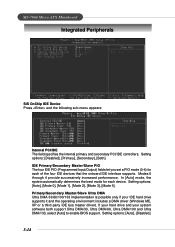
... possible only if your system software both support Ultra DMA/33, Ultra DMA/66, Ultra DMA/100 and Ultra DMA/133, select [Auto] to enable BIOS support. Setting options: [Auto], [Disabled]. 3-14 Modes 0 through 4 provide successively increased performance. Setting options: [Auto], [Mode 0], [Mode 1], [Mode 2], [Mode ...it and the operating environment includes a DMA driver (Windows ME, XP or a third-party IDE bus master driver). MS-7060 Micro ATX Mainboard Integrated Peripherals SiS OnChip IDE Device Press and the following sub-menu appears: Internal PCI/IDE The field specifies the internal ...
... possible only if your system software both support Ultra DMA/33, Ultra DMA/66, Ultra DMA/100 and Ultra DMA/133, select [Auto] to enable BIOS support. Setting options: [Auto], [Disabled]. 3-14 Modes 0 through 4 provide successively increased performance. Setting options: [Auto], [Mode 0], [Mode 1], [Mode 2], [Mode ...it and the operating environment includes a DMA driver (Windows ME, XP or a third-party IDE bus master driver). MS-7060 Micro ATX Mainboard Integrated Peripherals SiS OnChip IDE Device Press and the following sub-menu appears: Internal PCI/IDE The field specifies the internal ...
User Guide
Page 50
... options: [Enabled], [Disabled]. Setting options: [Enabled], [Disabled]. 3-15 Setting options: [Disabled], [Enabled]. Disable the controller if you to enable/disable the 10/100M Ethernet function. BIOS Setup IDE DMA transfer access Setting to [Enabled] will open DMA bus master and execute DMA action in the operating system that does not support...
... options: [Enabled], [Disabled]. Setting options: [Enabled], [Disabled]. 3-15 Setting options: [Disabled], [Enabled]. Disable the controller if you to enable/disable the 10/100M Ethernet function. BIOS Setup IDE DMA transfer access Setting to [Enabled] will open DMA bus master and execute DMA action in the operating system that does not support...

User Guide
Page 51
... in this time, the user can choose between DMA channel [3] or [1]. Setting options: [PCI Slot], [AGP]. 3-16 Selecting [Auto] allows BIOS to use it , the following sub-menu appears: Onboard FDC Controller Select [Enabled] if your primary graphics adapter. Setting options: [Disabled], [3F8/...item selects the EPP mode. Setting options: [378/IRQ7], [278/IRQ5], [3BC/IRQ7], [Disabled]. After selecting it . MS-7060 Micro ATX Mainboard Onboard SuperIO Device Press and the following message will appear: "ECP Mode Use DMA." Onboard Parallel Port This specifies the I/O port...
... in this time, the user can choose between DMA channel [3] or [1]. Setting options: [PCI Slot], [AGP]. 3-16 Selecting [Auto] allows BIOS to use it , the following sub-menu appears: Onboard FDC Controller Select [Enabled] if your primary graphics adapter. Setting options: [Disabled], [3F8/...item selects the EPP mode. Setting options: [378/IRQ7], [278/IRQ5], [3BC/IRQ7], [Disabled]. After selecting it . MS-7060 Micro ATX Mainboard Onboard SuperIO Device Press and the following message will appear: "ECP Mode Use DMA." Onboard Parallel Port This specifies the I/O port...


