Setup Guide
Page 2
... ARISING IN ANY WAY OUT OF THE SALE OF, USE OF, OR INABILITY TO USE ANY LOGITECH PRODUCT OR SERVICE, EVEN IF LOGITECH HAS BEEN ADVISED OF THE POSSIBILITY OF SUCH DAMAGES. Part Number: 623009-0403 Limited Warranty. THE WARRANTIES EXPRESSLY SET FORTH IN THIS AGREEMENT REPLACE ALL OTHER WARRANTIES. Logitech warrants that may not apply to the extent that the...
... ARISING IN ANY WAY OUT OF THE SALE OF, USE OF, OR INABILITY TO USE ANY LOGITECH PRODUCT OR SERVICE, EVEN IF LOGITECH HAS BEEN ADVISED OF THE POSSIBILITY OF SUCH DAMAGES. Part Number: 623009-0403 Limited Warranty. THE WARRANTIES EXPRESSLY SET FORTH IN THIS AGREEMENT REPLACE ALL OTHER WARRANTIES. Logitech warrants that may not apply to the extent that the...
Setup Guide
Page 3
...used with the installation of the product, they must accept any interference, including interference that interference will not occur in order to comply with Part 15 of Communications. Any changes or modifications not expressly approved by one or more of the device. This device complies with the instructions, may cause undesired operation...the equipment and the receiver; 3) connect the equipment to an outlet on a circuit different from digital apparatus specified in a residential installation. iii These limits are designed to operate the equipment. Canadian DOC Statement....
...used with the installation of the product, they must accept any interference, including interference that interference will not occur in order to comply with Part 15 of Communications. Any changes or modifications not expressly approved by one or more of the device. This device complies with the instructions, may cause undesired operation...the equipment and the receiver; 3) connect the equipment to an outlet on a circuit different from digital apparatus specified in a residential installation. iii These limits are designed to operate the equipment. Canadian DOC Statement....

Setup Guide
Page 7
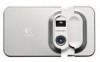
Features 1 1. Push to mute sound; Push to toggle camera resolutions; USB Connection. Camera Lens 4. hold to select Delete mode. 7. Shows functions. 6. Status Display. hold to enter timer mode. 8. Connect USB cable here and to USB port on PC 4 to recharge the internal camera battery (requires no replacement). 2 3 5 6 7 8 1 English Timer/Sound Button. View Finder 3. Takes a picture. 2. View Finder 5. Resolution/Delete Button. Also use to download pictures. Picture Taking Button.
Features 1 1. Push to mute sound; Push to toggle camera resolutions; USB Connection. Camera Lens 4. hold to select Delete mode. 7. Shows functions. 6. Status Display. hold to enter timer mode. 8. Connect USB cable here and to USB port on PC 4 to recharge the internal camera battery (requires no replacement). 2 3 5 6 7 8 1 English Timer/Sound Button. View Finder 3. Takes a picture. 2. View Finder 5. Resolution/Delete Button. Also use to download pictures. Picture Taking Button.

Setup Guide
Page 8
...Picture Taking button. When Timer icon flashes, the camera is low, the Battery icon blinks, all other icons disappear, and camera functions shut down. Point and shoot. Close the camera to conserve battery power and to turn off after 30 seconds if left open . 2. The camera shuts off the camera. Image Resolution. Sound. Slide the camera open . No focusing required. 3. Open camera to turn on Picture Taking button View finder 2 English Use the view finder to be taken. A "beep" will emit a "beep" when performing an operation. Delete Pictures. Indicates the camera...
...Picture Taking button. When Timer icon flashes, the camera is low, the Battery icon blinks, all other icons disappear, and camera functions shut down. Point and shoot. Close the camera to conserve battery power and to turn off after 30 seconds if left open . 2. The camera shuts off the camera. Image Resolution. Sound. Slide the camera open . No focusing required. 3. Open camera to turn on Picture Taking button View finder 2 English Use the view finder to be taken. A "beep" will emit a "beep" when performing an operation. Delete Pictures. Indicates the camera...
Setup Guide
Page 9
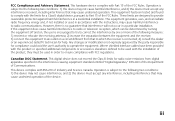
... hold the Resolution/Delete Picture button for one second to finish installing the software. 3 English Turn on -screen instructions to turn on the camera timer. 2. Using the Timer 1. Pressing the Resolution/Delete Picture button again puts the camera in delete-last-picture mode by default. Press the Picture Taking button to normal operation. The camera will flash. 3. Deleting Pictures 1. After the picture has been taken, the camera returns to start the timer. 4. Delete Picture icon flashes. Installing the Software 1. Press and hold the Timer/Sound button for one second...
... hold the Resolution/Delete Picture button for one second to finish installing the software. 3 English Turn on -screen instructions to turn on the camera timer. 2. Using the Timer 1. Pressing the Resolution/Delete Picture button again puts the camera in delete-last-picture mode by default. Press the Picture Taking button to normal operation. The camera will flash. 3. Deleting Pictures 1. After the picture has been taken, the camera returns to start the timer. 4. Delete Picture icon flashes. Installing the Software 1. Press and hold the Timer/Sound button for one second...
Setup Guide
Page 10
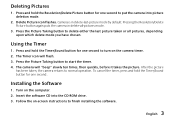
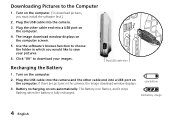
The image download window displays on the computer. 2. Turn on the computer screen. 5. The Battery icon flashes, and it stops flashing when the battery is fully recharged. Plug the USB cable into a USB port on the computer. 4. Plug the other cable end into a USB port on the computer. (To download pictures, you would like to choose the folder in the camera, the image download window displays. 3. Low battery Full battery charge 4 English Use the software's browse function to save your images. Plug USB cable here. Recharging...
The image download window displays on the computer. 2. Turn on the computer screen. 5. The Battery icon flashes, and it stops flashing when the battery is fully recharged. Plug the USB cable into a USB port on the computer. 4. Plug the other cable end into a USB port on the computer. (To download pictures, you would like to choose the folder in the camera, the image download window displays. 3. Low battery Full battery charge 4 English Use the software's browse function to save your images. Plug USB cable here. Recharging...
Setup Guide
Page 23
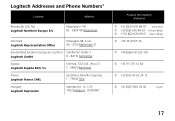
Logitech Addresses and Phone Numbers* Country Address Benelux (B, LUX, NL) Logitech Northern Europe B.V. Maanlander 14C NL - 3824 MP Amersfoort Denmark Logitech Representation Office Århusgade 88, 4.sal DK - 2100 København Ø Deutschland & Eastern European countries Streiflacher Straße 7 Logitech GmbH D - 82110 Germering España Logitech... ✆ +41 (0)21-863 54 00 English 17 Entenza, 332-334 , Atico 2ª E - 08029 Barcelona France Logitech France SARL 26-28 Rue Danielle Casanova F - 75002 Paris Hungary Logitech Képviselet Vámház Krt....
Logitech Addresses and Phone Numbers* Country Address Benelux (B, LUX, NL) Logitech Northern Europe B.V. Maanlander 14C NL - 3824 MP Amersfoort Denmark Logitech Representation Office Århusgade 88, 4.sal DK - 2100 København Ø Deutschland & Eastern European countries Streiflacher Straße 7 Logitech GmbH D - 82110 Germering España Logitech... ✆ +41 (0)21-863 54 00 English 17 Entenza, 332-334 , Atico 2ª E - 08029 Barcelona France Logitech France SARL 26-28 Rue Danielle Casanova F - 75002 Paris Hungary Logitech Képviselet Vámház Krt....
Setup Guide
Page 25
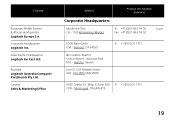
... S.A. Fremont, CA 94555 #2 Creation Road IV Science-Based - Australia Logitech Australia Computer Peripherals Pty Ltd. Dee Why NSW 2099 ✆ +1 800-231 7717 5025 Orbitor Dr., Bldg. 6, Suite 200 ✆ +1 800-231 7717 CDN - Mississauga, ... Product Information (Infoline) Corporate Headquarters Moulin-du-Choc CH - 1122 Romanel-sur-Morges ✆ +41 (0)21 863 54 00 Fax +41 (0)21 863 54 02 English 6505 Kaiser Drive USA - Industrial Park ROC - Asian Pacific Headquarters Logitech Far East Ltd. Hsinchu, Taiwan Level 2, 633 Pittwater Road AUS - Corporate Headquarters...
... S.A. Fremont, CA 94555 #2 Creation Road IV Science-Based - Australia Logitech Australia Computer Peripherals Pty Ltd. Dee Why NSW 2099 ✆ +1 800-231 7717 5025 Orbitor Dr., Bldg. 6, Suite 200 ✆ +1 800-231 7717 CDN - Mississauga, ... Product Information (Infoline) Corporate Headquarters Moulin-du-Choc CH - 1122 Romanel-sur-Morges ✆ +41 (0)21 863 54 00 Fax +41 (0)21 863 54 02 English 6505 Kaiser Drive USA - Industrial Park ROC - Asian Pacific Headquarters Logitech Far East Ltd. Hsinchu, Taiwan Level 2, 633 Pittwater Road AUS - Corporate Headquarters...
Setup Guide
Page 26
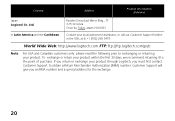
..., Tokyo, Japan 104-0061 In Latin America and the Caribbean: Contact your product through Logitech, you an RMA number and a special address for the exchange. 20 If you return or exchange your local authorized distributor, or call our Customer Support Hotline in the USA, at ✆ +1 (702) 269 3457. Country Address Product Information...
..., Tokyo, Japan 104-0061 In Latin America and the Caribbean: Contact your product through Logitech, you an RMA number and a special address for the exchange. 20 If you return or exchange your local authorized distributor, or call our Customer Support Hotline in the USA, at ✆ +1 (702) 269 3457. Country Address Product Information...
Setup Guide
Page 32
Logitech, the Logitech logo, and other trademarks are owned by Logitech and may appear in this manual. Logitech assumes no responsibility for any errors that may be registered. All other Logitech marks are the property of their respective owners. Part number: 623009-0403 Logitech® on the world wide web: www.logitech.com ©2002 Logitech. Information contained herein is subject to change without notice. All rights reserved.
Logitech, the Logitech logo, and other trademarks are owned by Logitech and may appear in this manual. Logitech assumes no responsibility for any errors that may be registered. All other Logitech marks are the property of their respective owners. Part number: 623009-0403 Logitech® on the world wide web: www.logitech.com ©2002 Logitech. Information contained herein is subject to change without notice. All rights reserved.