

Administration Guide
Page 6
...A: ATA Routing Field Reference Router Status page Product Information section System Status section WAN Status page Internet Connection Settings section Static IP Settings section PPPoE Settings section Optional Settings section MAC Clone Settings section Remote Management section QOS Settings section VLAN Settings section LAN Status page Networking Service section LAN Networking Settings section Static DHCP Lease Settings section Application page Port Forwarding Settings section DMZ Settings section Miscellaneous Settings section System Reserved Ports Range section Appendix B: ATA Voice Field...
...A: ATA Routing Field Reference Router Status page Product Information section System Status section WAN Status page Internet Connection Settings section Static IP Settings section PPPoE Settings section Optional Settings section MAC Clone Settings section Remote Management section QOS Settings section VLAN Settings section LAN Status page Networking Service section LAN Networking Settings section Static DHCP Lease Settings section Application page Port Forwarding Settings section DMZ Settings section Miscellaneous Settings section System Reserved Ports Range section Appendix B: ATA Voice Field...

Administration Guide
Page 40
... use a password during the initial configuration. a. Press **** on a computer that is required. c. By default, the page is convenient not to access the IVR menu. STEP 2 Click Network tab > WAN Setup. Basic Administration and Configuration Using the Administration Web Server 2 • "Advanced Configurations" section on the IVR menu, see your Quick Installation Guide or User Guide for Your ATA Device STEP 1 Start Internet Explorer, connect to step b.) b. STEP 2 Determine the address of the page. Setting...
... use a password during the initial configuration. a. Press **** on a computer that is required. c. By default, the page is convenient not to access the IVR menu. STEP 2 Click Network tab > WAN Setup. Basic Administration and Configuration Using the Administration Web Server 2 • "Advanced Configurations" section on the IVR menu, see your Quick Installation Guide or User Guide for Your ATA Device STEP 1 Start Internet Explorer, connect to step b.) b. STEP 2 Determine the address of the page. Setting...
Administration Guide
Page 97
... address that can be used with call routing: • usr: User-id used for authentication with the given gateway • pwd: Password used for the SPA8800. In addition, three parameters are added that the user enters. These settings are configured on page 180. NOTE The PBX handles outbound call routing with the given gateway • nat: Enable or disable NAT mapping when calling the gateway The following table lists some examples. Example...
... address that can be used with call routing: • usr: User-id used for authentication with the given gateway • pwd: Password used for the SPA8800. In addition, three parameters are added that the user enters. These settings are configured on page 180. NOTE The PBX handles outbound call routing with the given gateway • nat: Enable or disable NAT mapping when calling the gateway The following table lists some examples. Example...

Administration Guide
Page 107
...; "Static IP Settings section," on page 108 • "PPPoE Settings section," on page 108 • "Optional Settings section," on page 109 • "MAC Clone Settings section," on page 110 • "Remote Management section," on page 110 • "QOS Settings section," on page 110 • "VLAN Settings section," on page 111 Router tab > WAN Setup page > Internet Connection Settings section Connection Type The type of broadcast bytes received but not processed. Total number of...
...; "Static IP Settings section," on page 108 • "PPPoE Settings section," on page 108 • "Optional Settings section," on page 109 • "MAC Clone Settings section," on page 110 • "Remote Management section," on page 110 • "QOS Settings section," on page 110 • "VLAN Settings section," on page 111 Router tab > WAN Setup page > Internet Connection Settings section Connection Type The type of broadcast bytes received but not processed. Total number of...
Administration Guide
Page 110
... Internet. Options are None or TBF (token bucket filter). Options are Yes or No. Router tab > WAN Setup page > Remote Management section Enable WAN Web Server Allows or prevents access to the router with the MAC Address Clone feature. Allow QoS Queuing. Enable MAC Clone Service Cloned MAC Address To use QoS. Router tab > WAN Setup page > QOS Settings section Use Quality of hardware for identification, like a social security number. Use when your ISP, you may assign the MAC address you want to the ATA device. WAN Web Server Port...
... Internet. Options are None or TBF (token bucket filter). Options are Yes or No. Router tab > WAN Setup page > Remote Management section Enable WAN Web Server Allows or prevents access to the router with the MAC Address Clone feature. Allow QoS Queuing. Enable MAC Clone Service Cloned MAC Address To use QoS. Router tab > WAN Setup page > QOS Settings section Use Quality of hardware for identification, like a social security number. Use when your ISP, you may assign the MAC address you want to the ATA device. WAN Web Server Port...

Administration Guide
Page 126
... server for logging ATA device system information and critical events. Primary NTP Server Secondary NTP Server The default is accepted by the ATA device. IP address or name of detailed output depends on the debug level parameter setting. The debug server name and port. The level of primary NTP server. ATA Voice Field Reference System page B DNS Server Order DNS Query Mode Specifies the method for selecting the DNS server. If both Debug Server...
... server for logging ATA device system information and critical events. Primary NTP Server Secondary NTP Server The default is accepted by the ATA device. IP address or name of detailed output depends on the debug level parameter setting. The debug server name and port. The level of primary NTP server. ATA Voice Field Reference System page B DNS Server Order DNS Query Mode Specifies the method for selecting the DNS server. If both Debug Server...
Administration Guide
Page 132
... Administration Guide 132 RTP Packet Size The default is set to 0, the ATA device ignores the limit on which can range from 0.01 to 0.16. Interval to wait before the ATA device terminates the call. Number of 0.01 seconds. ATA Voice Field Reference SIP page B SIT4 RSC Try Backup RSC Retry Reg RSC SIP response status code to INVITE on ICMP errors. Maximum port number...
... Administration Guide 132 RTP Packet Size The default is set to 0, the ATA device ignores the limit on which can range from 0.01 to 0.16. Interval to wait before the ATA device terminates the call. Number of 0.01 seconds. ATA Voice Field Reference SIP page B SIT4 RSC Try Backup RSC Retry Reg RSC SIP response status code to INVITE on ICMP errors. Maximum port number...
Administration Guide
Page 160
... device, there may appear on pages other than the Line page. • On the SPA2102, refer to the Line pages and the corresponding User pages. • On the SPA8800, refer to the Phone pages 1 to 4 to configure the settings for voice service. This field is no. The default is not found in the PAP2T. Refer to the Line pages to configure the settings for the Line (FXO) ports 1 to configure...
... device, there may appear on pages other than the Line page. • On the SPA2102, refer to the Line pages and the corresponding User pages. • On the SPA8800, refer to the Phone pages 1 to 4 to configure the settings for voice service. This field is no. The default is not found in the PAP2T. Refer to the Line pages to configure the settings for the Line (FXO) ports 1 to configure...

Administration Guide
Page 161
... In a configuration profile, the Line parameters must be appended with the model of the ATA device. Voice tab > Line page > Line Enable section Line Enable Trunk Enable To enable this line to which the setting applies. Otherwise, choose none. Cisco Small Business ATA Administration Guide 161 Otherwise, select no. To add this line for example, [1] or [2]) to identify the line to a trunk group, choose the trunk group number. For example, the SPA2102 provides two Line tabs (Line 1 and Line 2), while...
... In a configuration profile, the Line parameters must be appended with the model of the ATA device. Voice tab > Line page > Line Enable section Line Enable Trunk Enable To enable this line to which the setting applies. Otherwise, choose none. Cisco Small Business ATA Administration Guide 161 Otherwise, select no. To add this line for example, [1] or [2]) to identify the line to a trunk group, choose the trunk group number. For example, the SPA2102 provides two Line tabs (Line 1 and Line 2), while...
Administration Guide
Page 200
...) > Line Enable section Line Enable To enable this line for service, select yes. Otherwise, select no . Voice tab > PSTN Line page (SPA3102) > NAT Settings section NAT Mapping Enable To use externally mapped IP addresses and SIP/RTP ports in SIP messages, select yes. Cisco Small Business ATA Administration Guide 200 The default is no. The default is Phone1+2. Otherwise, select no . Select the appropriate list: None, Phone 1+2, Phone 1, or Phone 2. PSTN Contact List The default...
...) > Line Enable section Line Enable To enable this line for service, select yes. Otherwise, select no . Voice tab > PSTN Line page (SPA3102) > NAT Settings section NAT Mapping Enable To use externally mapped IP addresses and SIP/RTP ports in SIP messages, select yes. Cisco Small Business ATA Administration Guide 200 The default is no. The default is Phone1+2. Otherwise, select no . Select the appropriate list: None, Phone 1+2, Phone 1, or Phone 2. PSTN Contact List The default...
Administration Guide
Page 231
... of DHCP. (For help with port forwarding, consult your router to port forward "TCP port 80" to the defaults as necessary. Press * to the unit using the User or Admin account without a password and reconfigure the unit as it supports NAT, using the Outbound Proxy parameter. If the Admin account needs to the ATA device and access the IVR by the ITSP. Configure your router documentation) 2. Make sure you have no password. Troubleshooting C Q. Log...
... of DHCP. (For help with port forwarding, consult your router to port forward "TCP port 80" to the defaults as necessary. Press * to the unit using the User or Admin account without a password and reconfigure the unit as it supports NAT, using the Outbound Proxy parameter. If the Admin account needs to the ATA device and access the IVR by the ITSP. Configure your router documentation) 2. Make sure you have no password. Troubleshooting C Q. Log...
Configuration Guide
Page 1
... have no separate router, wireless router, or combination broadband modem/router already in this guide. The guide that the router settings (and other network settings like PPPoE settings) to connect to contact your Internet Service Provider. You only need to your Internet service comes from 8x8. Linksys SPA2102 Router Configuration Guide Dear 8x8 Virtual Office Customer, This Linksys guide provides instructions on pages 1-5 of the Linksys SPA2102 Installation Guide for Fax and Analog Phone Extensions at : www.8x8.com/Support/BusinessSupport/Documentation.aspx If...
... have no separate router, wireless router, or combination broadband modem/router already in this guide. The guide that the router settings (and other network settings like PPPoE settings) to connect to contact your Internet Service Provider. You only need to your Internet service comes from 8x8. Linksys SPA2102 Router Configuration Guide Dear 8x8 Virtual Office Customer, This Linksys guide provides instructions on pages 1-5 of the Linksys SPA2102 Installation Guide for Fax and Analog Phone Extensions at : www.8x8.com/Support/BusinessSupport/Documentation.aspx If...
Configuration Guide
Page 9
... Voice Response Menu. 2 Chapter 1: Introduction What's in the Quick Installation or this User Guide to configure the Phone Adapter using the settings provided by your ISP. You also have other chapters available for setting up the Phone Adapter. Phone Adapter with Router To create your web browser and the Phone Adapter's Web-based Utility. To guide you . You will only need to get the most users will configure the Phone Adapter using your network, install and set up the Phone Adapter. • Chapter 6: Using...
... Voice Response Menu. 2 Chapter 1: Introduction What's in the Quick Installation or this User Guide to configure the Phone Adapter using the settings provided by your ISP. You also have other chapters available for setting up the Phone Adapter. Phone Adapter with Router To create your web browser and the Phone Adapter's Web-based Utility. To guide you . You will only need to get the most users will configure the Phone Adapter using your network, install and set up the Phone Adapter. • Chapter 6: Using...
Configuration Guide
Page 13
... addresses manually every time a new user is automatically assigned to a device on the Phone Adapter, see the Router - dynamic ip address: a temporary IP address assigned by a DHCP server. This is a dedicated, high-speed connection type called Point to the PC or other network devices, typically computers. If you already have assigned a static IP address to your network. These IP addresses are called the DHCP client. The PC or network device obtaining an IP address is similar to log...
... addresses manually every time a new user is automatically assigned to a device on the Phone Adapter, see the Router - dynamic ip address: a temporary IP address assigned by a DHCP server. This is a dedicated, high-speed connection type called Point to the PC or other network devices, typically computers. If you already have assigned a static IP address to your network. These IP addresses are called the DHCP client. The PC or network device obtaining an IP address is similar to log...
Configuration Guide
Page 22
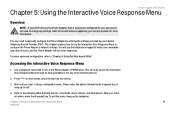
... configure the Phone Adapter's network settings. You may be pre-configured for more advanced configuration, refer to "Chapter 6: Using the Web-based Utility." Refer to the following table that lists actions, commands, menu choices, and descriptions. After you hear "Linksys configuration menu. This chapter explains how to use voice responses. Use a telephone connected to one of the Internet phones.) 2. Chapter 5: Using the Interactive Voice Response Menu 15 Overview Accessing the Interactive Voice Response Menu 1. Refer to the instructions supplied...
... configure the Phone Adapter's network settings. You may be pre-configured for more advanced configuration, refer to "Chapter 6: Using the Web-based Utility." Refer to the following table that lists actions, commands, menu choices, and descriptions. After you hear "Linksys configuration menu. This chapter explains how to use voice responses. Use a telephone connected to one of the Internet phones.) 2. Chapter 5: Using the Interactive Voice Response Menu 15 Overview Accessing the Interactive Voice Response Menu 1. Refer to the instructions supplied...
Configuration Guide
Page 27
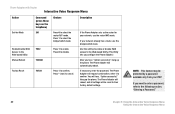
... enable or disable WAN access to the Web-based Utility. (This Utility lets you configure the Phone Adapter.) After you need to enter a password, refer to the following section, "Entering a Password." 20 Chapter 5: Using the Interactive Voice Response Menu Using the Interactive Voice Response Menu NOTE: This feature may be reset to select the router/NAT mode. Phone Adapter with Router Interactive Voice Response Menu Action Set the Mode Enable/Disable WAN Access to the Web-based Utility Manual Reboot Factory Reset Command (press these keys...
... enable or disable WAN access to the Web-based Utility. (This Utility lets you configure the Phone Adapter.) After you need to enter a password, refer to the following section, "Entering a Password." 20 Chapter 5: Using the Interactive Voice Response Menu Using the Interactive Voice Response Menu NOTE: This feature may be reset to select the router/NAT mode. Phone Adapter with Router Interactive Voice Response Menu Action Set the Mode Enable/Disable WAN Access to the Web-based Utility Manual Reboot Factory Reset Command (press these keys...

Configuration Guide
Page 28
... i - Chapter 5: Using the Interactive Voice Response Menu Entering a Password Phone Adapter with Router 21 Press * (star) to confirm. press 4. • To enter J, K, L, j, k, or l - enter 1 to cancel. To enter the password, use the phone's keypad, and follow the appropriate instructions. • To enter A, B, C, a, b, or c - press 5. • To enter M, N, O, m, n, or o - Hang up the phone. press 6. Action User Factory Reset Interactive Voice Response Menu Command (press these keys on the...
... i - Chapter 5: Using the Interactive Voice Response Menu Entering a Password Phone Adapter with Router 21 Press * (star) to confirm. press 4. • To enter J, K, L, j, k, or l - enter 1 to cancel. To enter the password, use the phone's keypad, and follow the appropriate instructions. • To enter A, B, C, a, b, or c - press 5. • To enter M, N, O, m, n, or o - Hang up the phone. press 6. Action User Factory Reset Interactive Voice Response Menu Command (press these keys on the...
Configuration Guide
Page 30
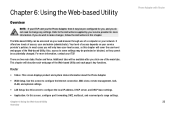
... more information. Router • Status. This screen displays product and system status information about the Phone Adapter. • WAN Setup. This chapter will only have user-level access, so this screen to some settings may be accidentally changed. Use this chapter. Also, access to configure the local IP address, DHCP server, and DHCP lease settings. • Application. If you do not need to configure the Internet connection, MAC clone, remote management, QoS, VLAN, and optional settings. • LAN Setup. Your...
... more information. Router • Status. This screen displays product and system status information about the Phone Adapter. • WAN Setup. This chapter will only have user-level access, so this screen to some settings may be accidentally changed. Use this chapter. Also, access to configure the local IP address, DHCP server, and DHCP lease settings. • Application. If you do not need to configure the Internet connection, MAC clone, remote management, QoS, VLAN, and optional settings. • LAN Setup. Your...

Configuration Guide
Page 31
... your Internet Telephony Service Provider (ITSP) did not supply a password, you have finished making changes on the PC connected to configure the user password. • User 1. Use this screen to the Phone Adapter's Ethernet port. If you will see a login screen. In the User Name field, enter user, the default user name for user access. (This cannot be changed.) Then enter the password supplied by your ITSP supplied a password, then you have assigned a static IP address to Access the Web-based...
... your Internet Telephony Service Provider (ITSP) did not supply a password, you have finished making changes on the PC connected to configure the user password. • User 1. Use this screen to the Phone Adapter's Ethernet port. If you will see a login screen. In the User Name field, enter user, the default user name for user access. (This cannot be changed.) Then enter the password supplied by your ITSP supplied a password, then you have assigned a static IP address to Access the Web-based...

Configuration Guide
Page 76
... Control Protocol (RFC793) UDP - TOS (RFC 791/1349) VLAN Tagging - 802.1p SNTP - Real Time Protocol (RFC 1889) (RFC 1890) RTCP - User Datagram Protocol (RFC768) RTP - Simple Network Time Protocol (RFC 2030) Upload Data Rate Limiting - Voice Packet Prioritization over Ethernet (RFC 2516) ICMP - Internet Protocol v4 (RFC 791) upgradeable to Point Protocol over Other Packet Types Router or Bridge Mode of Service - A Record (RFC 1706), SRV Record (RFC 2782) DHCP Client - Appendix E: Specifications Model Data Networking SPA2102 MAC Address (IEEE...
... Control Protocol (RFC793) UDP - TOS (RFC 791/1349) VLAN Tagging - 802.1p SNTP - Real Time Protocol (RFC 1889) (RFC 1890) RTCP - User Datagram Protocol (RFC768) RTP - Simple Network Time Protocol (RFC 2030) Upload Data Rate Limiting - Voice Packet Prioritization over Ethernet (RFC 2516) ICMP - Internet Protocol v4 (RFC 791) upgradeable to Point Protocol over Other Packet Types Router or Bridge Mode of Service - A Record (RFC 1706), SRV Record (RFC 2782) DHCP Client - Appendix E: Specifications Model Data Networking SPA2102 MAC Address (IEEE...


