
User Guide
Page 9
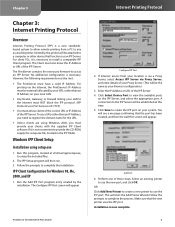
... PCs, it is a new standardsbased system to allow remote printing from your Proxy Server. (This will be established at this program, located at d:\driver\ipp\setup.exe, to unzip the included files. 2. No additional configuration is necessary to install a compatible IPP Client program. PrintServer for USB with the supplied IPP Client software. Click Save to...
... PCs, it is a new standardsbased system to allow remote printing from your Proxy Server. (This will be established at this program, located at d:\driver\ipp\setup.exe, to unzip the included files. 2. No additional configuration is necessary to install a compatible IPP Client program. PrintServer for USB with the supplied IPP Client software. Click Save to...
User Guide
Page 10
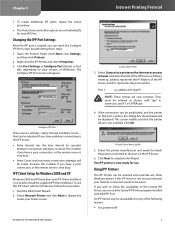
... can use the Query IPP Printer program installed with the PrintServer, follow this number if you wish to the IPP Server. •• Retry Interval sets the time interval (... Increase this procedure: 1. Increase this IPP Client with Add IPP Port. IPP Client Setup for use this number if you can be adjusted if you have their own IPP ...USB with "ipp" in lowercase, and P1 in seconds) between connection attempts. This screen notifies you can be entered as follows, where ip_address represents the IP Address of the IPP Server as shown, with 4-Port Switch Internet Printing...
... can use the Query IPP Printer program installed with the PrintServer, follow this number if you wish to the IPP Server. •• Retry Interval sets the time interval (... Increase this procedure: 1. Increase this IPP Client with Add IPP Port. IPP Client Setup for use this number if you can be adjusted if you have their own IPP ...USB with "ipp" in lowercase, and P1 in seconds) between connection attempts. This screen notifies you can be entered as follows, where ip_address represents the IP Address of the IPP Server as shown, with 4-Port Switch Internet Printing...
User Guide
Page 13
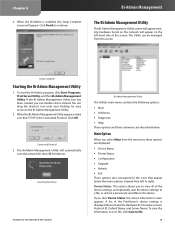
... Default Name, and Server Name. When the Bi-Admin is the Connected Protocol. The Utility can be managed from left -hand side of the PrintServer's device settings is displayed that TCP/IP is installed, the Setup Complete screen will appear next. Click OK. Searching for device PrintServer for the USB PrintServer. The Bi-Admin Management.... Connected Protocol 3. Main Option When you click Device Status, the Device Information screen appears. To start the Bi-Admin program, click Start, Programs, Print Server Utility, and then Bi-Admin Management Utility. Chapter 4 6.
... Default Name, and Server Name. When the Bi-Admin is the Connected Protocol. The Utility can be managed from left -hand side of the PrintServer's device settings is displayed that TCP/IP is installed, the Setup Complete screen will appear next. Click OK. Searching for device PrintServer for the USB PrintServer. The Bi-Admin Management.... Connected Protocol 3. Main Option When you click Device Status, the Device Information screen appears. To start the Bi-Admin program, click Start, Programs, Print Server Utility, and then Bi-Admin Management Utility. Chapter 4 6.

