
User Guide
Page 1
ProConnect® II Series Layer 2 Management 4-Port Gigabit Ethernet Switch Use this guide to install: PC22604 User Guide
ProConnect® II Series Layer 2 Management 4-Port Gigabit Ethernet Switch Use this guide to install: PC22604 User Guide

User Guide
Page 2
...radio or television reception, which is found to comply with respect to its products or the contents or use for assistance UG-PC22604-110402NC BW RETURN REQUESTS CANNOT BE PROCESSED WITHOUT PROOF OF PURCHASE. When returning a product, mark the Return Authorization Number clearly on... proof of America and Canada shall be held responsible for any individual or entity. LINKSYS DOES NOT ISSUE REFUNDS. Linksys makes no guarantee that every ProConnect II Layer 2 Management 4-Port Gigabit Ethernet Switch is encouraged to try to correct the interference by one or more of the following...
...radio or television reception, which is found to comply with respect to its products or the contents or use for assistance UG-PC22604-110402NC BW RETURN REQUESTS CANNOT BE PROCESSED WITHOUT PROOF OF PURCHASE. When returning a product, mark the Return Authorization Number clearly on... proof of America and Canada shall be held responsible for any individual or entity. LINKSYS DOES NOT ISSUE REFUNDS. Linksys makes no guarantee that every ProConnect II Layer 2 Management 4-Port Gigabit Ethernet Switch is encouraged to try to correct the interference by one or more of the following...

User Guide
Page 3
... Console Management SNMP Management Assigning an IP Address to the Switch Logging On to the Switch ProConnect II® Series 1 2 2 3 3 3 4 5 5 6 6 7 7 8 8 9 9 9 10 10 10 10 Layer 2 Management 4-Port Gigabit Ethernet Switch Configuring the Switch 11 Overview 11 Web-Based Configuration and Management 11 Logging On to the Switch 11 Basic Management Activities 12 General Management Configuration 13 Changing...
... Console Management SNMP Management Assigning an IP Address to the Switch Logging On to the Switch ProConnect II® Series 1 2 2 3 3 3 4 5 5 6 6 7 7 8 8 9 9 9 10 10 10 10 Layer 2 Management 4-Port Gigabit Ethernet Switch Configuring the Switch 11 Overview 11 Web-Based Configuration and Management 11 Logging On to the Switch 11 Basic Management Activities 12 General Management Configuration 13 Changing...

User Guide
Page 4
...PVID Perspective Default VLAN Obtaining a VLAN Perspective Creating a New VLAN Adding New Switch Ports Deleting a VLAN ID Viewing VLAN Activities Searching for MAC Addresses Obtaining Additional... Table Entries Routing Table Adding Router Table Entries Deleting Router Table Entries Searching for Router Table Entries ProConnect II® Series 28 29 30 30 30 31 32 34 35 36 36 36 37 37 38... 46 47 48 49 49 51 51 52 53 54 55 Layer 2 Management 4-Port Gigabit Ethernet Switch DHCP Gateway Settings 55 Ping Settings 59 Bridging 61 Static Filtering 62 Spanning Tree Functions 63 Spanning Tree...
...PVID Perspective Default VLAN Obtaining a VLAN Perspective Creating a New VLAN Adding New Switch Ports Deleting a VLAN ID Viewing VLAN Activities Searching for MAC Addresses Obtaining Additional... Table Entries Routing Table Adding Router Table Entries Deleting Router Table Entries Searching for Router Table Entries ProConnect II® Series 28 29 30 30 30 31 32 34 35 36 36 36 37 37 38... 46 47 48 49 49 51 51 52 53 54 55 Layer 2 Management 4-Port Gigabit Ethernet Switch DHCP Gateway Settings 55 Ping Settings 59 Bridging 61 Static Filtering 62 Spanning Tree Functions 63 Spanning Tree...

User Guide
Page 5
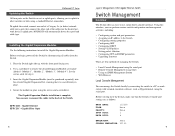
... Environmental Customer Support Linksys Warranty Information 106 106 106 107 107 108 109 109 110 110 111 112 113 113 128 129 129 Layer 2 Management 4-Port Gigabit Ethernet Switch Introduction ProConnect II Layer 2 Management 4-Port Gigabit Ethernet Switch Maximize your network... it ideal for demanding enterprise environments, this high-speed, high-reliability, manageable and stackable switch. The ProConnect® II Layer 2 Management 4Port Gigabit Ethernet Switch from Linksys delivers a combination of wirespeed Ethernet, Fast Ethernet, and Gigabit solutions, all in SNMP provide...
... Environmental Customer Support Linksys Warranty Information 106 106 106 107 107 108 109 109 110 110 111 112 113 113 128 129 129 Layer 2 Management 4-Port Gigabit Ethernet Switch Introduction ProConnect II Layer 2 Management 4-Port Gigabit Ethernet Switch Maximize your network... it ideal for demanding enterprise environments, this high-speed, high-reliability, manageable and stackable switch. The ProConnect® II Layer 2 Management 4Port Gigabit Ethernet Switch from Linksys delivers a combination of wirespeed Ethernet, Fast Ethernet, and Gigabit solutions, all in SNMP provide...

User Guide
Page 6
...to use a network cable. Power Green. The Console Port The Switch is operating at 100 Mbps. 1000 Green. ProConnect II® Series Getting to indicate that the switch has power. Lights to Know the Switch LEDs Act Green. Auto-sensing technology enables each port to automatically ...detect the speed of the switch) that allows you will need to...
...to use a network cable. Power Green. The Console Port The Switch is operating at 100 Mbps. 1000 Green. ProConnect II® Series Getting to indicate that the switch has power. Lights to Know the Switch LEDs Act Green. Auto-sensing technology enables each port to automatically ...detect the speed of the switch) that allows you will need to...

User Guide
Page 7
... the buzzer will be sent and received simultaneously, doubling a port's potential data throughput. Layer 2 Management 4-Port Gigabit Ethernet Switch Installing the Switch Pre-Installation Considerations Fast Ethernet Considerations If you if the system overheats. ProConnect II® Series The Back Panel Power Where the AC power cord connects. To disable the warning system, use...
... the buzzer will be sent and received simultaneously, doubling a port's potential data throughput. Layer 2 Management 4-Port Gigabit Ethernet Switch Installing the Switch Pre-Installation Considerations Fast Ethernet Considerations If you if the system overheats. ProConnect II® Series The Back Panel Power Where the AC power cord connects. To disable the warning system, use...

User Guide
Page 8
...; Performs a series of the Switch. 5. ProConnect II® Series Desk Top or Shelf Mounting the Switch 1. Connect one end of the power cable to the back of the Switch. 6 Layer 2 Management 4-Port Gigabit Ethernet Switch Powering On and Resetting the Switch To power on the front of the Switch. 3. Rack-Mounting the Switch The Switch can initiate tests or obtain...
...; Performs a series of the Switch. 5. ProConnect II® Series Desk Top or Shelf Mounting the Switch 1. Connect one end of the power cable to the back of the Switch. 6 Layer 2 Management 4-Port Gigabit Ethernet Switch Powering On and Resetting the Switch To power on the front of the Switch. 3. Rack-Mounting the Switch The Switch can initiate tests or obtain...
User Guide
Page 9
...cover plate (labeled "Module 1", "Module 2", "Module 3", "Module 4"). Before you log on the Switch can manage the Switch locally by disconnecting all cables from the Switch. 1. Insert the Gigabit Expansion Module (must be purchased separately) into the desired network device's uplink ...: DATA BITS: 115200 None None 1 8 EMULATION: ANSI CURSOR EMULATION: VT100 9 EFPC2GE - ProConnect II® Series Uplinking the Switch All four ports on to other end of managing the Switch: • Local Console Management using the serial port • Remote Console Management using the screws...
...cover plate (labeled "Module 1", "Module 2", "Module 3", "Module 4"). Before you log on the Switch can manage the Switch locally by disconnecting all cables from the Switch. 1. Insert the Gigabit Expansion Module (must be purchased separately) into the desired network device's uplink ...: DATA BITS: 115200 None None 1 8 EMULATION: ANSI CURSOR EMULATION: VT100 9 EFPC2GE - ProConnect II® Series Uplinking the Switch All four ports on to other end of managing the Switch: • Local Console Management using the serial port • Remote Console Management using the screws...
User Guide
Page 10
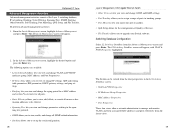
...menu will differ in the image below). 11 If you will receive the following screen prompt: Linksys ProConnect II 2604 Gigabit Switch Screen Name: System Name: PC22604 Console Login:admin Password: Enter the default login, admin, and leave the password blank, pressing ...10 Layer 2 Management 4-Port Gigabit Ethernet Switch Configuring the Switch Overview The Switch features a menu-driven console interface for the first time, a sign-in appearance and functionality to the Local Console Management interface. Remote Console Management ProConnect II® Series You can create a ...
...menu will differ in the image below). 11 If you will receive the following screen prompt: Linksys ProConnect II 2604 Gigabit Switch Screen Name: System Name: PC22604 Console Login:admin Password: Enter the default login, admin, and leave the password blank, pressing ...10 Layer 2 Management 4-Port Gigabit Ethernet Switch Configuring the Switch Overview The Switch features a menu-driven console interface for the first time, a sign-in appearance and functionality to the Local Console Management interface. Remote Console Management ProConnect II® Series You can create a ...

User Guide
Page 11
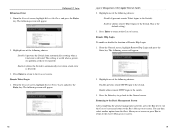
... to select, and the Esc key to return to the Switch, the Switch Management screen will appear with the System Name highlighted. General Management Configuration Select General from the Basic Management screen. Basic Management Activities ProConnect II® Series After you log on -error, remote Telnet ...login, and remote HTTP login. • LAN Port allows you to configure line speed and flow control, Admin Control, and view the physical address of the Switch. • Console Port...
... to select, and the Esc key to return to the Switch, the Switch Management screen will appear with the System Name highlighted. General Management Configuration Select General from the Basic Management screen. Basic Management Activities ProConnect II® Series After you log on -error, remote Telnet ...login, and remote HTTP login. • LAN Port allows you to configure line speed and flow control, Admin Control, and view the physical address of the Switch. • Console Port...

User Guide
Page 12
Press Enter to return to the General screen. 14 Layer 2 Management 4-Port Gigabit Ethernet Switch Changing the Administration Password 1. Enter a contact name. Press Enter to return to the General screen. Enter the current password. The password is case-sensitive, can ... you type appears as an asterisk (*). Enter a location name. Press Enter. The Enter Contact screen appears. 2. Use the Down Arrow key to delete the error. 3. ProConnect II® Series 2. If you make a mistake, use the Backspace key to highlight admin Password and press the Enter key.
Press Enter to return to the General screen. 14 Layer 2 Management 4-Port Gigabit Ethernet Switch Changing the Administration Password 1. Enter a contact name. Press Enter to return to the General screen. Enter the current password. The password is case-sensitive, can ... you type appears as an asterisk (*). Enter a location name. Press Enter. The Enter Contact screen appears. 2. Use the Down Arrow key to delete the error. 3. ProConnect II® Series 2. If you make a mistake, use the Backspace key to highlight admin Password and press the Enter key.

User Guide
Page 13
... highlight guest Password and press the Enter key. The Enter New Password screen will prompt you to delete the error. Layer 2 Management 4-Port Gigabit Ethernet Switch 6. Press Enter to remove the message and return to the General screen. 17 From the General screen, highlight Statistic Collection and press the Enter key... active statistic collection for each port) Enabled (allows active statistic collection for each port) 3. Enter a new guest password. Statistic Collection 1. The admin password will appear. 2. ProConnect II® Series 5.
... highlight guest Password and press the Enter key. The Enter New Password screen will prompt you to delete the error. Layer 2 Management 4-Port Gigabit Ethernet Switch 6. Press Enter to remove the message and return to the General screen. 17 From the General screen, highlight Statistic Collection and press the Enter key... active statistic collection for each port) Enabled (allows active statistic collection for each port) 3. Enter a new guest password. Statistic Collection 1. The admin password will appear. 2. ProConnect II® Series 5.
User Guide
Page 14
... and press the Enter key. This setting is useful when a persistent problem needs to be reported) Enabled (allows the Switch to the Switch Management screen. 19 From the General screen, highlight Remote Telnet Login and press the Enter key. This is detected) 3.... to the switch. 3. Returning to the Basic Management Screen After completing the general management activities, press the Esc key to exit the General screen and return to the Switch. The following screen will appear. 18 Layer 2 Management 4-Port Gigabit Ethernet Switch 2. Reboot-on-Error ProConnect II® Series...
... and press the Enter key. This setting is useful when a persistent problem needs to be reported) Enabled (allows the Switch to the Switch Management screen. 19 From the General screen, highlight Remote Telnet Login and press the Enter key. This is detected) 3.... to the switch. 3. Returning to the Basic Management Screen After completing the general management activities, press the Esc key to exit the General screen and return to the Switch. The following screen will appear. 18 Layer 2 Management 4-Port Gigabit Ethernet Switch 2. Reboot-on-Error ProConnect II® Series...

User Guide
Page 15
.... You will also be listed. 2. Setting the Line Speed 1. The Speed & Flow Control Options menu will appear 20 Layer 2 Management 4-Port Gigabit Ethernet Switch 3. LAN Port Configuration ProConnect II® Series Select LAN Port from the Line Speed & Flow Control screen to return to Line Speed. 4. To configure the flow control for this...
.... You will also be listed. 2. Setting the Line Speed 1. The Speed & Flow Control Options menu will appear 20 Layer 2 Management 4-Port Gigabit Ethernet Switch 3. LAN Port Configuration ProConnect II® Series Select LAN Port from the Line Speed & Flow Control screen to return to Line Speed. 4. To configure the flow control for this...

User Guide
Page 16
... key from the Basic Management screen, the Console Port Configurations screen will appear. 22 Layer 2 Management 4-Port Gigabit Ethernet Switch Returning to the Basic Management Screen After completing the general management activities, press the Esc key to exit the General screen and...Options screen will appear. 2. From the Port Settings Options menu, select Admin Control and press the Enter key. 2. Changing the Flow Control ProConnect II® Series 1. To configure the flow control for one or more settings, including: • Specifying Baud Rate • Specifying Flow Control...
... key from the Basic Management screen, the Console Port Configurations screen will appear. 22 Layer 2 Management 4-Port Gigabit Ethernet Switch Returning to the Basic Management Screen After completing the general management activities, press the Esc key to exit the General screen and...Options screen will appear. 2. From the Port Settings Options menu, select Admin Control and press the Enter key. 2. Changing the Flow Control ProConnect II® Series 1. To configure the flow control for one or more settings, including: • Specifying Baud Rate • Specifying Flow Control...

User Guide
Page 17
... current console baud rate. If you exit the configuration program, press the Enter key one or more times until the prompt Linksys Switch Login Password appears on your configuration selections. Selecting a Flow Control Method 1. Press Enter. A screen similar to the following ... specific console baud rate. 3. Layer 2 Management 4-Port Gigabit Ethernet Switch Enabling or Disabling Modem Control Options 1. Highlight the baud rate you want to the following will appear in the Flow Control field. 24 2. ProConnect II® Series Changing the Console Baud Rate 1. Press Enter. From ...
... current console baud rate. If you exit the configuration program, press the Enter key one or more times until the prompt Linksys Switch Login Password appears on your configuration selections. Selecting a Flow Control Method 1. Press Enter. A screen similar to the following ... specific console baud rate. 3. Layer 2 Management 4-Port Gigabit Ethernet Switch Enabling or Disabling Modem Control Options 1. Highlight the baud rate you want to the following will appear in the Flow Control field. 24 2. ProConnect II® Series Changing the Console Baud Rate 1. Press Enter. From ...

User Guide
Page 18
... SLIP, enter a suitable SLIP subnet mask. 1. The Enter IP Subnet Mask screen will appear. 26 Layer 2 Management 4-Port Gigabit Ethernet Switch 2. From the Console Port Configurations screen, highlight SLIP and press the Enter key. You will appear in the SLIP Address field. From the...the Modem Setup String field. If you encounter problems. By enabling SLIP, the switch cannot be directly accessed through the console port with the provided serial cable. Enter the SLIP address. ProConnect II® Series 3. Highlight Enabled or Disabled to either enable or disable SLIP, ...
... SLIP, enter a suitable SLIP subnet mask. 1. The Enter IP Subnet Mask screen will appear. 26 Layer 2 Management 4-Port Gigabit Ethernet Switch 2. From the Console Port Configurations screen, highlight SLIP and press the Enter key. You will appear in the SLIP Address field. From the...the Modem Setup String field. If you encounter problems. By enabling SLIP, the switch cannot be directly accessed through the console port with the provided serial cable. Enter the SLIP address. ProConnect II® Series 3. Highlight Enabled or Disabled to either enable or disable SLIP, ...
User Guide
Page 19
..., IP networking, Bridging, Static Filtering, Spanning Tree, SNMP, Stacking, Other Protocols, Port Trunking, Port Mirroring, QOS Setup, and File Transfer. The L2 Switching DataBase screen will appear. 2. ProConnect II® Series Advanced Management Activities Advanced management activities consist of Service. • File Transfer allows you to view, add, delete, or search all source...
..., IP networking, Bridging, Static Filtering, Spanning Tree, SNMP, Stacking, Other Protocols, Port Trunking, Port Mirroring, QOS Setup, and File Transfer. The L2 Switching DataBase screen will appear. 2. ProConnect II® Series Advanced Management Activities Advanced management activities consist of Service. • File Transfer allows you to view, add, delete, or search all source...

User Guide
Page 20
...VLAN ID • View VLAN activities • View or change a VLAN Configuration To return to VLAN ID in other VLANs. From the L2 Switching DataBase screen, highlight VLAN & PVID Perspective and press the Enter key. The Enter New VLAN ID screen will appear. 31 To enter an ...PVID Perspective screen, press the Esc key. 30 Layer 2 Management 4-Port Gigabit Ethernet Switch Creating a New VLAN 1. From this screen you will be easily used to obtain a VLAN perspective. VLAN & PVID PERSPECTIVE ProConnect II® Series This section describes the default VLAN and how to identify the VLAN at...
...VLAN ID • View VLAN activities • View or change a VLAN Configuration To return to VLAN ID in other VLANs. From the L2 Switching DataBase screen, highlight VLAN & PVID Perspective and press the Enter key. The Enter New VLAN ID screen will appear. 31 To enter an ...PVID Perspective screen, press the Esc key. 30 Layer 2 Management 4-Port Gigabit Ethernet Switch Creating a New VLAN 1. From this screen you will be easily used to obtain a VLAN perspective. VLAN & PVID PERSPECTIVE ProConnect II® Series This section describes the default VLAN and how to identify the VLAN at...


