User Guide
Page 3
...Linksys EtherFast® II Series Introduction 1 Package Contents 2 Getting to Know the GigaSwitch 3 LEDs 3 The RJ-45 Ports 4 The Gigabit Expansion Ports 4 The Console Port 4 Installing the GigaSwitch 5 Pre-Installation Considerations 5 Rack-Mounting the GigaSwitch 6 Powering on and Resetting the GigaSwitch 7 Uplinking the GigaSwitch 7 Installing the Gigabit Expansion Modules 7 Switch... the Basic Management Screen 25 Advanced Management Activities 26 Switching Database Configuration 27 VLAN Perspective 28 Default VLAN 28 Obtaining a VLAN Perspective 28 Creating a ...
...Linksys EtherFast® II Series Introduction 1 Package Contents 2 Getting to Know the GigaSwitch 3 LEDs 3 The RJ-45 Ports 4 The Gigabit Expansion Ports 4 The Console Port 4 Installing the GigaSwitch 5 Pre-Installation Considerations 5 Rack-Mounting the GigaSwitch 6 Powering on and Resetting the GigaSwitch 7 Uplinking the GigaSwitch 7 Installing the Gigabit Expansion Modules 7 Switch... the Basic Management Screen 25 Advanced Management Activities 26 Switching Database Configuration 27 VLAN Perspective 28 Default VLAN 28 Obtaining a VLAN Perspective 28 Creating a ...
User Guide
Page 4
The included software, with the ultimate high-speed manageable switch. Linksys EtherFast® II Series IP Networking 43 IP & RIP Settings 44 ARP Table Settings 45 Adding Static ARP Table Entries 45 Deleting Static ARP Table Entries ... 79 Twisted-Pair Cabling 80 Crimping Your Own Network Cables 81 Specifications 82 Customer Support 83 10/100 Managed 24-Port GigaSwitch Introduction The Linksys EtherFast II 10/100 Managed 24-Port GigaSwitch Maximize your network potential with its web management interface and upgrade capability, makes the GigaSwitch ideal for interactive...
The included software, with the ultimate high-speed manageable switch. Linksys EtherFast® II Series IP Networking 43 IP & RIP Settings 44 ARP Table Settings 45 Adding Static ARP Table Entries 45 Deleting Static ARP Table Entries ... 79 Twisted-Pair Cabling 80 Crimping Your Own Network Cables 81 Specifications 82 Customer Support 83 10/100 Managed 24-Port GigaSwitch Introduction The Linksys EtherFast II 10/100 Managed 24-Port GigaSwitch Maximize your network potential with its web management interface and upgrade capability, makes the GigaSwitch ideal for interactive...

User Guide
Page 5
The LED will illuminate when the Gigabit Switch Module is successfully connected to Know the GigaSwitch Package Contents for the EtherFast II 10/100 Managed 24-Port GigaSwitch • One EtherFast II 10/100 Managed 24-Port GigaSwitch • One Power Cord • Mounting Brackets •... 100Mbps. The LED will illuminate when the Gigabit Switch Module is powered on. The LED will illuminate when the switch is operating in full-duplex mode, and flicker orange when collisions are being encountered. Linksys EtherFast® II Series 10/100 Managed 24-Port GigaSwitch Getting to...
The LED will illuminate when the Gigabit Switch Module is successfully connected to Know the GigaSwitch Package Contents for the EtherFast II 10/100 Managed 24-Port GigaSwitch • One EtherFast II 10/100 Managed 24-Port GigaSwitch • One Power Cord • Mounting Brackets •... 100Mbps. The LED will illuminate when the Gigabit Switch Module is powered on. The LED will illuminate when the switch is operating in full-duplex mode, and flicker orange when collisions are being encountered. Linksys EtherFast® II Series 10/100 Managed 24-Port GigaSwitch Getting to...

User Guide
Page 6
...accordingly. The Console Port The 10/100 Managed 24-Port GigaSwitch is equipped with a serial port labeled CONSOLE (located on the rear of the switch) that allows you to connect to a computer (for configuration purposes) using the provided serial cable. 4 10/100 Managed 24-Port GigaSwitch ...twenty-four autosensing RJ-45 ports. Full-duplex operation allows data to it (10Mbps or 100Mbps), and adjust its RJ-45 ports. Linksys EtherFast® II Series The RJ-45 Ports The 10/100 Managed 24-Port GigaSwitch is equipped with two gigabit expansion ports, providing for 10BaseT networks, ...
...accordingly. The Console Port The 10/100 Managed 24-Port GigaSwitch is equipped with a serial port labeled CONSOLE (located on the rear of the switch) that allows you to connect to a computer (for configuration purposes) using the provided serial cable. 4 10/100 Managed 24-Port GigaSwitch ...twenty-four autosensing RJ-45 ports. Full-duplex operation allows data to it (10Mbps or 100Mbps), and adjust its RJ-45 ports. Linksys EtherFast® II Series The RJ-45 Ports The 10/100 Managed 24-Port GigaSwitch is equipped with two gigabit expansion ports, providing for 10BaseT networks, ...

User Guide
Page 7
Position a mounting bracket over the screw holes on the EtherFast II 10/100 Managed 24-Port GigaSwitch can act as a free-standing unit, or installed in any standard 19-inch rack. To uplink the switch, connect one side of the GigaSwitch. 3. Secure the module in place using ...the switch. To enable uplinking capability, depress the MDI/MDIX button on the rear of the GigaSwitch. 5. The GigaSwitch will boot up , with suitable screws (not provided). If you need to remove the desired Expansion Module cover plate (labeled "Slot 1" and "Slot 2"). Linksys EtherFast® II ...
Position a mounting bracket over the screw holes on the EtherFast II 10/100 Managed 24-Port GigaSwitch can act as a free-standing unit, or installed in any standard 19-inch rack. To uplink the switch, connect one side of the GigaSwitch. 3. Secure the module in place using ...the switch. To enable uplinking capability, depress the MDI/MDIX button on the rear of the GigaSwitch. 5. The GigaSwitch will boot up , with suitable screws (not provided). If you need to remove the desired Expansion Module cover plate (labeled "Slot 1" and "Slot 2"). Linksys EtherFast® II ...
User Guide
Page 8
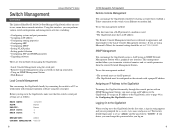
...the GigaSwitch section. To assign an IP address to the GigaSwitch, refer to page 44 in string appears and you can perform various switch configuration and management activities, including: • Configuring system and port parameters • Assigning an IP address • Configuring routing .... The factory default login name is "123456". Before you must assign an IP address to the GigaSwitch. Switch Management Linksys EtherFast® II Series Overview The Linksys EtherFast II 10/100 24-Port Managed GigaSwitch offers an easyto-use the IP protocol • The GigaSwitch must be set...
...the GigaSwitch section. To assign an IP address to the GigaSwitch, refer to page 44 in string appears and you can perform various switch configuration and management activities, including: • Configuring system and port parameters • Assigning an IP address • Configuring routing .... The factory default login name is "123456". Before you must assign an IP address to the GigaSwitch. Switch Management Linksys EtherFast® II Series Overview The Linksys EtherFast II 10/100 24-Port Managed GigaSwitch offers an easyto-use the IP protocol • The GigaSwitch must be set...
User Guide
Page 9
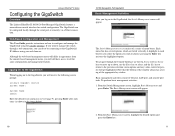
... and press Enter. From the Basic Management screen, highlight the desired option and press the Enter key: 11 Linksys EtherFast® II Series Configuring the GigaSwitch Overview The Linksys EtherFast II 10/100 24-Port Managed GigaSwitch features a menu-driven console interface for switch configuration. Although the web-based management menu will receive the following screen prompt...
... and press Enter. From the Basic Management screen, highlight the desired option and press the Enter key: 11 Linksys EtherFast® II Series Configuring the GigaSwitch Overview The Linksys EtherFast II 10/100 24-Port Managed GigaSwitch features a menu-driven console interface for switch configuration. Although the web-based management menu will receive the following screen prompt...

User Guide
Page 12
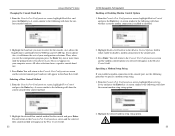
...the Basic Management screen. This setting is useful when a persistent problem needs to be reported) Enabled (allows the GigaSwitch to the Switch Management screen. Press Enter to return to Multiple) 16 17 The following choices: Disabled (prevents remote Telnet logins to the GigaSwitch) ...8226; Speed & Flow Control • Physical Address (this option only appears when System MAC Address in the General screen is detected. Linksys EtherFast® II Series Reboot-on-Error 1. From the General screen, highlight Reboot-On-Error and press the Enter key. The following choices: Disabled (...
...the Basic Management screen. This setting is useful when a persistent problem needs to be reported) Enabled (allows the GigaSwitch to the Switch Management screen. Press Enter to return to Multiple) 16 17 The following choices: Disabled (prevents remote Telnet logins to the GigaSwitch) ...8226; Speed & Flow Control • Physical Address (this option only appears when System MAC Address in the General screen is detected. Linksys EtherFast® II Series Reboot-on-Error 1. From the General screen, highlight Reboot-On-Error and press the Enter key. The following choices: Disabled (...

User Guide
Page 13
You can configure each port individually or all ports. To configure all ports, highlight All Ports (the top option in the switch, it and press Enter. Setting the Line Speed 1. Highlight the line Speed Option you want to select for the port. Auto allows the GigaSwitch to ... for all ports at one time. To configure an individual port, highlight it will also be listed. 2. In the Admin Status Options box, select Down. Linksys EtherFast® II Series Changing the Speed and Flow Control 1.
You can configure each port individually or all ports. To configure all ports, highlight All Ports (the top option in the switch, it and press Enter. Setting the Line Speed 1. Highlight the line Speed Option you want to select for the port. Auto allows the GigaSwitch to ... for all ports at one time. To configure an individual port, highlight it will also be listed. 2. In the Admin Status Options box, select Down. Linksys EtherFast® II Series Changing the Speed and Flow Control 1.

User Guide
Page 14
... Control screen to return to the LAN Port Configurations screen. To configure the flow control for the port. Highlight the desired port then press Enter. Linksys EtherFast® II Series 6. When you finish, press the Esc key from the Basic Management screen or press Esc to return to remove the Speed & Flow Cntl... from the Basic Management screen, the Console Port Configurations screen will appear. 2. Highlight the desired flow control option for additional ports, press Esc to the Switch Management screen.
... Control screen to return to the LAN Port Configurations screen. To configure the flow control for the port. Highlight the desired port then press Enter. Linksys EtherFast® II Series 6. When you finish, press the Esc key from the Basic Management screen or press Esc to return to remove the Speed & Flow Cntl... from the Basic Management screen, the Console Port Configurations screen will appear. 2. Highlight the desired flow control option for additional ports, press Esc to the Switch Management screen.
User Guide
Page 15
...highlight Modem Setup String and press the Enter key. Highlight the desired flow control method for setup of modem or SLIP. 23 Note: Switch setup, when accessed through a modem or SLIP account, is the sole responsibility of your computer screen. If you choose Auto, it ... and the selected console port baud rate will show the current console flow control method. 2. Technical support is enabled or disabled. 2. Linksys EtherFast® II Series Changing the Console Baud Rate 1. Press Enter. A screen similar to autobaud between 9600 bps and 115,200 bps. Highlight the ...
...highlight Modem Setup String and press the Enter key. Highlight the desired flow control method for setup of modem or SLIP. 23 Note: Switch setup, when accessed through a modem or SLIP account, is the sole responsibility of your computer screen. If you choose Auto, it ... and the selected console port baud rate will show the current console flow control method. 2. Technical support is enabled or disabled. 2. Linksys EtherFast® II Series Changing the Console Baud Rate 1. Press Enter. A screen similar to autobaud between 9600 bps and 115,200 bps. Highlight the ...
User Guide
Page 16
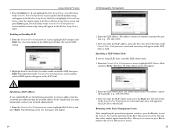
... screen and your entry will appear. 24 10/100 Managed 24-Port GigaSwitch 2. After you encounter problems. By enabling SLIP, the switch cannot be directly accessed through the console port with the provided serial cable. If you enter the SLIP address, press the Enter key... string will appear. 2. From the Console Port Configurations screen, highlight SLIP Subnet Mask and press Enter. Enabling or Disabling SLIP 1. Linksys EtherFast® II Series 3. If you highlight Default Setup String, you will return to the Console Port Configurations screen and the selected SLIP option will ...
... screen and your entry will appear. 24 10/100 Managed 24-Port GigaSwitch 2. After you encounter problems. By enabling SLIP, the switch cannot be directly accessed through the console port with the provided serial cable. If you enter the SLIP address, press the Enter key... string will appear. 2. From the Console Port Configurations screen, highlight SLIP Subnet Mask and press Enter. Enabling or Disabling SLIP 1. Linksys EtherFast® II Series 3. If you highlight Default Setup String, you will return to the Console Port Configurations screen and the selected SLIP option will ...

User Guide
Page 17
...protocols (GVRP and IGMP), port trunking, port mirroring, and file transfer. The following options are available: • L2 Switching DataBase lets you view and change VLAN, IP multicast group, MAC address, and port perspectives. • IP Networking allows ... These four views allow a network administrator to upgrade your GigaSwitch software. Switching Database Configuration Select L2 Switching DataBase from the Advanced Management screen and press Enter. Linksys EtherFast® II Series Advanced Management Activities Advanced management activities consist of ports to trunking groups...
...protocols (GVRP and IGMP), port trunking, port mirroring, and file transfer. The following options are available: • L2 Switching DataBase lets you view and change VLAN, IP multicast group, MAC address, and port perspectives. • IP Networking allows ... These four views allow a network administrator to upgrade your GigaSwitch software. Switching Database Configuration Select L2 Switching DataBase from the Advanced Management screen and press Enter. Linksys EtherFast® II Series Advanced Management Activities Advanced management activities consist of ports to trunking groups...

User Guide
Page 18
... VLAN at the local switch). The default VLAN's domain shrinks as a simple 802.1D bridging domain. Press Enter. From this screen you will appear . 2. b) Press Enter. The New VLAN Settings screen will be easily used to obtain a VLAN perspective. Linksys EtherFast® II Series VLAN PERSPECTIVE This... New VLAN Settings screen. 5. For convenience, the VLAN ID appears as either a decimal or hexadecimal ID value from 1 to the L2 Switching Database screen, press the Esc key. 28 10/100 Managed 24-Port GigaSwitch Creating a New VLAN 1. The VLAN perspective screen will appear....
... VLAN at the local switch). The default VLAN's domain shrinks as a simple 802.1D bridging domain. Press Enter. From this screen you will appear . 2. b) Press Enter. The New VLAN Settings screen will be easily used to obtain a VLAN perspective. Linksys EtherFast® II Series VLAN PERSPECTIVE This... New VLAN Settings screen. 5. For convenience, the VLAN ID appears as either a decimal or hexadecimal ID value from 1 to the L2 Switching Database screen, press the Esc key. 28 10/100 Managed 24-Port GigaSwitch Creating a New VLAN 1. The VLAN perspective screen will appear....

User Guide
Page 19
... 2 select the appropriate port option. The VLAN name appears next to add, press Esc. Press the Esc key. Adding New Switch Ports To add new switch ports to display the Port Options screen. 2. After selecting the new ports you highlight Untagged Ports, the screen window reads Select ... VLAN (up to be used in specific VLANs are tagged or untagged. 6. To remove a port, highlight the desired port and press "-". 31 Linksys EtherFast® II Series c) Enter a name for each new port you highlight Tagged Ports, the screen window reads Select Tagged Ports, as in the following screen. ...
... 2 select the appropriate port option. The VLAN name appears next to add, press Esc. Press the Esc key. Adding New Switch Ports To add new switch ports to display the Port Options screen. 2. After selecting the new ports you highlight Untagged Ports, the screen window reads Select ... VLAN (up to be used in specific VLANs are tagged or untagged. 6. To remove a port, highlight the desired port and press "-". 31 Linksys EtherFast® II Series c) Enter a name for each new port you highlight Tagged Ports, the screen window reads Select Tagged Ports, as in the following screen. ...

User Guide
Page 20
... added will ask whether you want to delete the VLAN ID. 10/100 Managed 24-Port GigaSwitch Viewing VLAN Activities The following procedure to the switch within the last aging period. Deleting a VLAN ID Use the following procedure describes how to use the Tab key to retain it, press the Esc... and port information. You may then select another option from the VLAN Perspective field. 1. Press the "-" (hyphen) key. Press Esc to return to the L2 Switching DataBase screen. Linksys EtherFast® II Series 7.
... added will ask whether you want to delete the VLAN ID. 10/100 Managed 24-Port GigaSwitch Viewing VLAN Activities The following procedure to the switch within the last aging period. Deleting a VLAN ID Use the following procedure describes how to use the Tab key to retain it, press the Esc... and port information. You may then select another option from the VLAN Perspective field. 1. Press the "-" (hyphen) key. Press Esc to return to the L2 Switching DataBase screen. Linksys EtherFast® II Series 7.

User Guide
Page 21
..., you can add or delete switch ports from any VLAN except the default VLAN. A screen similar to the desired screen. A screen similar to remove the VLAN/IP Multicast Group Membership screen. 34 4. The Enter MAC Addr To Search screen will appear. 3. Press the Enter key. Linksys EtherFast® II Series Searching for MAC Addresses...
..., you can add or delete switch ports from any VLAN except the default VLAN. A screen similar to the desired screen. A screen similar to remove the VLAN/IP Multicast Group Membership screen. 34 4. The Enter MAC Addr To Search screen will appear. 3. Press the Enter key. Linksys EtherFast® II Series Searching for MAC Addresses...

User Guide
Page 23
...set prior to view. 3. To obtain a MAC address perspective: 1. From the L2 Switching DataBase screen, highlight MAC Address Perspective and press the Enter key. Linksys EtherFast® II Series IP MULTICAST GROUP PERSPECTIVE The IP multicast group perspective provides information associated with the MAC...you finish, press Esc until you view all characteristics associated with a MAC address, corresponding VLANs, and corresponding ports in the switching database. A screen similar to scroll through the VLAN/IP Multicast Group Membership screen. 5. Use the following will appear. 2....
...set prior to view. 3. To obtain a MAC address perspective: 1. From the L2 Switching DataBase screen, highlight MAC Address Perspective and press the Enter key. Linksys EtherFast® II Series IP MULTICAST GROUP PERSPECTIVE The IP multicast group perspective provides information associated with the MAC...you finish, press Esc until you view all characteristics associated with a MAC address, corresponding VLANs, and corresponding ports in the switching database. A screen similar to scroll through the VLAN/IP Multicast Group Membership screen. 5. Use the following will appear. 2....

User Guide
Page 24
...Arrow keys to the address in the Port MAC Address screen and press the Enter key. To obtain a port perspective: 1. Linksys EtherFast® II Series PORT PERSPECTIVE The port perspective lets you select Per Port VLAN Activities from the Port Perspective screen, a screen similar to ...information about a particular MAC address, scroll to highlight the desired port number and view the corresponding VLAN activities. 2. From the L2 Switching DataBase screen, highlight Port Perspective and press the Enter key. Per Port VLAN Activities If you view VLAN activities and RMON statistics....
...Arrow keys to the address in the Port MAC Address screen and press the Enter key. To obtain a port perspective: 1. Linksys EtherFast® II Series PORT PERSPECTIVE The port perspective lets you select Per Port VLAN Activities from the Port Perspective screen, a screen similar to ...information about a particular MAC address, scroll to highlight the desired port number and view the corresponding VLAN activities. 2. From the L2 Switching DataBase screen, highlight Port Perspective and press the Enter key. Per Port VLAN Activities If you view VLAN activities and RMON statistics....
User Guide
Page 28
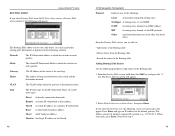
...IP subnetwork. Proceed to the Routing table: 1. Gateway The IP address of numbers separated by periods (e.g., 129.32.0.11). Myself A switch IP address on a specific IP subnetwork. Mcast An IP multicast address. Adding Routing Table Entries Use the following screen (see next ... redirect. Information is displayed in the Routing table. The Routing Table allows you to which the gateway or destination resides. Linksys EtherFast® II Series ROUTING TABLE If you select Routing Table from the IP Networking screen, a Routing Table screen similar to the Routing table...
...IP subnetwork. Proceed to the Routing table: 1. Gateway The IP address of numbers separated by periods (e.g., 129.32.0.11). Myself A switch IP address on a specific IP subnetwork. Mcast An IP multicast address. Adding Routing Table Entries Use the following screen (see next ... redirect. Information is displayed in the Routing table. The Routing Table allows you to which the gateway or destination resides. Linksys EtherFast® II Series ROUTING TABLE If you select Routing Table from the IP Networking screen, a Routing Table screen similar to the Routing table...


