User Guide
Page 3
Table of Contents Linksys EtherFast® II Series Introduction 1 Package Contents 2 Getting to Know the GigaSwitch 3 LEDs 3 The RJ-45 Ports 4 The Gigabit Expansion Ports 4 The Console Port 4 Installing the GigaSwitch 5 Pre-Installation Considerations 5 Rack-Mounting the GigaSwitch 6 Powering on and Resetting the GigaSwitch 7 Uplinking the GigaSwitch 7 Installing the Gigabit Expansion Modules 7 Switch Management 8 Overview 8 Local Console Management 8 Remote Console Management 9 SNMP Management 9 Assigning an IP Address to the GigaSwitch 9 Configuring ...
Table of Contents Linksys EtherFast® II Series Introduction 1 Package Contents 2 Getting to Know the GigaSwitch 3 LEDs 3 The RJ-45 Ports 4 The Gigabit Expansion Ports 4 The Console Port 4 Installing the GigaSwitch 5 Pre-Installation Considerations 5 Rack-Mounting the GigaSwitch 6 Powering on and Resetting the GigaSwitch 7 Uplinking the GigaSwitch 7 Installing the Gigabit Expansion Modules 7 Switch Management 8 Overview 8 Local Console Management 8 Remote Console Management 9 SNMP Management 9 Assigning an IP Address to the GigaSwitch 9 Configuring ...
User Guide
Page 4
...web management interface and upgrade capability, makes the GigaSwitch ideal for interactive web-based applications. Linksys EtherFast® II Series IP Networking 43 IP & RIP Settings 44 ARP Table Settings 45 Adding Static ARP Table Entries 45 Deleting Static ARP Table Entries 47 Searching for ARP Table Entries 47 Routing Table 48 Adding Router Table Entries 49 Deleting Router Table Entries 50 Searching for Router Tsble Entries 51 DHCP Gateway Settings 51 Ping Settings 56 Bridging 57 Static Filtering 58 Spanning Tree Functions 60 Spanning Tree Port Configuration...
...web management interface and upgrade capability, makes the GigaSwitch ideal for interactive web-based applications. Linksys EtherFast® II Series IP Networking 43 IP & RIP Settings 44 ARP Table Settings 45 Adding Static ARP Table Entries 45 Deleting Static ARP Table Entries 47 Searching for ARP Table Entries 47 Routing Table 48 Adding Router Table Entries 49 Deleting Router Table Entries 50 Searching for Router Tsble Entries 51 DHCP Gateway Settings 51 Ping Settings 56 Bridging 57 Static Filtering 58 Spanning Tree Functions 60 Spanning Tree Port Configuration...

User Guide
Page 5
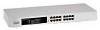
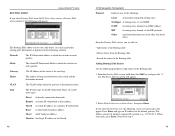
...; Mounting Brackets • One Serial/Console Cable • User Guide and Registration Card 2 LEDs MAIN Power Management PER PORT Link 10/100 (Row A) Tx/Rx (Row B) FD/Col (Row C) GIGABIT Link Tx/Rx FD The LED will flicker green when the port is operating in full-duplex mode. 3 The LED will illuminate when the Gigabit Switch Module is transmitting or receiving data. Linksys EtherFast® II Series 10/100 Managed 24-Port GigaSwitch Getting to a network. The LED will illuminate when management...
...; Mounting Brackets • One Serial/Console Cable • User Guide and Registration Card 2 LEDs MAIN Power Management PER PORT Link 10/100 (Row A) Tx/Rx (Row B) FD/Col (Row C) GIGABIT Link Tx/Rx FD The LED will flicker green when the port is operating in full-duplex mode. 3 The LED will illuminate when the Gigabit Switch Module is transmitting or receiving data. Linksys EtherFast® II Series 10/100 Managed 24-Port GigaSwitch Getting to a network. The LED will illuminate when management...

User Guide
Page 6
... fiber optic cabling, refer to use fiber optic cabling. To establish a Gigabit Ethernet connection, you will need to the Fiber Optic Cabling section on page 79. Full-Duplex Considerations As previously mentioned, the GigaSwitch provides full-duplex support for 10BaseT networks, however, if you are using 100BaseTX devices you will need to be using the GigaSwitch in half- Full-duplex operation allows data to install a SX or TX Gigabit expansion module and use...
... fiber optic cabling, refer to use fiber optic cabling. To establish a Gigabit Ethernet connection, you will need to the Fiber Optic Cabling section on page 79. Full-Duplex Considerations As previously mentioned, the GigaSwitch provides full-duplex support for 10BaseT networks, however, if you are using 100BaseTX devices you will need to be using the GigaSwitch in half- Full-duplex operation allows data to install a SX or TX Gigabit expansion module and use...

User Guide
Page 7
... as a free-standing unit, or installed in place. 4. Place the GigaSwitch right side up within approximately 30 seconds. Use a screwdriver to remove the desired Expansion Module cover plate (labeled "Slot 1" and "Slot 2"). Uplinking the GigaSwitch Port 24 on the EtherFast II 10/100 Managed 24-Port GigaSwitch can now re-connect the cables to other mounting bracket on one or two seconds. Linksys EtherFast® II Series Rack-Mounting the...
... as a free-standing unit, or installed in place. 4. Place the GigaSwitch right side up within approximately 30 seconds. Use a screwdriver to remove the desired Expansion Module cover plate (labeled "Slot 1" and "Slot 2"). Uplinking the GigaSwitch Port 24 on the EtherFast II 10/100 Managed 24-Port GigaSwitch can now re-connect the cables to other mounting bracket on one or two seconds. Linksys EtherFast® II Series Rack-Mounting the...
User Guide
Page 8
...; Configuring DHCP • Setting VLAN policy • Setting packet filtration • Configuring STP and SNMP parameters • Upgrading software There are as "admin" and the password is set as follows: BAUD RATE: FLOW: PARITY: STOP BITS: DATA BITS: 115200 None None 1 8 EMULATION: ANSI CURSOR EMULATION: VT100 8 10/100 Managed 24-Port GigaSwitch Remote Console Management You can manage the GigaSwitch locally by having a remote host establish a Telnet connection to the GigaSwitch. To use this management method: • The network...
...; Configuring DHCP • Setting VLAN policy • Setting packet filtration • Configuring STP and SNMP parameters • Upgrading software There are as "admin" and the password is set as follows: BAUD RATE: FLOW: PARITY: STOP BITS: DATA BITS: 115200 None None 1 8 EMULATION: ANSI CURSOR EMULATION: VT100 8 10/100 Managed 24-Port GigaSwitch Remote Console Management You can manage the GigaSwitch locally by having a remote host establish a Telnet connection to the GigaSwitch. To use this management method: • The network...
User Guide
Page 9
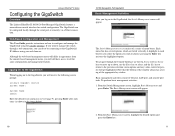
... the serial port or remotely via a Telnet connection. menu options and any values entered or present will appear. 2. The Basic Management screen will get highlighted. To perform basic management activities: 1. Linksys EtherFast® II Series Configuring the GigaSwitch Overview The Linksys EtherFast II 10/100 24-Port Managed GigaSwitch features a menu-driven console interface for switch configuration. Web-Based Configuration and Management This User Guide provides instructions on to the GigaSwitch, the Switch Management screen will still have access to...
... the serial port or remotely via a Telnet connection. menu options and any values entered or present will appear. 2. The Basic Management screen will get highlighted. To perform basic management activities: 1. Linksys EtherFast® II Series Configuring the GigaSwitch Overview The Linksys EtherFast II 10/100 24-Port Managed GigaSwitch features a menu-driven console interface for switch configuration. Web-Based Configuration and Management This User Guide provides instructions on to the GigaSwitch, the Switch Management screen will still have access to...

User Guide
Page 10
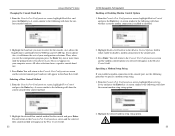
Linksys EtherFast® II Series • General allows you change the system name, location, administration and guest passwords, statistics collection, reboot-on System Name, with the cursor on -error, and remote Telnet login. • LAN Port allows you configure speed and flow control, link type, and physical address. • Console Port allows you change the console baud rate, flow control method, modem control, and setup string; and configure the SLIP address and SLIP subnet mask. Changing the Location 1. From the General screen...
Linksys EtherFast® II Series • General allows you change the system name, location, administration and guest passwords, statistics collection, reboot-on System Name, with the cursor on -error, and remote Telnet login. • LAN Port allows you configure speed and flow control, link type, and physical address. • Console Port allows you change the console baud rate, flow control method, modem control, and setup string; and configure the SLIP address and SLIP subnet mask. Changing the Location 1. From the General screen...

User Guide
Page 12
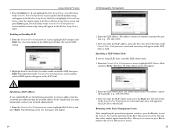
... the Basic Management screen. Remote Telnet Login 1. This setting is useful when a persistent problem needs to be reported) Enabled (allows the GigaSwitch to automatically reset when a fatal error is set to Multiple) 16 17 The following choices: Disabled (prevents remote Telnet logins to the GigaSwitch) Enabled (allows remote Telnet logins to configure the LAN Port Configuration options for one or more ports, including: • Speed & Flow Control • Physical Address (this option only appears when System MAC Address in the...
... the Basic Management screen. Remote Telnet Login 1. This setting is useful when a persistent problem needs to be reported) Enabled (allows the GigaSwitch to automatically reset when a fatal error is set to Multiple) 16 17 The following choices: Disabled (prevents remote Telnet logins to the GigaSwitch) Enabled (allows remote Telnet logins to configure the LAN Port Configuration options for one or more ports, including: • Speed & Flow Control • Physical Address (this option only appears when System MAC Address in the...

User Guide
Page 13
... determine the line speed and duplex mode. Click Enter. Highlight the line Speed Option you selected appears next to select for all ports. Linksys EtherFast® II Series Changing the Speed and Flow Control 1. From the LAN Port Configurations screen, highlight Speed & Flow Control and press the Enter key. A screen similar to the following will return to the Speed & Flow Cntl Options screen and the line speed setting you want to Line Speed. 4. If an expansion module is present...
... determine the line speed and duplex mode. Click Enter. Highlight the line Speed Option you selected appears next to select for all ports. Linksys EtherFast® II Series Changing the Speed and Flow Control 1. From the LAN Port Configurations screen, highlight Speed & Flow Control and press the Enter key. A screen similar to the following will return to the Speed & Flow Cntl Options screen and the line speed setting you want to Line Speed. 4. If an expansion module is present...

User Guide
Page 14
... the Switch Management screen. Off disables flow control at all times. 3. You can then select another option from the Basic Management screen, the Console Port Configurations screen will appear next to display the physical port address. Changing the Flow Control 1. When you finish, press the Esc key from the Line Speed & Flow Control screen to return to Multiple. Use the procedures in the General screen is set to the LAN Port Configurations screen. To configure the flow control...
... the Switch Management screen. Off disables flow control at all times. 3. You can then select another option from the Basic Management screen, the Console Port Configurations screen will appear next to display the physical port address. Changing the Flow Control 1. When you finish, press the Esc key from the Line Speed & Flow Control screen to return to Multiple. Use the procedures in the General screen is set to the LAN Port Configurations screen. To configure the flow control...
User Guide
Page 15
Linksys EtherFast® II Series Changing the Console Baud Rate 1. A screen similar to the following will appear in the Modem Control Options field to either enable or disable a modem connection to select for the console. Specifying a Modem Setup String If you enabled a modem connection to the Console Port Configurations screen and the selected flow control method will show the current modem setup string option. 2. You will return to the console port, use the following will...
Linksys EtherFast® II Series Changing the Console Baud Rate 1. A screen similar to the following will appear in the Modem Control Options field to either enable or disable a modem connection to select for the console. Specifying a Modem Setup String If you enabled a modem connection to the Console Port Configurations screen and the selected flow control method will show the current modem setup string option. 2. You will return to the console port, use the following will...
User Guide
Page 16
... the Switch Management screen. 25 The address consists of numbers separated by periods (e.g., 192.168.1.105). 3. You will return to the Console Port Configurations screen and the custom setup string will show the current SLIP setting. 2. Press the Enter key. If you highlight Default Setup String, you highlight Custom Setup String, enter the custom string in the SLIP Subnet Mask field. Linksys EtherFast® II Series 3. You...
... the Switch Management screen. 25 The address consists of numbers separated by periods (e.g., 192.168.1.105). 3. You will return to the Console Port Configurations screen and the custom setup string will show the current SLIP setting. 2. Press the Enter key. If you highlight Default Setup String, you highlight Custom Setup String, enter the custom string in the SLIP Subnet Mask field. Linksys EtherFast® II Series 3. You...

User Guide
Page 17
... change VLAN, IP multicast group, MAC address, and port perspectives. • IP Networking allows you to view or change IP settings, ARP and routing table parameters, RIP parameters, DHCP gateway settings, and ping settings. • Bridging lets you view and change the aging period for a MAC address. • Static Filtering allows you to view, add, delete, or search all source or destination addresses to be filtered. • Spanning Tree lets you view and change parameters relating to the spanning tree protocol. • SNMP...
... change VLAN, IP multicast group, MAC address, and port perspectives. • IP Networking allows you to view or change IP settings, ARP and routing table parameters, RIP parameters, DHCP gateway settings, and ping settings. • Bridging lets you view and change the aging period for a MAC address. • Static Filtering allows you to view, add, delete, or search all source or destination addresses to be filtered. • Spanning Tree lets you view and change parameters relating to the spanning tree protocol. • SNMP...

User Guide
Page 24
... Port VLAN Activities If you view VLAN activities and RMON statistics. To search for the selected port. 3. To view per -port VLAN activities, highlight Per Port VLAN Activities, then press the Enter key. 3. Linksys EtherFast® II Series PORT PERSPECTIVE The port perspective lets you select Per Port VLAN Activities from the Port Perspective screen, a screen similar to the following Per Port VLAN Activities screen appears. 10/100 Managed 24-Port GigaSwitch Scrolling Through MAC Addresses Use...
... Port VLAN Activities If you view VLAN activities and RMON statistics. To search for the selected port. 3. To view per -port VLAN activities, highlight Per Port VLAN Activities, then press the Enter key. 3. Linksys EtherFast® II Series PORT PERSPECTIVE The port perspective lets you select Per Port VLAN Activities from the Port Perspective screen, a screen similar to the following Per Port VLAN Activities screen appears. 10/100 Managed 24-Port GigaSwitch Scrolling Through MAC Addresses Use...

User Guide
Page 25
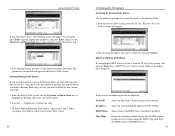
After reviewing this information, press the Esc key until you can: • View or change IP and RIP Settings. • View or change ARP Table Parameters. • View or change Routing Table Parameters. • View or change DHCP Gateway Settings. • View or change Ping Settings. 4. Press the Enter key. The following screen will appear. 2. To view statistics for the port in the screen above, press the "R" key. From the IP Networking screen, you return to the...
After reviewing this information, press the Esc key until you can: • View or change IP and RIP Settings. • View or change ARP Table Parameters. • View or change Routing Table Parameters. • View or change DHCP Gateway Settings. • View or change Ping Settings. 4. Press the Enter key. The following screen will appear. 2. To view statistics for the port in the screen above, press the "R" key. From the IP Networking screen, you return to the...

User Guide
Page 27
... Internet Address in the Static ARP Specifications screen. 6. Type the corresponding physical address and press Enter. From the ARP Table screen, use the following procedure to highlight Physical Address and press Enter. Searching for ARP Table Entries Use the following screen shows an example of numbers separated by periods (e.g., 129.32.0.11). The selected address will appear next to the ARP Table screen. Linksys EtherFast® II Series 3. The following procedure to delete...
... Internet Address in the Static ARP Specifications screen. 6. Type the corresponding physical address and press Enter. From the ARP Table screen, use the following procedure to highlight Physical Address and press Enter. Searching for ARP Table Entries Use the following screen shows an example of numbers separated by periods (e.g., 129.32.0.11). The selected address will appear next to the ARP Table screen. Linksys EtherFast® II Series 3. The following procedure to delete...
User Guide
Page 28
...; Add entries to the Routing table. • Delete entries from the IP Networking screen, a Routing Table screen similar to which the switch can route packets. Linksys EtherFast® II Series ROUTING TABLE If you select Default Gateway, the following screen (see next page) will appear. Martian An illegal IP address to view, add, delete, or search a particular routing path. ICMP A routing entry obtained via the RIP protocol. Select Default Gateway or Static Route, then press Enter. Adding Routing Table Entries Use...
...; Add entries to the Routing table. • Delete entries from the IP Networking screen, a Routing Table screen similar to which the switch can route packets. Linksys EtherFast® II Series ROUTING TABLE If you select Default Gateway, the following screen (see next page) will appear. Martian An illegal IP address to view, add, delete, or search a particular routing path. ICMP A routing entry obtained via the RIP protocol. Select Default Gateway or Static Route, then press Enter. Adding Routing Table Entries Use...
User Guide
Page 29
... disabled. DHCP GATEWAY SETTINGS If you highlight DHCP Gateway Settings from the DHCP client to search for , then press Enter. Deleting Routing Table Entries If you no precautionary message that have been defined. DHCP Relay shows whether the DHCP relay is no longer need an entry in the Routing Table: 1. Use the Up Arrow and Down Arrow keys to the following will appear. Linksys EtherFast® II Series If you select Static Route...
... disabled. DHCP GATEWAY SETTINGS If you highlight DHCP Gateway Settings from the DHCP client to search for , then press Enter. Deleting Routing Table Entries If you no precautionary message that have been defined. DHCP Relay shows whether the DHCP relay is no longer need an entry in the Routing Table: 1. Use the Up Arrow and Down Arrow keys to the following will appear. Linksys EtherFast® II Series If you select Static Route...

User Guide
Page 43
... times faster than fast enough to handle even the most viable and economical. Although fiber is tipped with a layer of data per second), is made to communicate with slower 10BaseT equipment when routed through a switch. Each fiber optic cable is physically capable of carrying tetrabits of rubber tubing, fiber optics use a square SC connector that fits into a port or connected to another cable. Linksys EtherFast® II Series...
... times faster than fast enough to handle even the most viable and economical. Although fiber is tipped with a layer of data per second), is made to communicate with slower 10BaseT equipment when routed through a switch. Each fiber optic cable is physically capable of carrying tetrabits of rubber tubing, fiber optics use a square SC connector that fits into a port or connected to another cable. Linksys EtherFast® II Series...


