User Guide
Page 13
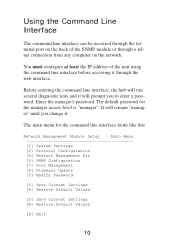
... access level is "manager". Before entering the command line interface, the hub will run several diagnostic tests and it will remain "manager" until you to enter a password. The default password for the command line interface looks like this Network Management Module Setup Main Menu [1] System Settings [2] Protocol Configuration [4] Restart Management Kit [5] SNMP...
... access level is "manager". Before entering the command line interface, the hub will run several diagnostic tests and it will remain "manager" until you to enter a password. The default password for the command line interface looks like this Network Management Module Setup Main Menu [1] System Settings [2] Protocol Configuration [4] Restart Management Kit [5] SNMP...

User Guide
Page 14
Once you have entered the new names that you wish to use, press X to return to change a setting or Exit: _ Entering any one of the keys above to change the information about the managed hub's name, location, and contact name. System Settings Menu You can access the system settings menu by pressing 1 at the main menu. Network Management Module Setup System Settings [1] System Name: TEST [2] System Location: LINKSYS [3] System Contact: SYSADMIN [X] Exit Press one of the menu options will allow you to the main menu. 11
Once you have entered the new names that you wish to use, press X to return to change a setting or Exit: _ Entering any one of the keys above to change the information about the managed hub's name, location, and contact name. System Settings Menu You can access the system settings menu by pressing 1 at the main menu. Network Management Module Setup System Settings [1] System Name: TEST [2] System Location: LINKSYS [3] System Contact: SYSADMIN [X] Exit Press one of the menu options will allow you to the main menu. 11
User Guide
Page 15
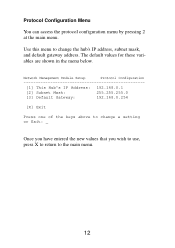
Network Management Module Setup Protocol Configuration [1] This Hub's IP Address: 192.168.0.1 [2] Subnet Mask: 255.255.255.0 [3] Default Gateway: 192.168.0.254 [X] Exit Press one of the keys above to the main menu. ... this menu to change a setting or Exit: _ Once you have entered the new values that you wish to use, press X to return to change the hub's IP address, subnet mask, and default gateway address. Protocol Configuration Menu You can access the protocol configuration menu by pressing 2 at the main menu. The...
Network Management Module Setup Protocol Configuration [1] This Hub's IP Address: 192.168.0.1 [2] Subnet Mask: 255.255.255.0 [3] Default Gateway: 192.168.0.254 [X] Exit Press one of the keys above to the main menu. ... this menu to change a setting or Exit: _ Once you have entered the new values that you wish to use, press X to return to change the hub's IP address, subnet mask, and default gateway address. Protocol Configuration Menu You can access the protocol configuration menu by pressing 2 at the main menu. The...

User Guide
Page 17
... values that you wish to use, press T to enter the trap receivers menu or X to return to change the SNMP access properties. Network Management Module Setup SNMP Configuration [1] SNMP Read Community: PUBLIC [2] SNMP Read/Write Community: PRIVATE [3] SNMP Authentication: ENABLED [T] Trap Receivers Menu [X] Exit Press one of the SNMP configuration menu...
... values that you wish to use, press T to enter the trap receivers menu or X to return to change the SNMP access properties. Network Management Module Setup SNMP Configuration [1] SNMP Read Community: PUBLIC [2] SNMP Read/Write Community: PRIVATE [3] SNMP Authentication: ENABLED [T] Trap Receivers Menu [X] Exit Press one of the SNMP configuration menu...
User Guide
Page 18
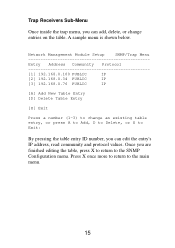
Trap Receivers Sub-Menu Once inside the trap menu, you can edit the entry's IP address, read community and protocol values. Network Management Module Setup SNMP/Trap Menu Entry Address Community Protocol [1] 192.168.0.100 PUBLIC IP [2] 192.168.0.34 PUBLIC IP [3] 192.168.0.76 PUBLIC IP [A] Add New Table ...
Trap Receivers Sub-Menu Once inside the trap menu, you can edit the entry's IP address, read community and protocol values. Network Management Module Setup SNMP/Trap Menu Entry Address Community Protocol [1] 192.168.0.100 PUBLIC IP [2] 192.168.0.34 PUBLIC IP [3] 192.168.0.76 PUBLIC IP [A] Add New Table ...

User Guide
Page 19
You can access the port management menu by pressing 7 at the main menu. The menu looks like this menu to set the speed of the keys above to change a setting or Exit: _ 16 Port Management Menu You can also partition any hub in the stack. Use this : Network Management Module Setup Port Management [1] Currently Selected Hub: [2] Hub's Port Speed: [3] Enable/Disable Ports: [X] Exit Press one of any particular port or multiple ports on any port in the stack.
You can access the port management menu by pressing 7 at the main menu. The menu looks like this menu to set the speed of the keys above to change a setting or Exit: _ 16 Port Management Menu You can also partition any hub in the stack. Use this : Network Management Module Setup Port Management [1] Currently Selected Hub: [2] Hub's Port Speed: [3] Enable/Disable Ports: [X] Exit Press one of any particular port or multiple ports on any port in the stack.

User Guide
Page 20
Enter the ID number of the hub to configure, or X to manage. Network Management Module Setup Port Management/Choose Hub Each hub in the stack you want to Exit: _ The find a hub's unit number, start with Unit 1 at the top of 6 StackPro II hubs, Unit 1 is on the top and Unit 6 is on the bottom. In ...a stack of the stack and count downwards. Choose an ID number between 1 and 6. After you have an opportunity to the port management menu. 17 selection [1] Here, you have selected the hub that you want...
Enter the ID number of the hub to configure, or X to manage. Network Management Module Setup Port Management/Choose Hub Each hub in the stack you want to Exit: _ The find a hub's unit number, start with Unit 1 at the top of 6 StackPro II hubs, Unit 1 is on the top and Unit 6 is on the bottom. In ...a stack of the stack and count downwards. Choose an ID number between 1 and 6. After you have an opportunity to the port management menu. 17 selection [1] Here, you have selected the hub that you want...

User Guide
Page 21
...Setup Port Management/Speed Port [1][2][3][4][5][6][7][8][9][10][11][12][13][14][15][16] Status [A][A][A][A][A][A][A][A][A][A][A][A][A][A][A][A Port [17][18][19][20][21][22][23][24] Status [A][A][A][A][A][A][A][A] [A] Auto-Sensing 10BaseT/100BaseTX (10Mbps or 100Mbps) [F] 100BaseTX only (100Mbps) [E] 10BaseT only (10Mbps) Select one port number .. If you are using a 24-Port StackPro II hub... the ID number of the port list. For example, if you have finished your hubs, they will allow you can select another hub in the stack and manage more ports, or you to different speeds.
...Setup Port Management/Speed Port [1][2][3][4][5][6][7][8][9][10][11][12][13][14][15][16] Status [A][A][A][A][A][A][A][A][A][A][A][A][A][A][A][A Port [17][18][19][20][21][22][23][24] Status [A][A][A][A][A][A][A][A] [A] Auto-Sensing 10BaseT/100BaseTX (10Mbps or 100Mbps) [F] 100BaseTX only (100Mbps) [E] 10BaseT only (10Mbps) Select one port number .. If you are using a 24-Port StackPro II hub... the ID number of the port list. For example, if you have finished your hubs, they will allow you can select another hub in the stack and manage more ports, or you to different speeds.

User Guide
Page 22
Network Management Module Setup Port Management/Partition Port [1][2][3][4][5][6][7][8][9][10][11][12][13][14][15][16] Status [E][E][E][E][E][E][E][E][E][E][E][E][E][E][E][E ... If you are using fiber optic distance extender modules, they will allow you are using a 24-Port StackPro II hub, the fiber module will be listed as port 25. selection [3] The enable/disable sub-menu will appear... at the end of the particular port on the hub, you want to return to the Port Management menu, and then X again if you can toggle the...
Network Management Module Setup Port Management/Partition Port [1][2][3][4][5][6][7][8][9][10][11][12][13][14][15][16] Status [E][E][E][E][E][E][E][E][E][E][E][E][E][E][E][E ... If you are using fiber optic distance extender modules, they will allow you are using a 24-Port StackPro II hub, the fiber module will be listed as port 25. selection [3] The enable/disable sub-menu will appear... at the end of the particular port on the hub, you want to return to the Port Management menu, and then X again if you can toggle the...

User Guide
Page 23
When you will begin the update process. You should download the latest firmware upgrade from the Linksys FTP site and save it to install your upgrade. Some features will change with New Firmware [X] Exit Press U to Update or X to Exit: _ By pressing U ... version. Firmware Update Use this menu, you upgrade the firmware, be sure to download the newest version of the user guide as well. Check the Linksys web site for information about the current firmware version for the SNMP module. The firmware upgrade will include detailed instructions regarding how to the terminal...
When you will begin the update process. You should download the latest firmware upgrade from the Linksys FTP site and save it to install your upgrade. Some features will change with New Firmware [X] Exit Press U to Update or X to Exit: _ By pressing U ... version. Firmware Update Use this menu, you upgrade the firmware, be sure to download the newest version of the user guide as well. Check the Linksys web site for information about the current firmware version for the SNMP module. The firmware upgrade will include detailed instructions regarding how to the terminal...

User Guide
Page 25
Network Management Setup Restore Default Values WARNING: Pressing [R] below will replace all of your SNMP module to Exit: Pressing R at this menu will replace the stack configuration back to its original factory settings. [R] Restore Default Values [X] Exit Press R to Restore factory settings or X to the factory defaults. Restore Defaults This menu will allow you to completely reset all of the variables on your settings for the entire stack with the manufacturer default settings, leaving you with a clean slate. 22
Network Management Setup Restore Default Values WARNING: Pressing [R] below will replace all of your SNMP module to Exit: Pressing R at this menu will replace the stack configuration back to its original factory settings. [R] Restore Default Values [X] Exit Press R to Restore factory settings or X to the factory defaults. Restore Defaults This menu will allow you to completely reset all of the variables on your settings for the entire stack with the manufacturer default settings, leaving you with a clean slate. 22
User Guide
Page 32
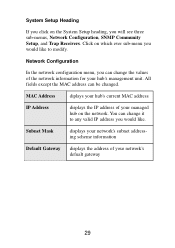
...values of the network information for your hub's management unit. Subnet Mask displays your network's subnet addressing scheme information Default Gateway displays the address of your network's defualt gateway 29 System Setup Heading If you click on the System Setup heading, you would like to any ... menu, you would like . MAC Address diplays your hub's current MAC address IP Address displays the IP address of your managed hub on which ever sub-menu you will see three sub-menus, Network Configuration, SNMP Community Setup, and Trap Receivers. You can change it to modify...
...values of the network information for your hub's management unit. Subnet Mask displays your network's subnet addressing scheme information Default Gateway displays the address of your network's defualt gateway 29 System Setup Heading If you click on the System Setup heading, you would like to any ... menu, you would like . MAC Address diplays your hub's current MAC address IP Address displays the IP address of your managed hub on which ever sub-menu you will see three sub-menus, Network Configuration, SNMP Community Setup, and Trap Receivers. You can change it to modify...

User Guide
Page 33
The default name for the Read Only community is private. The community fields basically allow you to give unique names to to view and change the community settings. The default name for the Read & Write community is public. SNMP Community Setup Click on the SNMP community setup menu under the System Setup heading to your Read Only and Read & Write access levels.
The default name for the Read Only community is private. The community fields basically allow you to give unique names to to view and change the community settings. The default name for the Read & Write community is public. SNMP Community Setup Click on the SNMP community setup menu under the System Setup heading to your Read Only and Read & Write access levels.

User Guide
Page 34
Trapping is performed. The StackPro II SNMP application allows you can configure your SNMP module to send the test results to a specific IP address on the network. Trap Receiver Setup If you are running performance tests on your managed stack of hubs, you to set the IP address that will receive all of the information...
Trapping is performed. The StackPro II SNMP application allows you can configure your SNMP module to send the test results to a specific IP address on the network. Trap Receiver Setup If you are running performance tests on your managed stack of hubs, you to set the IP address that will receive all of the information...
