
User Guide
Page 5
...-based interface to control your hub's activity through advanced SNMP and Remote Monitoring (RMON) features, as well as possible. Since the StackPro II hubs can stack up to the Linksys web site, at http://www.linksys.com, and download the latest free firmware upgrade. You can configure protocols, partition ports on any hub in the command line interface...
...-based interface to control your hub's activity through advanced SNMP and Remote Monitoring (RMON) features, as well as possible. Since the StackPro II hubs can stack up to the Linksys web site, at http://www.linksys.com, and download the latest free firmware upgrade. You can configure protocols, partition ports on any hub in the command line interface...

User Guide
Page 6
...to provide you read the entire user guide, including the full version available in PDF format on the Linksys web site before installing and configuring the module. Getting to the latest firmware update. This user guide is recommended that you with both ... SNMP Management Module (DSHSNMP) provides extensive management support for the following Linksys products: • StackPro II 10/100 Dual-Speed 16-Port Hub (DSHUB16) • StackPro II 10/100 Dual-Speed 24-Port Hub (DSHUB24) The StackPro II hubs also feature additional expansion options for system administrators who have never used...
...to provide you read the entire user guide, including the full version available in PDF format on the Linksys web site before installing and configuring the module. Getting to the latest firmware update. This user guide is recommended that you with both ... SNMP Management Module (DSHSNMP) provides extensive management support for the following Linksys products: • StackPro II 10/100 Dual-Speed 16-Port Hub (DSHUB16) • StackPro II 10/100 Dual-Speed 24-Port Hub (DSHUB24) The StackPro II hubs also feature additional expansion options for system administrators who have never used...

User Guide
Page 7
... install an SNMP module in a StackPro II Hub, you can use with RMON on levels 1,2,3 and 9 • Manually control the speed settings (10Mbps, 100Mbps, or 10/100 auto-sensing) for each port on the hub or in the stack. • Configure hub IP addresses, network protocols, and system...web interface • Generate graphs that show hub or port activity over a selected time period • Configure each port's security settings • View hub statistics with a modem • Download free firmware and software upgrades 4 The StackPro II Management Module provides management options for the ...
... install an SNMP module in a StackPro II Hub, you can use with RMON on levels 1,2,3 and 9 • Manually control the speed settings (10Mbps, 100Mbps, or 10/100 auto-sensing) for each port on the hub or in the stack. • Configure hub IP addresses, network protocols, and system...web interface • Generate graphs that show hub or port activity over a selected time period • Configure each port's security settings • View hub statistics with a modem • Download free firmware and software upgrades 4 The StackPro II Management Module provides management options for the ...

User Guide
Page 9
...rack, remove it up ). Turn off the StackPro II hub. If your SNMP module. if you can move it by wiggling it, then it is not properly connected. 3. For your safety, it is important to do this computer to configure your hub is securely connected to the slots inside of the... hub. Find a PC with the circuits and chips facing up . 6 Only one of the hubs in a StackPro II 10/100 hub or a stack of the provided instructions before continuing with the ...
...rack, remove it up ). Turn off the StackPro II hub. If your SNMP module. if you can move it by wiggling it, then it is not properly connected. 3. For your safety, it is important to do this computer to configure your hub is securely connected to the slots inside of the... hub. Find a PC with the circuits and chips facing up . 6 Only one of the hubs in a StackPro II 10/100 hub or a stack of the provided instructions before continuing with the ...

User Guide
Page 10
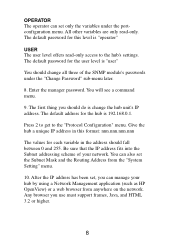
... not use a null modem cable. 5. On the hub that the hub passes all functions on the hub and can configure any of the PC's active serial ports. There are displaying management information. The default password for this level is running a self-test. The hub is "manager" 7 MANAGER The manager has access to...38400 8 None 1 No 4. Please wait for example, run the HyperTerm program under Windows 95/98 - Directly connect them using one of the hub's settings. After the hub finishes its self-test, you give. You will see diagnostic messages in the terminal window. Your access to the...
... not use a null modem cable. 5. On the hub that the hub passes all functions on the hub and can configure any of the PC's active serial ports. There are displaying management information. The default password for this level is running a self-test. The hub is "manager" 7 MANAGER The manager has access to...38400 8 None 1 No 4. Please wait for example, run the HyperTerm program under Windows 95/98 - Directly connect them using one of the hub's settings. After the hub finishes its self-test, you give. You will see diagnostic messages in the terminal window. Your access to the...
User Guide
Page 11
...Address from anywhere on the network. Enter the manager password. The default address for each variable in this level is change all three of your hub by using a Network Management application (such as HP OpenView) or a web browser from the "System Setting" menu. 10. After the ... "Change Password" sub-menu later. 8. Press 2 to get to the hub's settings. Give the hub a unique IP address in the address should fall between 0 and 255. All other variables are only read -only access to the "Protocol Configuration" menu. You will see a command menu. 9. Any browser you use...
...Address from anywhere on the network. Enter the manager password. The default address for each variable in this level is change all three of your hub by using a Network Management application (such as HP OpenView) or a web browser from the "System Setting" menu. 10. After the ... "Change Password" sub-menu later. 8. Press 2 to get to the hub's settings. Give the hub a unique IP address in the address should fall between 0 and 255. All other variables are only read -only access to the "Protocol Configuration" menu. You will see a command menu. 9. Any browser you use...
User Guide
Page 13
...it . The main menu for the manager access level is "manager". Before entering the command line interface, the hub will prompt you to enter a password. Enter the manager's password. The default password for the command line interface... looks like this Network Management Module Setup Main Menu [1] System Settings [2] Protocol Configuration [4] Restart Management Kit [5] SNMP Configuration [7] Port Management [8] Firmware Update [9] Modify Password [S] Save Current Settings [R] Restore Default Values [S] Save Current Settings ...
...it . The main menu for the manager access level is "manager". Before entering the command line interface, the hub will prompt you to enter a password. Enter the manager's password. The default password for the command line interface... looks like this Network Management Module Setup Main Menu [1] System Settings [2] Protocol Configuration [4] Restart Management Kit [5] SNMP Configuration [7] Port Management [8] Firmware Update [9] Modify Password [S] Save Current Settings [R] Restore Default Values [S] Save Current Settings ...
User Guide
Page 15
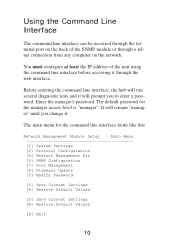
The default values for these variables are shown in the menu below. Use this menu to the main menu. 12 Network Management Module Setup Protocol Configuration [1] This Hub's IP Address: 192.168.0.1 [2] Subnet Mask: 255.255.255.0 [3] Default Gateway: 192.168.0.254 [X] Exit Press one of the keys above... setting or Exit: _ Once you have entered the new values that you wish to use, press X to return to change the hub's IP address, subnet mask, and default gateway address. Protocol Configuration Menu You can access the protocol configuration menu by pressing 2 at the main menu.
The default values for these variables are shown in the menu below. Use this menu to the main menu. 12 Network Management Module Setup Protocol Configuration [1] This Hub's IP Address: 192.168.0.1 [2] Subnet Mask: 255.255.255.0 [3] Default Gateway: 192.168.0.254 [X] Exit Press one of the keys above... setting or Exit: _ Once you have entered the new values that you wish to use, press X to return to change the hub's IP address, subnet mask, and default gateway address. Protocol Configuration Menu You can access the protocol configuration menu by pressing 2 at the main menu.

User Guide
Page 17
... T to enter the trap receivers menu or X to return to change the SNMP access properties. Network Management Module Setup SNMP Configuration [1] SNMP Read Community: PUBLIC [2] SNMP Read/Write Community: PRIVATE [3] SNMP Authentication: ENABLED [T] Trap Receivers Menu [X] Exit Press one of the SNMP... configuration menu and can be toggled by pressing 5 at the main menu. The default values and locations for these variables are shown in ...
... T to enter the trap receivers menu or X to return to change the SNMP access properties. Network Management Module Setup SNMP Configuration [1] SNMP Read Community: PUBLIC [2] SNMP Read/Write Community: PRIVATE [3] SNMP Authentication: ENABLED [T] Trap Receivers Menu [X] Exit Press one of the SNMP... configuration menu and can be toggled by pressing 5 at the main menu. The default values and locations for these variables are shown in ...
User Guide
Page 18
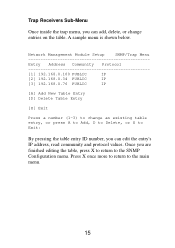
A sample menu is shown below. Press X once more to return to the SNMP Configuration menu. Network Management Module Setup SNMP/Trap Menu Entry Address Community Protocol [1] 192.168.0.100 PUBLIC IP [2] 192.168.0.34 PUBLIC IP [3] 192.168.0.76 ...
A sample menu is shown below. Press X once more to return to the SNMP Configuration menu. Network Management Module Setup SNMP/Trap Menu Entry Address Community Protocol [1] 192.168.0.100 PUBLIC IP [2] 192.168.0.34 PUBLIC IP [3] 192.168.0.76 ...

User Guide
Page 20
... manage, press X to return to Exit: _ The find a hub's unit number, start with Unit 1 at the top of 6 StackPro II hubs, Unit 1 is on the top and Unit 6 is on the bottom. After you have an opportunity to manage. Enter the ID number of the hub to configure, or X to the port management menu. 17 Choose...
... manage, press X to return to Exit: _ The find a hub's unit number, start with Unit 1 at the top of 6 StackPro II hubs, Unit 1 is on the top and Unit 6 is on the bottom. After you have an opportunity to manage. Enter the ID number of the hub to configure, or X to the port management menu. 17 Choose...

User Guide
Page 25
Network Management Setup Restore Default Values WARNING: Pressing [R] below will replace the stack configuration back to its original factory settings. [R] Restore Default Values [X] Exit Press R to Restore factory settings or X to the factory defaults. Restore Defaults This menu will replace all of the variables on your settings for the entire stack with the manufacturer default settings, leaving you to completely reset all of your SNMP module to Exit: Pressing R at this menu will allow you with a clean slate. 22
Network Management Setup Restore Default Values WARNING: Pressing [R] below will replace the stack configuration back to its original factory settings. [R] Restore Default Values [X] Exit Press R to Restore factory settings or X to the factory defaults. Restore Defaults This menu will replace all of the variables on your settings for the entire stack with the manufacturer default settings, leaving you to completely reset all of your SNMP module to Exit: Pressing R at this menu will allow you with a clean slate. 22
User Guide
Page 26
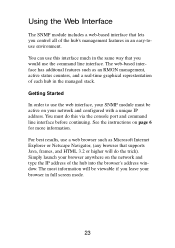
... line interface. You can use this via the console port and command line interface before continuing. See the instructions on your network and configured with a unique IP address. For best results, use the web interface, your SNMP module must do the trick). Simply launch your ...Started In order to use a web browser such as an RMON management, active status counters, and a real-time graphical represtentation of the hub into the browser's address window. The web-based interface has additonal features such as Microsoft Internet Explorer or Netscape Navigator, (any browser that ...
... line interface. You can use this via the console port and command line interface before continuing. See the instructions on your network and configured with a unique IP address. For best results, use the web interface, your SNMP module must do the trick). Simply launch your ...Started In order to use a web browser such as an RMON management, active status counters, and a real-time graphical represtentation of the hub into the browser's address window. The web-based interface has additonal features such as Microsoft Internet Explorer or Netscape Navigator, (any browser that ...
User Guide
Page 32
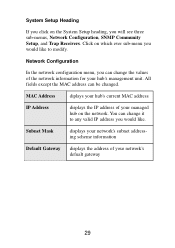
... click on the System Setup heading, you would like . You can change the values of your managed hub on which ever sub-menu you can be changed. Network Configuration In the network configuration menu, you would like to any valid IP address you will see three sub-menus, Network... Configuration, SNMP Community Setup, and Trap Receivers. MAC Address diplays your hub's current MAC address IP Address displays the IP address of the network information for your network's defualt gateway 29 All ...
... click on the System Setup heading, you would like . You can change the values of your managed hub on which ever sub-menu you can be changed. Network Configuration In the network configuration menu, you would like to any valid IP address you will see three sub-menus, Network... Configuration, SNMP Community Setup, and Trap Receivers. MAC Address diplays your hub's current MAC address IP Address displays the IP address of the network information for your network's defualt gateway 29 All ...

User Guide
Page 34
...the information collected when the trap is performed. The StackPro II SNMP application allows you to set the IP address that will receive all of network or networked application performance statistics. The SNMP module's Trap Receiver menu allows you can configure your SNMP module to send the test results to ...four trap receivers on the network. You can also view the trap receiver's community name, and you to set up to a specific IP address on your managed stack of hubs, you can view the ...
...the information collected when the trap is performed. The StackPro II SNMP application allows you to set the IP address that will receive all of network or networked application performance statistics. The SNMP module's Trap Receiver menu allows you can configure your SNMP module to send the test results to ...four trap receivers on the network. You can also view the trap receiver's community name, and you to set up to a specific IP address on your managed stack of hubs, you can view the ...

User Guide
Page 41
...StackPro II Hub SNMP module, you change the passwords for the three access levels. Save Configuration This menu option will find the latest version of this user guide, as well as pertinent information about feature changes, common errors, and quick solutions to save your settings. Remember to the Linksys... web site. Once you have made to the SNMP module since you last saved your configuration after you will save your settings and any changes that you have changed your passwords...
...StackPro II Hub SNMP module, you change the passwords for the three access levels. Save Configuration This menu option will find the latest version of this user guide, as well as pertinent information about feature changes, common errors, and quick solutions to save your settings. Remember to the Linksys... web site. Once you have made to the SNMP module since you last saved your configuration after you will save your settings and any changes that you have changed your passwords...

