User Guide
Page 7
Cordless Internet Telephony Kit List of Figures Figure 2-1: The Telephony Kit shown on its Charger 3 Figure 2-2: The Telephony Kit's Base Station 4 Figure 2-3: Front of Handset 5 Figure 2-4: Side of Handset 7 Figure 2-5: Back Panel of Handset 8 Figure 3-1: The Handset's Batteries 15 Figure 3-2: Handset on Charger 16 Figure 3-3: Windows Sound Properties 18 Figure 3-4: Volume Control 18
Cordless Internet Telephony Kit List of Figures Figure 2-1: The Telephony Kit shown on its Charger 3 Figure 2-2: The Telephony Kit's Base Station 4 Figure 2-3: Front of Handset 5 Figure 2-4: Side of Handset 7 Figure 2-5: Back Panel of Handset 8 Figure 3-1: The Handset's Batteries 15 Figure 3-2: Handset on Charger 16 Figure 3-3: Windows Sound Properties 18 Figure 3-4: Volume Control 18
User Guide
Page 25
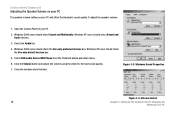
...USB audio Device/USB Phone from the Preferred device pull-down menu. 6. Click the Volume button and adjust the volume using the slider for the best sound quality. 7. To adjust the speaker volume: 1. Windows XP users should check the Use only default devices box. 5. Windows XP users should select Sound and Audio devices. 3. Figure 3-3: Windows... Volume Control 18 Chapter 3: Setting Up the Cordless Internet Telephony Kit Setting Up Your PC Close the window when finished. Windows 2000 users should check the Use only preferred devices box. Select the Audio tab. 4. Open the ...
...USB audio Device/USB Phone from the Preferred device pull-down menu. 6. Click the Volume button and adjust the volume using the slider for the best sound quality. 7. To adjust the speaker volume: 1. Windows XP users should check the Use only default devices box. 5. Windows XP users should select Sound and Audio devices. 3. Figure 3-3: Windows... Volume Control 18 Chapter 3: Setting Up the Cordless Internet Telephony Kit Setting Up Your PC Close the window when finished. Windows 2000 users should check the Use only preferred devices box. Select the Audio tab. 4. Open the ...


