
TAC1 Manual
Page 1
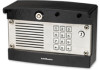
Elmhurst, IL 60126-1196 www.liftmaster.com TAC1 Telephone Entry System 1 23 456 789 0 Installation and Programming Manual The Chamberlain Group 845 Larch Ave.
Elmhurst, IL 60126-1196 www.liftmaster.com TAC1 Telephone Entry System 1 23 456 789 0 Installation and Programming Manual The Chamberlain Group 845 Larch Ave.

TAC1 Manual
Page 2
... Master Code 3 3 3 3 4-11 4 4 5 6 6 7 7 8 8 9 9 10 10 11 11 11 TESTING Test the Gate/Door Relays Test the Telephone Connections PROGRAMMING From the TAC1 Keypad Code Setup Code Operation From the Telephone Telephone Commands Program a Pre-Installed Liftmaster Receiver Quick Reference TAC1 MASTER CODE LIMITED WARRANTY 12 12 12 13-19 13 14 14 15-16 16 16...
... Master Code 3 3 3 3 4-11 4 4 5 6 6 7 7 8 8 9 9 10 10 11 11 11 TESTING Test the Gate/Door Relays Test the Telephone Connections PROGRAMMING From the TAC1 Keypad Code Setup Code Operation From the Telephone Telephone Commands Program a Pre-Installed Liftmaster Receiver Quick Reference TAC1 MASTER CODE LIMITED WARRANTY 12 12 12 13-19 13 14 14 15-16 16 16...

TAC1 Manual
Page 3
... 2 - Conductor Cable 2 - Conductor Cable 12 AWG copper wire, PVC insulated or 12 AWG copper wire, uninsulated 24 AWG twisted pair telephone wire 24 AWG twisted pair telephone wire 24 AWG twisted pair telephone wire See device specifications for wire size See device specifications for indoor installations ONLY. Belden #9502 DISTANCE Under 30 feet...
... 2 - Conductor Cable 2 - Conductor Cable 12 AWG copper wire, PVC insulated or 12 AWG copper wire, uninsulated 24 AWG twisted pair telephone wire 24 AWG twisted pair telephone wire 24 AWG twisted pair telephone wire See device specifications for wire size See device specifications for indoor installations ONLY. Belden #9502 DISTANCE Under 30 feet...
TAC1 Manual
Page 4
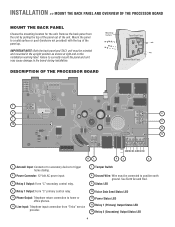
...2 8 3 4 1 Autocall Input: Connector for the unit. See Earth Ground Rod. 9 Status LED 4 Relay 1 Output: Form "C" primary control relay. 5 Phone Output: Telephone return connection to the board during installation. INSTALLATION >> MOUNT THE BACK PANEL AND OVERVIEW OF THE PROCESSOR BOARD MOUNT THE BACK PANEL Choose the mounting...a solid surface or post (hardware not provided) with the top of the panel up. IMPORTANT NOTE: Both the back panel and TAC1 unit must be oriented and mounted in the upright position as shown at right and on the installation warning label. Remove the back ...
...2 8 3 4 1 Autocall Input: Connector for the unit. See Earth Ground Rod. 9 Status LED 4 Relay 1 Output: Form "C" primary control relay. 5 Phone Output: Telephone return connection to the board during installation. INSTALLATION >> MOUNT THE BACK PANEL AND OVERVIEW OF THE PROCESSOR BOARD MOUNT THE BACK PANEL Choose the mounting...a solid surface or post (hardware not provided) with the top of the panel up. IMPORTANT NOTE: Both the back panel and TAC1 unit must be oriented and mounted in the upright position as shown at right and on the installation warning label. Remove the back ...
TAC1 Manual
Page 5
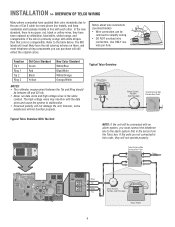
...should be connected with the data wires and cause the system to malfunction. • Reversed polarity will not damage the unit, however, some telephones will not operate properly. Use ONLY one HOUSE TELCO wire per hole. Typical Telco Overview Home Phone Ring Tip Alarm System Position (Not Provided... an alarm system, you can be removed to simplify wiring. In the new standard, there is orange/white. most telephone wiring components you must connect the telephone line to the alarm system first in the same conduit. If the units are not connected in line with white stripes...
...should be connected with the data wires and cause the system to malfunction. • Reversed polarity will not damage the unit, however, some telephones will not operate properly. Use ONLY one HOUSE TELCO wire per hole. Typical Telco Overview Home Phone Ring Tip Alarm System Position (Not Provided... an alarm system, you can be removed to simplify wiring. In the new standard, there is orange/white. most telephone wiring components you must connect the telephone line to the alarm system first in the same conduit. If the units are not connected in line with white stripes...

TAC1 Manual
Page 12
...Relay 1 status indicator LED will illuminate (Blue) to show activity when triggered. Place a telephone call from the resident's telephone to be triggered. The telephone in the residence should ring. The TAC1 will illuminate (Blue) to be triggered. The "1" Key indicates the Relay to show activity...TESTING >> TEST THE GATE/DOOR RELAYS AND TEST THE TELEPHONE CONNECTIONS TEST GATE/DOOR RELAYS TEST RELAY 1 Enter 4 digit Master Code + 1 (Key). NOTE: After the "Call" Button is activated. 12 3 456 789 0 Call Button 12 The TAC1 will blink during transmission. 3. Press the "Call"...
...Relay 1 status indicator LED will illuminate (Blue) to show activity when triggered. Place a telephone call from the resident's telephone to be triggered. The telephone in the residence should ring. The TAC1 will illuminate (Blue) to be triggered. The "1" Key indicates the Relay to show activity...TESTING >> TEST THE GATE/DOOR RELAYS AND TEST THE TELEPHONE CONNECTIONS TEST GATE/DOOR RELAYS TEST RELAY 1 Enter 4 digit Master Code + 1 (Key). NOTE: After the "Call" Button is activated. 12 3 456 789 0 Call Button 12 The TAC1 will blink during transmission. 3. Press the "Call"...

TAC1 Manual
Page 13
...? ? Enter the Master Code: ? ? ? ? 2. Enter the Program Code: 0 4 ENABLE INTERCOM (NO TELCO) MODE Intercom Mode is 2. Default level is using the main telephone line for the unit's communications to hear the visitor at the unit, 1 = Low, 2 = Medium and 3 = High. Example: 0000 = 0.5 Seconds (Minimum) 0010 = ... Enter the Program Code: 0 2 3 4. Enter the Volume Level: 1 or 2 or 3 2. The unit will beep. PROGRAMMING >> FROM THE TAC1 KEYPAD 12 3 GENERAL INSTRUCTION 456 789 0 NOTE: Use the STAR Key "*" to result in success (indicated by double high success tone). Enter the ...
...? ? Enter the Master Code: ? ? ? ? 2. Enter the Program Code: 0 4 ENABLE INTERCOM (NO TELCO) MODE Intercom Mode is 2. Default level is using the main telephone line for the unit's communications to hear the visitor at the unit, 1 = Low, 2 = Medium and 3 = High. Example: 0000 = 0.5 Seconds (Minimum) 0010 = ... Enter the Program Code: 0 2 3 4. Enter the Volume Level: 1 or 2 or 3 2. The unit will beep. PROGRAMMING >> FROM THE TAC1 KEYPAD 12 3 GENERAL INSTRUCTION 456 789 0 NOTE: Use the STAR Key "*" to result in success (indicated by double high success tone). Enter the ...
TAC1 Manual
Page 14
... Relay 2 be the same as the Master Code. Enter the Program Code: 5 6 To disengage party mode: Enter a valid code into the TAC1 keypad or enter "*5" into the local telephone. Enter the Master Code: ? ? ? ? Enter the Master Code: ? ? ? ? 2. The appropriate Relay/Channel will latch relay and... trigger corresponding channel. 1. Enter the Program Code: 5 4 To disengage party mode: Enter a valid code into the TAC1 keypad or enter "*9" into the local telephone. Enter User Code to control: 1 or 2 or no button is pressed. Enter the Program Code: 5 3 TRIGGER RELAY 1 AND...
... Relay 2 be the same as the Master Code. Enter the Program Code: 5 6 To disengage party mode: Enter a valid code into the TAC1 keypad or enter "*5" into the local telephone. Enter the Master Code: ? ? ? ? Enter the Master Code: ? ? ? ? 2. The appropriate Relay/Channel will latch relay and... trigger corresponding channel. 1. Enter the Program Code: 5 4 To disengage party mode: Enter a valid code into the TAC1 keypad or enter "*9" into the local telephone. Enter User Code to control: 1 or 2 or no button is pressed. Enter the Program Code: 5 3 TRIGGER RELAY 1 AND...

TAC1 Manual
Page 15
DISABLE ALTERNATE DTMF PROGRAMMING Enter the command tone: # 1 6 CALL FORWARD PROGRAMMING ENTER CALL FORWARDING TELEPHONE NUMBER Enter the command tone: # Up to # Enter the command tone: 1 3 ENABLE ALTERNATE (DUAL) RING TONE (DEFAULT) Enter the command tone: 1 5 NOTE: Alternate ring ...THE CALL FORWARDING NUMBER Enter the command tone: # 8 NOTE: This command will also disable the call forwarding mode. Enter the command tone: 1 0 2. PROGRAMMING >> FROM THE TELEPHONE TELEPHONE PROGRAMMING ENABLE INTERCOM MODE Enter the command tone: 0 3 ADJUST "PICK UP" RING COUNT 1.
DISABLE ALTERNATE DTMF PROGRAMMING Enter the command tone: # 1 6 CALL FORWARD PROGRAMMING ENTER CALL FORWARDING TELEPHONE NUMBER Enter the command tone: # Up to # Enter the command tone: 1 3 ENABLE ALTERNATE (DUAL) RING TONE (DEFAULT) Enter the command tone: 1 5 NOTE: Alternate ring ...THE CALL FORWARDING NUMBER Enter the command tone: # 8 NOTE: This command will also disable the call forwarding mode. Enter the command tone: 1 0 2. PROGRAMMING >> FROM THE TELEPHONE TELEPHONE PROGRAMMING ENABLE INTERCOM MODE Enter the command tone: 0 3 ADJUST "PICK UP" RING COUNT 1.

TAC1 Manual
Page 16
... pressed. ERASE ALL CONTROL CODES Press and hold the learn button on the TAC1 keypad. Press and release the learn button. 2. The indicator light on the receiver. PROGRAMMING >> TELEPHONE COMMANDS AND PROGRAM A PRE-INSTALLED LIFTMASTER RECEIVER TELEPHONE COMMANDS FROM LOCAL TELEPHONE FROM FORWARDED TELEPHONE TRIGGER RELAY 1 Enter the command tone: 9 TRIGGER RELAY 2 ACCEPT CALL FROM UNIT...
... pressed. ERASE ALL CONTROL CODES Press and hold the learn button on the TAC1 keypad. Press and release the learn button. 2. The indicator light on the receiver. PROGRAMMING >> TELEPHONE COMMANDS AND PROGRAM A PRE-INSTALLED LIFTMASTER RECEIVER TELEPHONE COMMANDS FROM LOCAL TELEPHONE FROM FORWARDED TELEPHONE TRIGGER RELAY 1 Enter the command tone: 9 TRIGGER RELAY 2 ACCEPT CALL FROM UNIT...
TAC1 Manual
Page 18
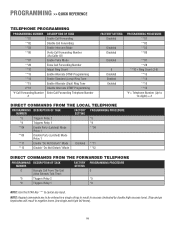
... Ring Tone **15 Enable Alternate (Dual) Ring Tone #*16 Disable Alternate DTMF Programming *# Call Forwarding Number Enter Call Forwarding Telephone Number # FACTORY SETTING Disabled Disabled Disabled PROGRAMMING PROCEDURE **01 **02 **03 **06 Disabled 5 Disabled Enabled Enabled **07 **#8 **10... **11 Enable "Do Not Disturb" Mode Disabled **11 **12 Disable "Do Not Disturb" Mode **12 DIRECT COMMANDS FROM THE FORWARDED TELEPHONE PROGRAMMING DESCRIPTION OF TASK NUMBER FACTORY PROGRAMMING PROCEDURE SETTING 0 Accepts Call From The Unit 0 (Also Extends Talk Time) *5 Triggers Relay ...
... Ring Tone **15 Enable Alternate (Dual) Ring Tone #*16 Disable Alternate DTMF Programming *# Call Forwarding Number Enter Call Forwarding Telephone Number # FACTORY SETTING Disabled Disabled Disabled PROGRAMMING PROCEDURE **01 **02 **03 **06 Disabled 5 Disabled Enabled Enabled **07 **#8 **10... **11 Enable "Do Not Disturb" Mode Disabled **11 **12 Disable "Do Not Disturb" Mode **12 DIRECT COMMANDS FROM THE FORWARDED TELEPHONE PROGRAMMING DESCRIPTION OF TASK NUMBER FACTORY PROGRAMMING PROCEDURE SETTING 0 Accepts Call From The Unit 0 (Also Extends Talk Time) *5 Triggers Relay ...

