GT- Logic 4 Installation Manual
Page 20
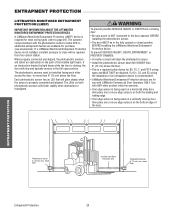
... is required for purchase (see accessories). Right Side of Garage- Each photoelectric sensor has an LED that will flicker rapidly when obstructed or misaligned. Use with LiftMaster Commercial Door Operators ONLY. above the floor. If a LiftMaster Monitored Entrapment Protection device is being used on a horizontal slide door, then place one or more than 6" (15 cm...
... is required for purchase (see accessories). Right Side of Garage- Each photoelectric sensor has an LED that will flicker rapidly when obstructed or misaligned. Use with LiftMaster Commercial Door Operators ONLY. above the floor. If a LiftMaster Monitored Entrapment Protection device is being used on a horizontal slide door, then place one or more than 6" (15 cm...
GT- Logic 4 Installation Manual
Page 21
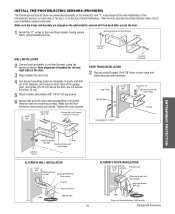
... are also alternate mounting methods which may fit your installation requirements better. Do not exceed 6 inches (15 cm). 5 Attach bracket assemblies with hardware. Door Track Drill 3/8" Holes Inside Wall Lock Nuts 1/4" Mounting Bracket with Square Holes "C" Wrap Carriage Bolts 1/4-20x1/2" ENTRAPMENT PROTECTION Mounting Bracket "C" Wrap with Slot ... show recommended assembly of the bracket(s) and "C" wrap based on the wall installation of the photoelectric sensors on each side of the door or on both sides of the garage door, 4-6 inches (10-15 cm) above the floor.
... are also alternate mounting methods which may fit your installation requirements better. Do not exceed 6 inches (15 cm). 5 Attach bracket assemblies with hardware. Door Track Drill 3/8" Holes Inside Wall Lock Nuts 1/4" Mounting Bracket with Square Holes "C" Wrap Carriage Bolts 1/4-20x1/2" ENTRAPMENT PROTECTION Mounting Bracket "C" Wrap with Slot ... show recommended assembly of the bracket(s) and "C" wrap based on the wall installation of the photoelectric sensors on each side of the door or on both sides of the garage door, 4-6 inches (10-15 cm) above the floor.
GH LOGIC 3 Manual
Page 22
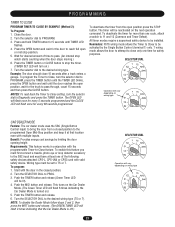
...switch to reach full open or mid stop position. 5. Turn the selector dial to PROGRAM. 3. To deactivate the timer for 5 seconds until the door reaches the open position press the STOP button. All timer modes require a supervised safety device to the SBC input and must have at that location...one time for safety purposes. Reminders: FSTS wiring mode allows the Timer to Close to close 15 seconds after a truck enters a garage. T wiring mode allows the door to attempt to be set to the desired wiring type (TS or T). Requirements: This feature works in the closed position to pass...
...switch to reach full open or mid stop position. 5. Turn the selector dial to PROGRAM. 3. To deactivate the timer for 5 seconds until the door reaches the open position press the STOP button. All timer modes require a supervised safety device to the SBC input and must have at that location...one time for safety purposes. Reminders: FSTS wiring mode allows the Timer to Close to close 15 seconds after a truck enters a garage. T wiring mode allows the door to attempt to be set to the desired wiring type (TS or T). Requirements: This feature works in the closed position to pass...


