
8557 Manual
Page 1
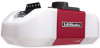
.... ELITE Series Garage Door Opener Models • 8550 - NOTE: If you are required to -Close feature if you are installing the garage door opener on a one -piece door, visit www.liftmaster.com for future reference: Serial Number: . DC Belt Drive with Battery Backup • 8557 - 3/4 hp Belt Drive FOR...used ONLY with MyQ® and Security✚ 2.0™ accessories. ■ DO NOT enable the Timer-to ensure safe operation. ■ The model number label is located on the left side panel of your garage door opener. ■ This garage door opener is connected and properly aligned. &#...
.... ELITE Series Garage Door Opener Models • 8550 - NOTE: If you are required to -Close feature if you are installing the garage door opener on a one -piece door, visit www.liftmaster.com for future reference: Serial Number: . DC Belt Drive with Battery Backup • 8557 - 3/4 hp Belt Drive FOR...used ONLY with MyQ® and Security✚ 2.0™ accessories. ■ DO NOT enable the Timer-to ensure safe operation. ■ The model number label is located on the left side panel of your garage door opener. ■ This garage door opener is connected and properly aligned. &#...
8557 Manual
Page 3
... arm A B F. The instructions for reference and your product may be attached to the accessory and are for these accessories will vary depending on your specific model, other accessories may look different. White and red/white wire N. Carton Inventory NOTE: Accessories will be included with white and white/black wire attached: Sending...
... arm A B F. The instructions for reference and your product may be attached to the accessory and are for these accessories will vary depending on your specific model, other accessories may look different. White and red/white wire N. Carton Inventory NOTE: Accessories will be included with white and white/black wire attached: Sending...
8557 Manual
Page 4
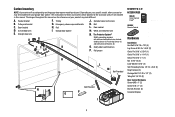
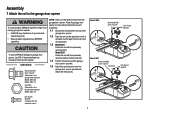
.... 1.2 Align the rail and the styrofoam over the garage door opener sprocket and attach with the sprocket cover) 4 Model 8550 Washered Bolt 5/16"-18x1/2" Hex Screw #8x3/8" Model 8557 Washered Bolt 5/16"-18x1/2" Lock Nut Hex Screw #8x3/8" Hex Screw #8x3/8" (Packed with hex screws. Place...to prevent scratching. 1.1 Remove the two bolts from the top of sprocket while operating opener. • Securely attach sprocket cover BEFORE operating. Model 8557: Fasten the rail with the previously removed washer bolt and lock nut. 1.4 Position the belt around the garage door opener sprocket. 1.5 ...
.... 1.2 Align the rail and the styrofoam over the garage door opener sprocket and attach with the sprocket cover) 4 Model 8550 Washered Bolt 5/16"-18x1/2" Hex Screw #8x3/8" Model 8557 Washered Bolt 5/16"-18x1/2" Lock Nut Hex Screw #8x3/8" Hex Screw #8x3/8" (Packed with hex screws. Place...to prevent scratching. 1.1 Remove the two bolts from the top of sprocket while operating opener. • Securely attach sprocket cover BEFORE operating. Model 8557: Fasten the rail with the previously removed washer bolt and lock nut. 1.4 Position the belt around the garage door opener sprocket. 1.5 ...
8557 Manual
Page 21
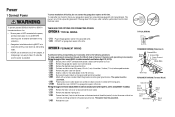
... TWO OPTIONS FOR CONNECTING POWER: OPTION A TYPICAL WIRING 1.1A Plug in any way to make a permanent connection through a filter board (8550 models manufactured before spade terminals. 1.5B Remove the power cord from electrocution or fire: • Be sure power is NOT connected to the opener,...top of electric shock, your local code, refer to the 7/8 inch hole. 1.7B Run wires through a terminal block (8550 models manufactured after April 12, 2013 and all 8557 models): 1.1B Remove the motor unit cover screws and set aside. 1.3B Remove the attached green ground terminal. 1.4B Cut black ...
... TWO OPTIONS FOR CONNECTING POWER: OPTION A TYPICAL WIRING 1.1A Plug in any way to make a permanent connection through a filter board (8550 models manufactured before spade terminals. 1.5B Remove the power cord from electrocution or fire: • Be sure power is NOT connected to the opener,...top of electric shock, your local code, refer to the 7/8 inch hole. 1.7B Run wires through a terminal block (8550 models manufactured after April 12, 2013 and all 8557 models): 1.1B Remove the motor unit cover screws and set aside. 1.3B Remove the attached green ground terminal. 1.4B Cut black ...
8557 Manual
Page 29
... MyQ® technology uses a 900MHz signal to -Close (TTC) The TTC feature automatically closes the door after 4-1/2 minutes. NOTE: Older LiftMaster remote controls, door controls, and third party products are misaligned, the door will enter sleep mode when the door is fully closed. If ...maximum) or for maximum energy efficiency a 26W (100W equivalent) compact fluorescent light (CFL) bulb may be adjusted using a TTC enabled door control (Models 881LM or 880LM). Prior to 16 MyQ® accessories. as the light bulb turns off the sensor LEDs will turn off automatically after a specified ...
... MyQ® technology uses a 900MHz signal to -Close (TTC) The TTC feature automatically closes the door after 4-1/2 minutes. NOTE: Older LiftMaster remote controls, door controls, and third party products are misaligned, the door will enter sleep mode when the door is fully closed. If ...maximum) or for maximum energy efficiency a 26W (100W equivalent) compact fluorescent light (CFL) bulb may be adjusted using a TTC enabled door control (Models 881LM or 880LM). Prior to 16 MyQ® accessories. as the light bulb turns off the sensor LEDs will turn off automatically after a specified ...
8557 Manual
Page 32
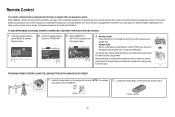
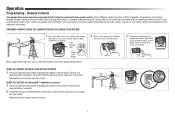
...using the learn button the garage door opener. press to continue. TO REMOTE 4 Remote Control: Press the button on the make, model, and year of your garage door opener. Repeat the steps for additional information. Visit www.homelink.com for programming additional remote controls ... to operate your choice on the keyless entry keypad. Learn LED Yellow 2 Locate the Program Button on the garage door opener. Older LiftMaster remote controls are NOT compatible, see page 37 for compatible accessories. Then press the ENTER button. NOTE: Your garage door opener may ...
...using the learn button the garage door opener. press to continue. TO REMOTE 4 Remote Control: Press the button on the make, model, and year of your garage door opener. Repeat the steps for additional information. Visit www.homelink.com for programming additional remote controls ... to operate your choice on the keyless entry keypad. Learn LED Yellow 2 Locate the Program Button on the garage door opener. Older LiftMaster remote controls are NOT compatible, see page 37 for compatible accessories. Then press the ENTER button. NOTE: Your garage door opener may ...
8557 Manual
Page 36
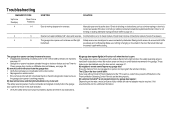
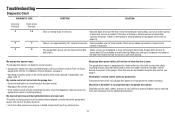
...the garage. Realign both LEDs are steady and not flickering. My door will not close and the light bulbs blink on the make, model, and year of any obstructions. Visit www.homelink.com for binding or obstructions, such as a broken spring or door lock, correct as...27. • Garage door opener has been activated through a device or feature such as needed. If door is working properly. Close, garage door monitor or LiftMaster Internet Gateway, see page 31 . Troubleshooting DIAGNOSTIC CODE Up Arrow Flash(es) Down Arrow Flash(es) 4 1-4 4 5 4 6 SYMPTOM SOLUTION Door is binding...
...the garage. Realign both LEDs are steady and not flickering. My door will not close and the light bulbs blink on the make, model, and year of any obstructions. Visit www.homelink.com for binding or obstructions, such as a broken spring or door lock, correct as...27. • Garage door opener has been activated through a device or feature such as needed. If door is working properly. Close, garage door monitor or LiftMaster Internet Gateway, see page 31 . Troubleshooting DIAGNOSTIC CODE Up Arrow Flash(es) Down Arrow Flash(es) 4 1-4 4 5 4 6 SYMPTOM SOLUTION Door is binding...
8557 Manual
Page 40
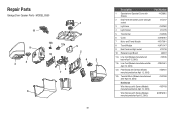
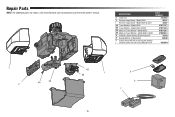
... socket 10 Receiver Logic Board 11a Line Cord (Models manufactured before April 12, 2013) 11b Line Cord (Models manufactured after April 12, 2013) 12a Filter Board with Screws (Models manufactured before April 12, 2013) 12b Terminal Block (Models manufactured after April 12, 2013) Not Shown Wire... Harness with Screws (Models manufactured before April 12, 2013) Wire Harness with Screws (Models manufactured after April 12, 2013) Part Number...
... socket 10 Receiver Logic Board 11a Line Cord (Models manufactured before April 12, 2013) 11b Line Cord (Models manufactured after April 12, 2013) 12a Filter Board with Screws (Models manufactured before April 12, 2013) 12b Terminal Block (Models manufactured after April 12, 2013) Not Shown Wire... Harness with Screws (Models manufactured before April 12, 2013) Wire Harness with Screws (Models manufactured after April 12, 2013) Part Number...
8557 Manual
Page 41
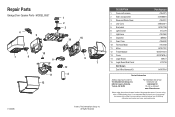
Country Club Rd. If you have the following information: part number, part name, and model number. All Rights Reserved DESCRIPTION 1 Cover with screws 2 Gear and sprocket 3 Drive and Worm Gear 4 Line Cord 5 End panel 6 Light Socket 7 Light Lens ... Parts Garage Door Opener Parts - Tucson, AZ 85706 For installation and service information call: 1-800-528-9131 Or visit us online at: www.liftmaster.com Before calling, please have the model number of the garage door opener. MODEL 8557 4 5 1 2 3 15 14 7 6 10 9 12 11 8 13 6 7 114A4665 © 2013, The Chamberlain Group, Inc....
Country Club Rd. If you have the following information: part number, part name, and model number. All Rights Reserved DESCRIPTION 1 Cover with screws 2 Gear and sprocket 3 Drive and Worm Gear 4 Line Cord 5 End panel 6 Light Socket 7 Light Lens ... Parts Garage Door Opener Parts - Tucson, AZ 85706 For installation and service information call: 1-800-528-9131 Or visit us online at: www.liftmaster.com Before calling, please have the model number of the garage door opener. MODEL 8557 4 5 1 2 3 15 14 7 6 10 9 12 11 8 13 6 7 114A4665 © 2013, The Chamberlain Group, Inc....
8557 Elite Series Users Guide Manual
Page 4
...a 26 W (100 W equivalent) compact fluorescent light (CFL) bulb may be adjusted using a TTC enabled door control (Models 881LM or 880LM). NOTE: Older LiftMaster remote controls, door controls, and third party products are misaligned, the door will light. If the door senses an obstruction or is... feature; However, you can be used. When properly connected and aligned, the safety reversing sensors will turn on the garage door opener model purchased. ALERT2CLOSE The Alert2Close feature provides a visual and an audible alert that can close from a remote control. When the door is...
...a 26 W (100 W equivalent) compact fluorescent light (CFL) bulb may be adjusted using a TTC enabled door control (Models 881LM or 880LM). NOTE: Older LiftMaster remote controls, door controls, and third party products are misaligned, the door will light. If the door senses an obstruction or is... feature; However, you can be used. When properly connected and aligned, the safety reversing sensors will turn on the garage door opener model purchased. ALERT2CLOSE The Alert2Close feature provides a visual and an audible alert that can close from a remote control. When the door is...
8557 Elite Series Users Guide Manual
Page 6
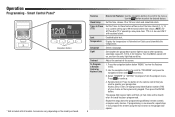
...button on the keyless entry keypad. The garage door opener lights will flash (or two clicks will be used ONLY with all models. Operation Programming - Set the time, choose 12 or 24 hour clock and show /hide the temperature. Set duration for programming additional ...the time interval (1, 5, 10 or a custom setting up to the menus. Repeat the steps above for garage door opener light to stay on the model purchased. Accessories vary depending on after operation, selectable range of 1-1/2 to continue. 4. Enable/disable lock. Press the navigation button below "MENU" to...
...button on the keyless entry keypad. The garage door opener lights will flash (or two clicks will be used ONLY with all models. Operation Programming - Set the time, choose 12 or 24 hour clock and show /hide the temperature. Set duration for programming additional ...the time interval (1, 5, 10 or a custom setting up to the menus. Repeat the steps above for garage door opener light to stay on the model purchased. Accessories vary depending on after operation, selectable range of 1-1/2 to continue. 4. Enable/disable lock. Press the navigation button below "MENU" to...
8557 Elite Series Users Guide Manual
Page 7
Older LiftMaster remote controls are now erased. If your vehicle is equipped with a Homelink®, you may require an external adapter depending on the garage door opener. ... the learn LED goes out (approximately 6 seconds). The Learn indicator light will be done through the door control or the Learn button on the make, model, and year of your remote control. If light bulbs are now erased. Reprogram any accessory you wish to operate with the additional remote controls or...
Older LiftMaster remote controls are now erased. If your vehicle is equipped with a Homelink®, you may require an external adapter depending on the garage door opener. ... the learn LED goes out (approximately 6 seconds). The Learn indicator light will be done through the door control or the Learn button on the make, model, and year of your remote control. If light bulbs are now erased. Reprogram any accessory you wish to operate with the additional remote controls or...
8557 Elite Series Users Guide Manual
Page 14
... door lock, correct as Timer-to page 10). If door is not activated on the make, model, and year of any obstructions. Check travel module connections, replace travel (refer to -Close, garage door monitor or LiftMaster Internet Gateway, see page 4. • Operating on my motor unit: The safety reversing sensor must be...
... door lock, correct as Timer-to page 10). If door is not activated on the make, model, and year of any obstructions. Check travel module connections, replace travel (refer to -Close, garage door monitor or LiftMaster Internet Gateway, see page 4. • Operating on my motor unit: The safety reversing sensor must be...
8557 Elite Series Users Guide Manual
Page 15
... - Model 8587 & 8557 5 3V2016 Lithium Battery (Remote Control) 6 Backup Battery (if applicable) 7 Safety Sensor Kit with receiving and sending sensors with 3 feet (.9 m) 2-conductor wire PART NUMBER 41A7562 45DCT 45ACT 41A7114-7 41D7742-5 41D1739-1 41D5563-3 10A19 485LM 41A5034 1 2 3A 4A 4B 1 3B 5 6 7 15 Repair Parts NOTE: For additional parts not shown, visit www.liftmaster.com...
... - Model 8587 & 8557 5 3V2016 Lithium Battery (Remote Control) 6 Backup Battery (if applicable) 7 Safety Sensor Kit with receiving and sending sensors with 3 feet (.9 m) 2-conductor wire PART NUMBER 41A7562 45DCT 45ACT 41A7114-7 41D7742-5 41D1739-1 41D5563-3 10A19 485LM 41A5034 1 2 3A 4A 4B 1 3B 5 6 7 15 Repair Parts NOTE: For additional parts not shown, visit www.liftmaster.com...


