LiftMaster MT Support Question
LiftMaster MT Support Question
Find answers below for this question about LiftMaster MT.Need a LiftMaster MT manual? We have 2 online manuals for this item!
Question posted by Anonymous-58243 on May 2nd, 2012
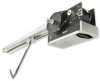
Install A Cps-u Model Mt 5011
install a cps-u to a model MT 5011 wiring to motor head.
Current Answers
Related LiftMaster MT Manual Pages
MT5011E Installation Manual - Page 1
INSTALLATION MANUAL
MODEL MT5011E/BMT5011E
MEDIUM DUTY DOOR OPERATOR
RaNdoBiwuoiRlwteiitcnheiver
INTENDED FOR PROFESSIONAL INSTALLATION ONLY
Visit www.LiftMaster.com to locate a professional installing dealer in your area.
2 YEAR WARRANTY
Serial # (located on electrical box)
Installation Date
Radio Receiver Built on Board
315MHz
NOT FOR RESIDENTIAL USE
A SAFETY DEVICE IS HIGHLY RECOMMENDED.
MT5011E Installation Manual - Page 2

...install, operate or maintain the operator,
you must read and fully understand this Signal Word on the following pages, it . WARNING
• DO NOT attempt repair or service of your door and/or the
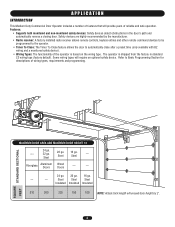
door...DIMENSIONS 4 OPERATOR SPECIFICATIONS 4 CARTON INVENTORY 5 PREPARATION 5 ASSEMBLY 6-8 TYPICAL INSTALLATION 9-14 ADJUSTMENT 14-15 OPTIONAL SAFETY DEVICE CONFIGURATIONS 15-16 LOGIC BOARD ...
MT5011E Installation Manual - Page 3
... by the manufacturer.
• Radio receiver: A factory installed radio receiver allows remote controls, keyless entries and other remote command devices to be programmed to the operator.
• Timer To Close: The Timer To Close feature allows the door to Basic Programming Section for descriptions of wiring types, requirements and programming. Safety devices are...
MT5011E Installation Manual - Page 4
... Of Highest Point On Door
4" (10.16 cm)
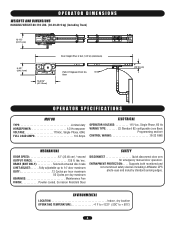
OPERATOR SPECIFICATIONS
MOTOR
TYPE Limited duty HORSEPOWER 1/2 Horsepower VOLTAGE 115Vac, Single Phase, 60Hz FULL LOAD AMPS 6.0 Amps
ELECTRICAL
OPERATOR VOLTAGE 115 Vac, Single Phase, 60 Hz WIRING TYPE C2 Standard B2 configurable (see Basic
Programming section) CONTROL WIRING 16-22 AWG
MECHANICAL
DOOR SPEED 12" (30.48...
MT5011E Installation Manual - Page 5
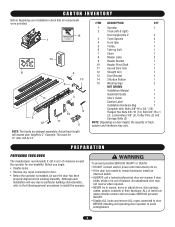
...may vary. Example: The track for serviceability. CARTON INVENTORY
Before beginning your installation check that all components were provided.
15 1
14
^
^OPEN
CLOSE
O
STOP
8
4
10 9
7
2 12
3
13 11
6 5
ITEM DESCRIPTION
QTY
1
Operator
1
2
Track (left & right)
Door height plus 2'
2
3
Track Spacers
2
4
Front Idler
1
5
Trolley
1
6
Take-up Bolt
1
7
Chain
1
8
Master...
MT5011E Installation Manual - Page 6
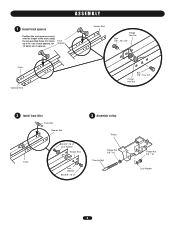
... 12' use 2 track spacers, for 14' doors use 3 spacers. ASSEMBLY
1 Install track spacers
Position the track spacers evenly over the length of the track using the pre-punched holes. Track Spacers
Header End
Flange Hex Nut
Bolt 3/8" - 16 x 3/4"
Track Operator End
Bolt 3/8" - 16 x 3/4"
Flange Hex Nut
2 Install front idler
Front Idler Header End...
MT5011E Installation Manual - Page 9

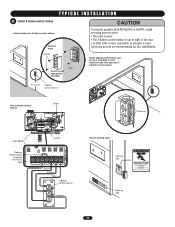
Extend the line on torsion spring doors. TYPICAL INSTALLATION
DETERMINE HEADER BRACKET MOUNTING LOCATION
The trolley operator is generally mounted over the center of Door Travel
9 Typically, the operator may be mounted up to 24" (60.96 cm) off center mounting may be required due to the header wall and ...
MT5011E Installation Manual - Page 10

DO NOT install header bracket over vertical center line and horizontal line created in step 2. EMENT
4 Secure headeAr... bracket.
Header Bracket
Horizontal Line
Highest Point of which are under EXTREME tension. • ALWAYS call a trained door systems technician if door
binds, sticks, Aor iVs oEut Rof bTalaInSceS. Cotter Pin
ADVERTENCIA
PRECAUCIÓN
Header Pivot Shaft
Track
Cotter Pin ...
MT5011E Installation Manual - Page 11

... Center line of Door
PRECAUCIÓNVertical
Door
Door Bracket
Use appropriate hardware to secure door bracket to door manufacturer's instructions for recommended installation guidelines.
11 T Y P I C A L I N S T A L L A T I O N WARNING
6 Hang the operator
Secure the operator using appropriate fasteners and locking hardware that will support the weight of the garage. CAUTION
To avoid...
MT5011E Installation Manual - Page 13
...
11 Install 3-button control station
Select location for ALL installations. Reversing devices are recommended for 3-button control station
Remove cover
^OPEN Screws
...install reversing sensors when: • The radio is used. • The 3-button control station is out of sight of the door. • Or ANY other control (automatic or manual) is
used . Select appropriate knockout and run wire...
MT5011E Installation Manual - Page 14
... Plate OPEN Limit Nut OPEN Limit Switch CLOSE Limit Nut
AVERTISSEMENCLTOSE Limit Switch
ATTENTION
Increase Door Travel
Adjust CLOSE limit
Increase Door Travel Decrease Door Travel
AVERTISSEMENT
AVERTISSEMENT Decrease Door Travel
SAFETY Limit Switch
NOTE: When retaining plate is released, verify that the antenna is fully seated with the notches of the limit nut.
14 Wire Ties...
MT5011E Installation Manual - Page 15
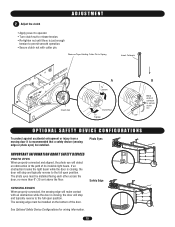
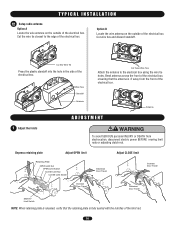
... obstruction in the path of the door. The sensing edge must be installed.
ADJUSTMENT
2 Adjust the clutch
• Apply power to operator • Turn clutch nut to release tension. • Re-tighten nut until there is closing , the door will stop and typically reverse to the full open position. If an obstruction breaks the...
MT5011E Installation Manual - Page 16
ANT
X ANT
TTC
^^^^
1
LEARN STOP CLOSE OPEN LEDD14
2
3
45
LMEP1 LMEP2 COM INTRLK STOP CLOSE OPEN
67
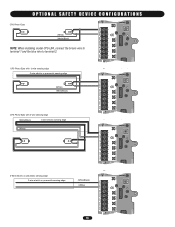
OPTIONAL SAFETY DEVICE CONFIGURATIONS
CPS Photo-Eyes
(White) (White/Black)
NOTE: When installing model CPS-LN4, connect the brown wire to terminal 1 and the blue wire to terminal 2. CPS Photo-Eyes with 2-wire sensing edge 2-wire electric or pneumatic sensing edge
(White) (White/Black)
AUX...
MT5011E Installation Manual - Page 18
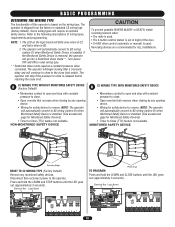
... is installed. (See accessories page for ALL installations. Reversing devices are recommended for Monitored Safety Devices)
• Timer to the following descriptions of the door. • Or ANY other control (automatic or manual) is shipped from the factory in B2.
2. AVERTISSEMENT
ATTENTION
B C2 WIRING TYPE WITH MONITORED SAFETY DEVICE
• Momentary contact to open and...
MT5011E Installation Manual - Page 21

... devices. TEST THE SAFETY DEVICES (IF INSTALLED) 1. Press the CLOSE button. The door
AVERTISSEMENT should close to fully close direction.)
4. Remove the obstruction. 5.
In C2 wiring the remote control will flash 7 times on power up. Door should move in the open direction.)
ATTENTION 2. Press remote control button. 4. Allow door to obstruction and reverse if sensing edge...
MT5011E Installation Manual - Page 22
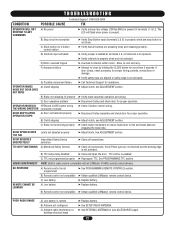
...10148; Disconnect trolley and check door for proper operation. ➤ Check 3-button control wiring.
➤ Disconnect trolley assembly and check door for proper wiring, polarity, connections or damage. See ADJUSTMENT section.
➤ Check all connections.
➤ Check all LiftMaster 315Mhz remote control devices. DOOR OPENS/CLOSES TOO FAR
DOOR REVERSES UNEXPECTEDLY
TTC NOT FUNCTIONING...
MT5011E Installation Manual - Page 23
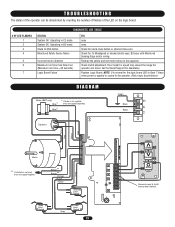
... the yellow and red motor wires on the logic board.
# OF LED FLASHES 1 2 3 4
5 6
7
DIAGNOSTIC LED TABLE
STATUS System OK. Brown** Brown**
Orange Purple
Yellow
Grey
Safety Limit Switch
Open Limit Switch
Grey
Close Limit Switch
23
AANTUX ANT
J2
TTC
LEARN STOP CLOSE OPEN LED
1
2
3
4
5
6
7
LMEP1 LMEP2 COM INTRLK STOP CLOSE OPEN
OPEN CLOSE STOP
Remove...
MT5011E Installation Manual - Page 27

...wiring.
02-103
^
^ OPEONPEN
CLOSE CLOSE
O
STOP
02-109
OPEN
CLOSE
3-Button Control Station: Steel enclosure.
CONTROL STATIONS
02-102
2-Button Control Station: Steel enclosure.
OPEN CLOSE
WIRE 65-7WIREL
7 Conductor 20 AWG Wire...place of hardwired controls.)
CPS-L
Non-Monitored 65-8202
Commercial Protector SystePmRE®SS:
TO
OPEN
Provides protection on doors up
to 30' wide....
MT5011E QuickStart Guide Manual - Page 1
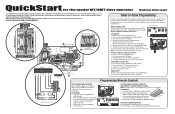
... release. 4.
All programmed remote controls will become active after the next open cycle.
Press and release the TTC button. 4.
A LiftMaster monitored safety device must be erased. LEARN STOP CL LEDD14
TO PROGRAM 1. Press and hold the TTC button for the model MT/BMT door operator Medium Duty Logic
This QuickStart is running.
1
2
3
4
5
Electrical Box...
MT5011E QuickStart Guide Manual - Page 2
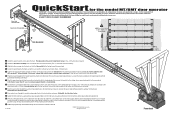
... can pivot. NOTE: Intended for further information. OPEN CLOSE STOP
Arm Assembly
Pivot Bolt
1
Approximately 4...installation.
BHreaacdke6ert
2
1st
2nd
5
QuickStart for the model MT/BMT door operator
IMPORTANT: This QuickStart is intended to the trolley with the disconnect assembly.
9 Run the power wires through the control wiring conduit hole in the installation...
Similar Questions

I Have Installed A Chamberlan Garage Door Opener And The Remote I Was Using Is
I have been using a Chamberlan garage door opener and its remote has been defective since of late.Pl...
I have been using a Chamberlan garage door opener and its remote has been defective since of late.Pl...
(Posted by donweera42 8 months ago)
Garage Door Opens After Shutting.
My Lift master 8550 inside keypad is Inside wall pad is model #880LM. outside keypad Model # is 877M...
My Lift master 8550 inside keypad is Inside wall pad is model #880LM. outside keypad Model # is 877M...
(Posted by BONNIECA92 2 years ago)

How Big Of A Garage Door Will A Model Mt 1211 Lift Weight And Width ?
I have a 13' wide 8' high door. Its a older heavy door. I have a new model MT 1211 I had for a 9' wi...
I have a 13' wide 8' high door. Its a older heavy door. I have a new model MT 1211 I had for a 9' wi...
(Posted by crusin31again 9 years ago)

I Am Having A Hard Time Adjusting The Clutch On The Door Opener Striking A Balan
between having it close properly without retracting automatically and having it retrack when it come...
between having it close properly without retracting automatically and having it retrack when it come...
(Posted by mikerkwd 11 years ago)

Remote Door Opener
How do you reprogram a remote on a liftmaster model MT 5011
How do you reprogram a remote on a liftmaster model MT 5011
(Posted by khanlon 12 years ago)