3275 Manual
Page 27
... the Back) next UP or DOWN operation, either manually or by using all codes. Press again to turn the Light Button opener light on or off whenever the "learn" button on for a 3-1/2 minute interval, etc., up to a maximum of persons and obstructions. • NEVER use handle to pull door open or closed , press...
... the Back) next UP or DOWN operation, either manually or by using all codes. Press again to turn the Light Button opener light on or off whenever the "learn" button on for a 3-1/2 minute interval, etc., up to a maximum of persons and obstructions. • NEVER use handle to pull door open or closed , press...
3275 Manual
Page 29
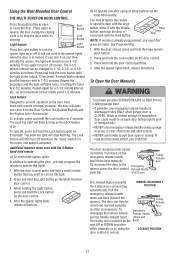
... Mode following the instructions for Using the Wall Mounted Door Control. • Reprogram remotes following page. 2. My remotes will sag. Bell Wire Safety Reversing Sensor "Learn" Button LED or Diagnostic LED Sending Eye Safety Reversing Sensor (Amber Indicator Light) Receiving Eye Safety Reversing Sensor (Green Indicator Light) 3. Decrease down travel by turning...
... Mode following the instructions for Using the Wall Mounted Door Control. • Reprogram remotes following page. 2. My remotes will sag. Bell Wire Safety Reversing Sensor "Learn" Button LED or Diagnostic LED Sending Eye Safety Reversing Sensor (Amber Indicator Light) Receiving Eye Safety Reversing Sensor (Green Indicator Light) 3. Decrease down travel by turning...
3275 Manual
Page 30
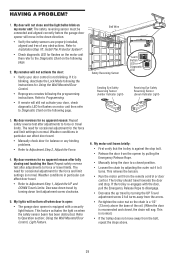
...8226; Replace logic board because motor rarely fails. 30 Bell Wire Diagnostics Located On Motor Unit Safety Reversing Sensor LED or Diagnostic LED "Learn" Button Diagnostic Chart Installed Safety Reversing Sensor Your garage door opener is stuck on door control. • Inspect door control/wires for a ... stop bolt = Motor unit hums briefly; the motor unit does not operate or trolley is programmed with jumper wire. The "Learn" button/diagnostic LED will not operate replace logic board. If motor unit activates, replace door control wires. If motor unit still will fl...
...8226; Replace logic board because motor rarely fails. 30 Bell Wire Diagnostics Located On Motor Unit Safety Reversing Sensor LED or Diagnostic LED "Learn" Button Diagnostic Chart Installed Safety Reversing Sensor Your garage door opener is stuck on door control. • Inspect door control/wires for a ... stop bolt = Motor unit hums briefly; the motor unit does not operate or trolley is programmed with jumper wire. The "Learn" button/diagnostic LED will not operate replace logic board. If motor unit activates, replace door control wires. If motor unit still will fl...
3275 Manual
Page 31
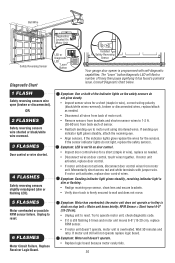
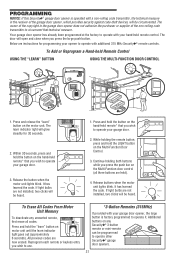
... the push bar on the Multi-Function door control (all codes: Press and hold the "learn" button on motor unit until the learn " button on the Multi-Function Door Control. 3. The learn indicator light will be heard. If light bulbs are not installed, two clicks will glow steadily... you wish to operate your garage door. 3. The door will be heard. 1. It has learned the code. If light bulbs are held remote control. Additional buttons on the hand-held Remote Control USING THE "LEARN" BUTTON USING THE MULTI-FUNCTION DOOR CONTROL 9 1 7 3 5 KG 9 1 7 3 5 KG LOCK LIGHT 1....
... the push bar on the Multi-Function door control (all codes: Press and hold the "learn" button on motor unit until the learn " button on the Multi-Function Door Control. 3. The learn indicator light will be heard. If light bulbs are not installed, two clicks will glow steadily... you wish to operate your garage door. 3. The door will be heard. 1. It has learned the code. If light bulbs are held remote control. Additional buttons on the hand-held Remote Control USING THE "LEARN" BUTTON USING THE MULTI-FUNCTION DOOR CONTROL 9 1 7 3 5 KG 9 1 7 3 5 KG LOCK LIGHT 1....
3275 Manual
Page 32
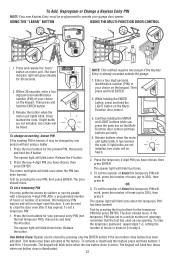
...temporary PIN was set the number of accesses, this feature press and hold the ENTER button. 3. The learn " button on the MultiFunction door control. 3. If light bulbs are held). 4. Test by pressing the four buttons for 10 seconds. Press the temporary 4-digit PIN you have chosen, then press ... new 4-digit PIN you press the push bar on the keypad. While holding the ENTER and LIGHT buttons while you have chosen, then press ENTER. USING THE "LEARN" BUTTON USING THE MULTI-FUNCTION DOOR CONTROL 1. After a programmed number of hours or number of times this ...
...temporary PIN was set the number of accesses, this feature press and hold the ENTER button. 3. The learn " button on the MultiFunction door control. 3. If light bulbs are held). 4. Test by pressing the four buttons for 10 seconds. Press the temporary 4-digit PIN you have chosen, then press ... new 4-digit PIN you press the push bar on the keypad. While holding the ENTER and LIGHT buttons while you have chosen, then press ENTER. USING THE "LEARN" BUTTON USING THE MULTI-FUNCTION DOOR CONTROL 1. After a programmed number of hours or number of times this ...


