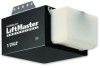

1355 Manual
Page 2
... PIN 36 Repair Parts 37-38 Rail assembly parts 37 Installation parts 37 Motor unit assembly parts 38 Accessories 39 Repair Parts and Service 40 Warranty 40 INTRODUCTION Safety Symbol and Signal Word Review This garage door opener has been designed and tested to WARNING your garage door opener 31 Using the wall-mounted door control 32 To open the door manually 32 Care...
... PIN 36 Repair Parts 37-38 Rail assembly parts 37 Installation parts 37 Motor unit assembly parts 38 Accessories 39 Repair Parts and Service 40 Warranty 40 INTRODUCTION Safety Symbol and Signal Word Review This garage door opener has been designed and tested to WARNING your garage door opener 31 Using the wall-mounted door control 32 To open the door manually 32 Care...
1355 Manual
Page 6
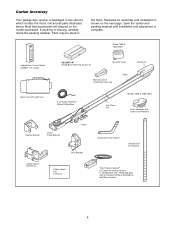
... garage door opener is packaged in the foam. Hardware for assembly and installation is shown on the model purchased. Save the carton and packing material until installation and adjustment is missing, carefully check the packing material. If anything is complete. Model 1355 & 1345 ONLY Lighted Door Control... Safety Labels and Literature One-Piece Rail Models 1346 & 1356 ONLY Chain Spreader with Screws and Washers Curved Door Arm Section Straight Door Arm Section The Protector System® (2) Safety Reversing Sensors (1 Sending Eye and 1 Receiving Eye) with 2-Conductor White &...
... garage door opener is packaged in the foam. Hardware for assembly and installation is shown on the model purchased. Save the carton and packing material until installation and adjustment is missing, carefully check the packing material. If anything is complete. Model 1355 & 1345 ONLY Lighted Door Control... Safety Labels and Literature One-Piece Rail Models 1346 & 1356 ONLY Chain Spreader with Screws and Washers Curved Door Arm Section Straight Door Arm Section The Protector System® (2) Safety Reversing Sensors (1 Sending Eye and 1 Receiving Eye) with 2-Conductor White &...
1355 Manual
Page 8
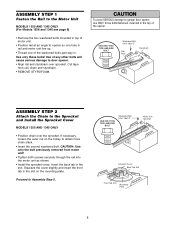
... one hole in rail and motor unit line up. • Thread one of the washered bolts part way in. Squeeze the cover slightly and insert the front tab in the slot on the trolley to door opener. • Align rail and styrofoam over the sprocket. USE ONLY THIS TYPE AND SIZE BOLT Washered.... ASSEMBLY STEP 1 Fasten the Rail to the Motor Unit MODELS 1355 AND 1345 ONLY (For Models 1356 and 1346 see page 9) • Remove the two washered bolts mounted in top of motor unit. • Position rail at an angle to garage door opener, use ONLY those bolts/fasteners mounted in the top of the...
... one hole in rail and motor unit line up. • Thread one of the washered bolts part way in. Squeeze the cover slightly and insert the front tab in the slot on the trolley to door opener. • Align rail and styrofoam over the sprocket. USE ONLY THIS TYPE AND SIZE BOLT Washered.... ASSEMBLY STEP 1 Fasten the Rail to the Motor Unit MODELS 1355 AND 1345 ONLY (For Models 1356 and 1346 see page 9) • Remove the two washered bolts mounted in top of motor unit. • Position rail at an angle to garage door opener, use ONLY those bolts/fasteners mounted in the top of the...

1355 Manual
Page 11
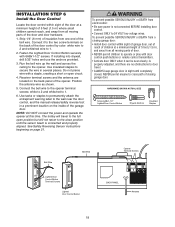
... ropes connected to garage door BEFORE installing opener to do not re-adjust the chain. Install garage door opener 7 feet (2.13 m) or more above floor. 7. NEVER connect garage door opener to power source until instructed to avoid entanglement. 5. Install wall-mounted garage door control: • within sight of the garage door. • out... and lubricated garage door. ASSEMBLY STEP 5 Tighten the Chain Outer Nut To Tighten Outer Nut Lock Washer Inner Nut ALL MODELS • Spin the inner nut and lock washer down the trolley threaded shaft, away from ALL moving parts of the door. 10. ...
... ropes connected to garage door BEFORE installing opener to do not re-adjust the chain. Install garage door opener 7 feet (2.13 m) or more above floor. 7. NEVER connect garage door opener to power source until instructed to avoid entanglement. 5. Install wall-mounted garage door control: • within sight of the garage door. • out... and lubricated garage door. ASSEMBLY STEP 5 Tighten the Chain Outer Nut To Tighten Outer Nut Lock Washer Inner Nut ALL MODELS • Spin the inner nut and lock washer down the trolley threaded shaft, away from ALL moving parts of the door. 10. ...
1355 Manual
Page 18
... are no obstructions to the opener. Strip 1/4" (6 mm) of insulation from all moving parts of door. • NEVER permit children to operate or play with door control push buttons or remote control transmitters. • Activate door ONLY when it to the two screw terminals on the inside of closing garage door: • Install door control within sight of...
... are no obstructions to the opener. Strip 1/4" (6 mm) of insulation from all moving parts of door. • NEVER permit children to operate or play with door control push buttons or remote control transmitters. • Activate door ONLY when it to the two screw terminals on the inside of closing garage door: • Install door control within sight of...

1355 Manual
Page 21
...No part of the door as long as the wall framing. The units must be installed inside the garage 21 Safety Reversing Sensor 6" (15 cm) max. WARNING Be sure power is closing . If it is necessary to mount the units on the left or right of the garage door (or door tracks,... reversing sensor. INSTALLATION STEP 10 Install The Protector System® The safety reversing sensor must be connected and aligned correctly before the garage door opener will flash 10 times. IMPORTANT INFORMATION ABOUT THE SAFETY REVERSING SENSOR When properly connected and aligned, the sensor will detect an obstacle ...
...No part of the door as long as the wall framing. The units must be installed inside the garage 21 Safety Reversing Sensor 6" (15 cm) max. WARNING Be sure power is closing . If it is necessary to mount the units on the left or right of the garage door (or door tracks,... reversing sensor. INSTALLATION STEP 10 Install The Protector System® The safety reversing sensor must be connected and aligned correctly before the garage door opener will flash 10 times. IMPORTANT INFORMATION ABOUT THE SAFETY REVERSING SENSOR When properly connected and aligned, the sensor will detect an obstacle ...
1355 Manual
Page 33
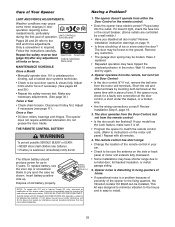
...remote control in living quarters of this device must accept any restriction. • The garage door spring may be installed. The opener doesn't operate from the remote control: • Is the door push bar flashing? Plug a lamp into the outlet. Have it is unbalanced or binding...Repeated operation may cause undesired operation. 1. Do not grease the door tracks. If not, remove the bell wire from the Door Control: • Is the door control lit? THERE ARE NO OTHER USER SERVICEABLE PARTS. Remove any interference received, including interference that may have tripped...
...remote control in living quarters of this device must accept any restriction. • The garage door spring may be installed. The opener doesn't operate from the remote control: • Is the door push bar flashing? Plug a lamp into the outlet. Have it is unbalanced or binding...Repeated operation may cause undesired operation. 1. Do not grease the door tracks. If not, remove the bell wire from the Door Control: • Is the door control lit? THERE ARE NO OTHER USER SERVICEABLE PARTS. Remove any interference received, including interference that may have tripped...


