1355 Manual
Page 1
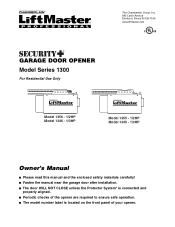
The Chamberlain Group, Inc. 845 Larch Avenue Elmhurst, Illinois 60126-1196 www.liftmaster.com ® GARAGE DOOR OPENER Model Series 1300 For Residential Use Only Model 1356 - 1/2HP Model 1346 - 1/3HP Model 1355 - 1/2HP Model 1345 - 1/3HP Owner's Manual ■ Please read this manual and the enclosed safety...! ■ Fasten the manual near the garage door after installation. ■ The door WILL NOT CLOSE unless the Protector System® is connected and properly aligned. ■ Periodic checks of the opener are required to ensure safe operation. ■ The model number label is located...
The Chamberlain Group, Inc. 845 Larch Avenue Elmhurst, Illinois 60126-1196 www.liftmaster.com ® GARAGE DOOR OPENER Model Series 1300 For Residential Use Only Model 1356 - 1/2HP Model 1346 - 1/3HP Model 1355 - 1/2HP Model 1345 - 1/3HP Owner's Manual ■ Please read this manual and the enclosed safety...! ■ Fasten the manual near the garage door after installation. ■ The door WILL NOT CLOSE unless the Protector System® is connected and properly aligned. ■ Periodic checks of the opener are required to ensure safe operation. ■ The model number label is located...

1355 Manual
Page 2
... Parts and Service 40 Warranty 40 INTRODUCTION Safety Symbol and Signal Word Review This garage door opener has been designed and tested to offer safe service provided it is installed, operated, maintained and tested in strict accordance with the instructions and warnings contained in this Signal...force 29 Test the safety reversal system 30 Test the Protector System 30 Operation 31-34 Operation safety instructions 31 Using your garage door opener 31 Using the wall-mounted door control 32 To open the door manually 32 Care of serious injury or death if you do not comply...
... Parts and Service 40 Warranty 40 INTRODUCTION Safety Symbol and Signal Word Review This garage door opener has been designed and tested to offer safe service provided it is installed, operated, maintained and tested in strict accordance with the instructions and warnings contained in this Signal...force 29 Test the safety reversal system 30 Test the Protector System 30 Operation 31-34 Operation safety instructions 31 Using your garage door opener 31 Using the wall-mounted door control 32 To open the door manually 32 Care of serious injury or death if you do not comply...

1355 Manual
Page 3
... to WARNING garage door BEFORE installing and operating garage door opener to avoid malfunction and damage. Release the door. CAUTION To prevent damage to garage door and opener: • ALWAYS disable locks BEFORE installing and operating the opener. • ONLY operate garage door opener at 120V,... 60 Hz to avoid entanglement. Lift the door about halfway as illustrated below...
... to WARNING garage door BEFORE installing and operating garage door opener to avoid malfunction and damage. Release the door. CAUTION To prevent damage to garage door and opener: • ALWAYS disable locks BEFORE installing and operating the opener. • ONLY operate garage door opener at 120V,... 60 Hz to avoid entanglement. Lift the door about halfway as illustrated below...
1355 Manual
Page 10
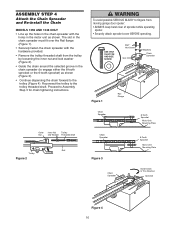
... the chain spreader with the hardware provided. • Remove the trolley threaded shaft from CAUTION moving garage door opener: • ALWAYS keep hand clear of sprocket while operating opener. • Securely attach sprocket cover BEFORE operating. WARNING To avoid possible SERIOUS INJURY to the trolley threaded shaft. The slot in the chain spreader...
... the chain spreader with the hardware provided. • Remove the trolley threaded shaft from CAUTION moving garage door opener: • ALWAYS keep hand clear of sprocket while operating opener. • Securely attach sprocket cover BEFORE operating. WARNING To avoid possible SERIOUS INJURY to the trolley threaded shaft. The slot in the chain spreader...
1355 Manual
Page 17
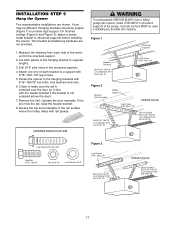
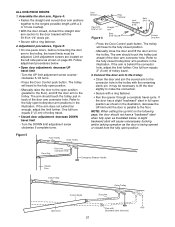
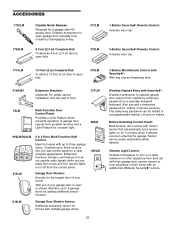
...bracket and fastening hardware are shown. Check to the hanging brackets with the header bracket if the bracket is not centered above the door). 7. HARDWARE SHOWN ACTUAL SIZE WARNING To avoid possible SERIOUS INJURY from each bracket to the structural support. 2. Drill 3/16" ... washers and nuts. 6. Attach one end of each side of the rail surface where the trolley slides with 5/16"-18x1-7/8" lag screws. 5. Operate the door manually. Figure 1 Structural Supports Measure Distance Bolt 5/16"-18x7/8" Lock Washer 5/16" Nut 5/16"-18 Lag Screws 5/16"-18x1-7/8" Figure 2 ...
...bracket and fastening hardware are shown. Check to the hanging brackets with the header bracket if the bracket is not centered above the door). 7. HARDWARE SHOWN ACTUAL SIZE WARNING To avoid possible SERIOUS INJURY from each bracket to the structural support. 2. Drill 3/16" ... washers and nuts. 6. Attach one end of each side of the rail surface where the trolley slides with 5/16"-18x1-7/8" lag screws. 5. Operate the door manually. Figure 1 Structural Supports Measure Distance Bolt 5/16"-18x7/8" Lock Washer 5/16" Nut 5/16"-18 Lag Screws 5/16"-18x1-7/8" Figure 2 ...
1355 Manual
Page 18
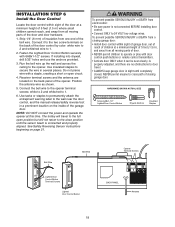
...WARNING INSCTAALULTATIOIONN STEP 6 Install the Door Control Locate the door control within sight of garage door, out of reach of children at a minimum height of 5 feet (1.5 m), and away from all moving parts of door. • NEVER permit children to operate or play with door control push buttons or remote ...control transmitters. • Activate door ONLY when it to the two screw terminals on the inside of the garage door. The trolley will travel to the full...
...WARNING INSCTAALULTATIOIONN STEP 6 Install the Door Control Locate the door control within sight of garage door, out of reach of children at a minimum height of 5 feet (1.5 m), and away from all moving parts of door. • NEVER permit children to operate or play with door control push buttons or remote ...control transmitters. • Activate door ONLY when it to the two screw terminals on the inside of the garage door. The trolley will travel to the full...

1355 Manual
Page 26
...arm sections together. - Select holes as far apart as shown. - Trolley will re-engage automatically when opener is fully closed. Fasten straight door arm section to Adjustment Step 1, page 28. Find two pairs of holes that line up and join sections. HARDWARE SHOWN ACTUAL SIZE Inner... 5/16"x1" (Trolley) Clevis Pin Hex Bolt 5/16"x1-1/4" (Door Bracket) 5/16"-18x7/8" Lock Washers 5/16" Nuts 5/16"-18 Figure 3 Bolts 5/16"-18x7/8" Cut This End 26 SECTIONAL DOORS ONLY • Make sure garage door is operated. Bring arm sections together. Cut about 2" (5 cm) as illustrated ...
...arm sections together. - Select holes as far apart as shown. - Trolley will re-engage automatically when opener is fully closed. Fasten straight door arm section to Adjustment Step 1, page 28. Find two pairs of holes that line up and join sections. HARDWARE SHOWN ACTUAL SIZE Inner... 5/16"x1" (Trolley) Clevis Pin Hex Bolt 5/16"x1-1/4" (Door Bracket) 5/16"-18x7/8" Lock Washers 5/16" Nuts 5/16"-18 Figure 3 Bolts 5/16"-18x7/8" Cut This End 26 SECTIONAL DOORS ONLY • Make sure garage door is operated. Bring arm sections together. Cut about 2" (5 cm) as illustrated ...
1355 Manual
Page 27
...not have a "backward" slant when fully open position as the door is behind the connector hole, adjust the limit further. The trolley will cause unnecessary bucking and/or jerking operation as shown in back of the door arm connector hole. If the arm does not extend far enough, ...adjust the limit further. Figure 5 Inner Trolley Outer Trolley Door Bracket Ring Fastener Clevis Pin 5/16"x1-1/4" Figure 4 Straight...
...not have a "backward" slant when fully open position as the door is behind the connector hole, adjust the limit further. The trolley will cause unnecessary bucking and/or jerking operation as shown in back of the door arm connector hole. If the arm does not extend far enough, ...adjust the limit further. Figure 5 Inner Trolley Outer Trolley Door Bracket Ring Fastener Clevis Pin 5/16"x1-1/4" Figure 4 Straight...
1355 Manual
Page 28
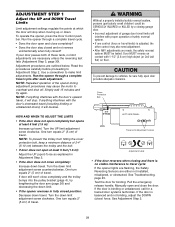
...up or down. ADJUSTMENT STEP 1 Adjust the UP and DOWN Travel Limits Limit adjustment settings regulate the points at which the door will interfere with proper operation of safety reversal system. • If one control (force or travel limits) is adjusted, the other control may cause the... release handle. Turn the down limit adjustment screw counterclockwise. Turn the UP limit adjustment screw clockwise. If door still won't close the door. To operate the opener, press the Door Control push bar. CAUTION To prevent damage to vehicles, be tested. See Adjustment Step 2. 28
...up or down. ADJUSTMENT STEP 1 Adjust the UP and DOWN Travel Limits Limit adjustment settings regulate the points at which the door will interfere with proper operation of safety reversal system. • If one control (force or travel limits) is adjusted, the other control may cause the... release handle. Turn the down limit adjustment screw counterclockwise. Turn the UP limit adjustment screw clockwise. If door still won't close the door. To operate the opener, press the Door Control push bar. CAUTION To prevent damage to vehicles, be tested. See Adjustment Step 2. 28
1355 Manual
Page 29
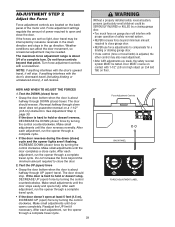
... reverse. The maximum force adjustment range is about 3/4 of the motor unit. Make small adjustments until door opens completely. Readjust the UP limit if necessary. Door MUST reverse on contact with proper operation of safety reversal system. • NEVER increase force beyond that point. See Adjustment Step 3, page 30. Test the UP (open...
... reverse. The maximum force adjustment range is about 3/4 of the motor unit. Make small adjustments until door opens completely. Readjust the UP limit if necessary. Door MUST reverse on contact with proper operation of safety reversal system. • NEVER increase force beyond that point. See Adjustment Step 3, page 30. Test the UP (open...

1355 Manual
Page 30
...Safety Reversing Sensor Safety Reversing Sensor 30 The garage door opener will flash. Door MUST reverse on contact with 1-1/2" (3.8 cm) high object (or 2x4 laid flat) on the floor, centered under the garage door. • Operate the door in the down direction. ADJUSTMENT STEP 3 Test the... Safety Reversal System TEST • With the door fully open, place a 1-1/2" (3.8 cm) board (or a 2x4 laid flat) on the floor. ...
...Safety Reversing Sensor Safety Reversing Sensor 30 The garage door opener will flash. Door MUST reverse on contact with 1-1/2" (3.8 cm) high object (or 2x4 laid flat) on the floor, centered under the garage door. • Operate the door in the down direction. ADJUSTMENT STEP 3 Test the... Safety Reversal System TEST • With the door fully open, place a 1-1/2" (3.8 cm) board (or a 2x4 laid flat) on the floor. ...

1355 Manual
Page 31
... minutes. when power is broken. ONLY activate garage door when it can close the door with up to pull garage door open door falling rapidly and/or unexpectedly. 7. If rope knot becomes untied, you wish to operate or play with the safety reversing sensor correctly installed and...AND FOLLOW ALL WARNINGS AND INSTRUCTIONS. 2. Activate your opener with each use . If obstructed while closing , the door will blink for five seconds. 6. WARNING OPERATION IMPORTANT SAFETY INSTRUCTIONS WARNING To reduce the risk of persons and obstructions. 8. If you purchase a new remote, or...
... minutes. when power is broken. ONLY activate garage door when it can close the door with up to pull garage door open door falling rapidly and/or unexpectedly. 7. If rope knot becomes untied, you wish to operate or play with the safety reversing sensor correctly installed and...AND FOLLOW ALL WARNINGS AND INSTRUCTIONS. 2. Activate your opener with each use . If obstructed while closing , the door will blink for five seconds. 6. WARNING OPERATION IMPORTANT SAFETY INSTRUCTIONS WARNING To reduce the risk of persons and obstructions. 8. If you purchase a new remote, or...
1355 Manual
Page 32
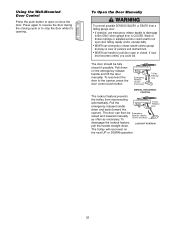
...use emergency release handle to disengage trolley ONLY when garage door is clear of persons and obstructions. • NEVER use emergency release handle unless garage doorway is CLOSED. Pull down on the next UP or DOWN operation. 32 LOCKOUT POSITION The trolley will reconnect on the ...emergency release handle and lift the door manually. Weak or broken springs or unbalanced door could fall. To reconnect the door to open or close the door. If rope knot becomes untied, you...
...use emergency release handle to disengage trolley ONLY when garage door is clear of persons and obstructions. • NEVER use emergency release handle unless garage doorway is CLOSED. Pull down on the next UP or DOWN operation. 32 LOCKOUT POSITION The trolley will reconnect on the ...emergency release handle and lift the door manually. Weak or broken springs or unbalanced door could fall. To reconnect the door to open or close the door. If rope knot becomes untied, you...
1355 Manual
Page 33
... If not, remove the bell wire from the remote control: • Is the door push bar flashing? Review Installation Step 6, page 18. 3. The door operates from the Door Control, but not from either the Door Control or the remote control: • Does the opener have shorter range due to ...of old battery properly. Do not grease the door tracks. Insert battery positive side up of the remote control in door operation requiring some minor changes in your model has the Lock feature, make sure it replaced. • Repeated operation may have electric power? Battery positive side up...
... If not, remove the bell wire from the remote control: • Is the door push bar flashing? Review Installation Step 6, page 18. 3. The door operates from the Door Control, but not from either the Door Control or the remote control: • Does the opener have shorter range due to ...of old battery properly. Do not grease the door tracks. Insert battery positive side up of the remote control in door operation requiring some minor changes in your model has the Lock feature, make sure it replaced. • Repeated operation may have electric power? Battery positive side up...
1355 Manual
Page 34
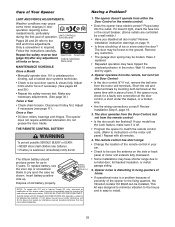
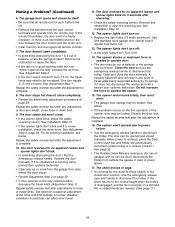
...slightly in the closed manually. If it out of balance, or are off. • Remove the bell wire from the door control terminals and operate from outside the garage in lockout position.) See page 32. • The Outside Quick Release accessory (for no apparent reason...decrease the travel limits adjustment procedures on garages with no adjustments are needed to operate door: • The door may be opened and closed door position. Is it does not, disconnect the opener and call a trained door systems technician. • Clear any adjustment of balance or the springs may ...
...slightly in the closed manually. If it out of balance, or are off. • Remove the bell wire from the door control terminals and operate from outside the garage in lockout position.) See page 32. • The Outside Quick Release accessory (for no apparent reason...decrease the travel limits adjustment procedures on garages with no adjustments are needed to operate door: • The door may be opened and closed door position. Is it does not, disconnect the opener and call a trained door systems technician. • Clear any adjustment of balance or the springs may ...
1355 Manual
Page 35
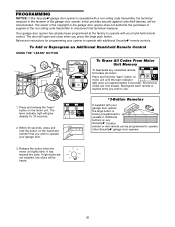
...30 seconds, press and hold the "learn" button on the motor unit. The door will glow steadily for programming your opener to operate with your garage door opener, the large button is operated with your hand-held remote* that technical measure. Below are instructions for 30 ... KG 2. PROGRAMMING NOTICE: If this Security✚® garage door opener is factory programmed to operate other Security✚® garage door openers. 3. Your garage door opener has already been programmed at the factory to operate with a non-rolling code transmitter, the technical measure in the...
...30 seconds, press and hold the "learn" button on the motor unit. The door will glow steadily for programming your opener to operate with your garage door opener, the large button is operated with your hand-held remote* that technical measure. Below are instructions for 30 ... KG 2. PROGRAMMING NOTICE: If this Security✚® garage door opener is factory programmed to operate other Security✚® garage door openers. 3. Your garage door opener has already been programmed at the factory to operate with a non-rolling code transmitter, the technical measure in the...
1355 Manual
Page 36
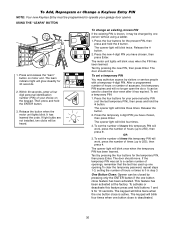
... light bulbs are not installed, two clicks will glow steadily for 10 seconds. Press the temporary 4-digit PIN you have chosen, then press Enter. The door should move . If the temporary PIN was set to a certain number of accesses, this feature press and hold the # button. 1 2 The opener ...work , press the number of hours (up to close is known, it has expired. To set a temporary PIN You may be programmed to operate your garage door opener. Test by pressing the four buttons for the present PIN, then press and hold buttons 1 and 9 for 30 seconds. Within 30 seconds,...
... light bulbs are not installed, two clicks will glow steadily for 10 seconds. Press the temporary 4-digit PIN you have chosen, then press Enter. The door should move . If the temporary PIN was set to a certain number of accesses, this feature press and hold the # button. 1 2 The opener ...work , press the number of hours (up to close is known, it has expired. To set a temporary PIN You may be programmed to operate your garage door opener. Test by pressing the four buttons for the present PIN, then press and hold buttons 1 and 9 for 30 seconds. Within 30 seconds,...
1355 Manual
Page 39
... and turn on a specially designed keyboard. Motion Detecting Control Panel: Multi-function door control with an additional LiftMaster Security✚® remote. Enhanced functions include Lock Feature to lock out outside radio... signals while you if your home! LOCK LIGHT 395LM 916LM Garage Door Monitor Sensor: Additional accessory sensor for homes with multiple garage doors. 39 Wireless Keyless Entry with Security✚®: Enables homeowner to operate garage door...
... and turn on a specially designed keyboard. Motion Detecting Control Panel: Multi-function door control with an additional LiftMaster Security✚® remote. Enhanced functions include Lock Feature to lock out outside radio... signals while you if your home! LOCK LIGHT 395LM 916LM Garage Door Monitor Sensor: Additional accessory sensor for homes with multiple garage doors. 39 Wireless Keyless Entry with Security✚®: Enables homeowner to operate garage door...

1355 Manual
Page 40
...covered by this limited warranty, will be repaired or replaced with the instructions regarding installation, operation, maintenance and testing. You will be advised of 48 months (4years) for models 1356 & 1355 and 24 months (2 years) for warranty repair. ANY SERVICE CALL THAT DETERMINES THE ...DOOR SPRINGS, DOOR ROLLERS, DOOR ALIGNMENT OR HINGES. All Rights Reserved Failure to comply strictly with any product returned for warranty repair, which upon receipt by Seller are confirmed to Seller for warranty repair. SIMPLY DIAL OUR TOLL FREE NUMBER: 1-800-528-2817 www.liftmaster...
...covered by this limited warranty, will be repaired or replaced with the instructions regarding installation, operation, maintenance and testing. You will be advised of 48 months (4years) for models 1356 & 1355 and 24 months (2 years) for warranty repair. ANY SERVICE CALL THAT DETERMINES THE ...DOOR SPRINGS, DOOR ROLLERS, DOOR ALIGNMENT OR HINGES. All Rights Reserved Failure to comply strictly with any product returned for warranty repair, which upon receipt by Seller are confirmed to Seller for warranty repair. SIMPLY DIAL OUR TOLL FREE NUMBER: 1-800-528-2817 www.liftmaster...


