
Setup Guide
Page 5
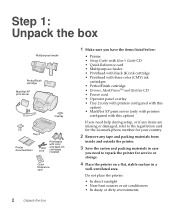
...card • Multipurpose feeder • Printhead with black (K) ink cartridge • Printhead with three color (CMY) ink cartridges • PerfectFinish cartridge • Drivers, MarkVisionTM and Utilities CD • Power cord • Operator panel overlay • Tray 2 (only with printers configured with this option) • MarkNet ...option) If you need help during setup, or if any items are missing or damaged, refer to the registration card for the Lexmark phone number for your country. 2 Remove any tape and packing materials from inside and outside the printer. 3 Save the carton and...
...card • Multipurpose feeder • Printhead with black (K) ink cartridge • Printhead with three color (CMY) ink cartridges • PerfectFinish cartridge • Drivers, MarkVisionTM and Utilities CD • Power cord • Operator panel overlay • Tray 2 (only with printers configured with this option) • MarkNet ...option) If you need help during setup, or if any items are missing or damaged, refer to the registration card for the Lexmark phone number for your country. 2 Remove any tape and packing materials from inside and outside the printer. 3 Save the carton and...
Setup Guide
Page 30
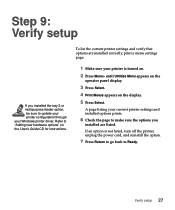
... listed, turn off the printer, unplug the power cord, and reinstall the option. 7 Press Return to go back to Ready. A page listing your Windows printer driver. If an option is turned on. 2 Press Menu> until Utilities Menu appears on the operator panel display. 3 Press Select. 4 Print Menus appears on the User...
... listed, turn off the printer, unplug the power cord, and reinstall the option. 7 Press Return to go back to Ready. A page listing your Windows printer driver. If an option is turned on. 2 Press Menu> until Utilities Menu appears on the operator panel display. 3 Press Select. 4 Print Menus appears on the User...
Setup Guide
Page 31
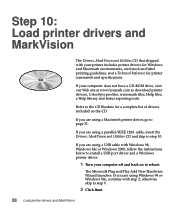
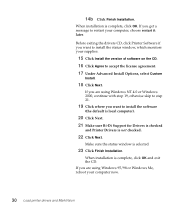
...and Play Add New Hardware Wizard launches. Refer to step 10. If you are using a Macintosh printer driver, go to reboot. If you are using a parallel/IEEE 1284 cable, insert the Drivers, MarkVision and Utilities CD and skip to the CD Readme for printer commands and specifications. If you ... If you are using a USB cable with Windows 98, Windows Me or Windows 2000, follow the instructions below to install a USB port driver and a Windows printer driver: 1 Turn your computer does not have a CD-ROM drive, visit our Web site at www.lexmark.com to step 9. 2 Click Next. 28 Load printer...
...and Play Add New Hardware Wizard launches. Refer to step 10. If you are using a Macintosh printer driver, go to reboot. If you are using a parallel/IEEE 1284 cable, insert the Drivers, MarkVision and Utilities CD and skip to the CD Readme for printer commands and specifications. If you ... If you are using a USB cable with Windows 98, Windows Me or Windows 2000, follow the instructions below to install a USB port driver and a Windows printer driver: 1 Turn your computer does not have a CD-ROM drive, visit our Web site at www.lexmark.com to step 9. 2 Click Next. 28 Load printer...
Setup Guide
Page 32
... computer and then click Next. 14a Click the Lexmark J110 printer and select a printer port. 3 Click Next again to search for a driver. 4 Insert the Drivers, MarkVision and Utilities CD and check Specify a Location to tell the computer where to find the USB port driver on the CD. 13 Click Agree to accept... the license agreement. 14 Click Local Printer Install if your printer is ready to install the USB port driver. 7 Click Next. 8 Click Finish. Load printer drivers and MarkVision 29 Uncheck any other boxes. 5 Use Browse or type in the path with the drive letter of software...
... computer and then click Next. 14a Click the Lexmark J110 printer and select a printer port. 3 Click Next again to search for a driver. 4 Insert the Drivers, MarkVision and Utilities CD and check Specify a Location to tell the computer where to find the USB port driver on the CD. 13 Click Agree to accept... the license agreement. 14 Click Local Printer Install if your printer is ready to install the USB port driver. 7 Click Next. 8 Click Finish. Load printer drivers and MarkVision 29 Uncheck any other boxes. 5 Use Browse or type in the path with the drive letter of software...
Setup Guide
Page 33
...you get a message to install the software (the default is local computer). 20 Click Next. 21 Make sure Bi-Di Support for Drivers is checked and Printer Drivers is selected. 23 Click Finish Installation. When installation is complete, click OK. If you want to restart your computer, choose restart it... later. If you want to install the status window, which monitors your computer now. 30 Load printer drivers and MarkVision When installation is complete, click OK and exit the CD. Make sure the status window is not checked. 22 Click Next. ...
...you get a message to install the software (the default is local computer). 20 Click Next. 21 Make sure Bi-Di Support for Drivers is checked and Printer Drivers is selected. 23 Click Finish Installation. When installation is complete, click OK. If you want to restart your computer, choose restart it... later. If you want to install the status window, which monitors your computer now. 30 Load printer drivers and MarkVision When installation is complete, click OK and exit the CD. Make sure the status window is not checked. 22 Click Next. ...
Setup Guide
Page 34
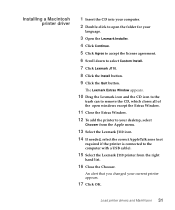
... down to the computer with a USB cable). 15 Select the Lexmark J110 printer from the right hand list. 16 Close the Chooser. An alert that you changed your current printer appears. 17 Click OK. Installing a Macintosh printer driver 1 Insert the CD into your computer. 2 Double-click to open..., select Chooser from the Apple menu. 13 Select the Lexmark J110 icon. 14 If needed, select the correct AppleTalk zone (not required if the printer is connected to select Custom Install. 7 Click Lexmark J110. 8 Click the Install button. 9 Click the Quit button. Load printer drivers and MarkVision 31
... down to the computer with a USB cable). 15 Select the Lexmark J110 printer from the right hand list. 16 Close the Chooser. An alert that you changed your current printer appears. 17 Click OK. Installing a Macintosh printer driver 1 Insert the CD into your computer. 2 Double-click to open..., select Chooser from the Apple menu. 13 Select the Lexmark J110 icon. 14 If needed, select the correct AppleTalk zone (not required if the printer is connected to select Custom Install. 7 Click Lexmark J110. 8 Click the Install button. 9 Click the Quit button. Load printer drivers and MarkVision 31
Setup Guide
Page 35
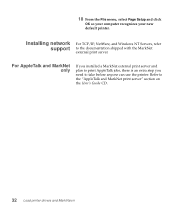
18 From the File menu, select Page Setup and click OK so your computer recognizes your new default printer. Installing network support For TCP/IP, NetWare, and Windows NT Servers, refer to take before anyone can use the printer. For AppleTalk and MarkNet only If you installed a MarkNet external print server and plan to print AppleTalk jobs, there is an extra step you need to the documentation shipped with the MarkNet external print server. Refer to the "AppleTalk and MarkNet print server" section on the User's Guide CD. 32 Load printer drivers and MarkVision
18 From the File menu, select Page Setup and click OK so your computer recognizes your new default printer. Installing network support For TCP/IP, NetWare, and Windows NT Servers, refer to take before anyone can use the printer. For AppleTalk and MarkNet only If you installed a MarkNet external print server and plan to print AppleTalk jobs, there is an extra step you need to the documentation shipped with the MarkNet external print server. Refer to the "AppleTalk and MarkNet print server" section on the User's Guide CD. 32 Load printer drivers and MarkVision

Setup Guide
Page 36
Use the User's Guide CD in the back of this book for: • Printing tips • Changing menu settings from the Windows driver, Macintosh driver, and the operator panel • Replacing ink cartridges, printheads and the PerfectFinish cartridge • Clearing paper jams • Troubleshooting Warning: If you move the printer, keep it level. You are finished setting up your printer and are ready to print. Congratulations! 33 Congratulations!
Use the User's Guide CD in the back of this book for: • Printing tips • Changing menu settings from the Windows driver, Macintosh driver, and the operator panel • Replacing ink cartridges, printheads and the PerfectFinish cartridge • Clearing paper jams • Troubleshooting Warning: If you move the printer, keep it level. You are finished setting up your printer and are ready to print. Congratulations! 33 Congratulations!
Setup Guide
Page 37
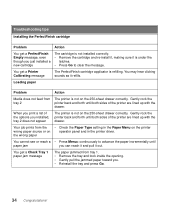
... cartridge is not installed correctly. • Remove the cartridge and re-install it, making sure it is not on operator panel and in the printer driver. Gently rock the printer back and forth until both sides of the options you . • Reinstall the tray and press Go. 34 Congratulations! You may...
... cartridge is not installed correctly. • Remove the cartridge and re-install it, making sure it is not on operator panel and in the printer driver. Gently rock the printer back and forth until both sides of the options you . • Reinstall the tray and press Go. 34 Congratulations! You may...
User's Guide
Page 6
... 13: N-Up printing 31 From Windows 31 From a Macintosh computer 32 Chapter 14: When to replace supplies 33 Operator panel 33 Audible alarm 33 Windows driver status window 33 MarkVision status window 34 Web page 34 Chapter 15: Replacing an ink cartridge 35 Chapter 16: Replacing PerfectFinish 38 Chapter 17: Replacing...
... 13: N-Up printing 31 From Windows 31 From a Macintosh computer 32 Chapter 14: When to replace supplies 33 Operator panel 33 Audible alarm 33 Windows driver status window 33 MarkVision status window 34 Web page 34 Chapter 15: Replacing an ink cartridge 35 Chapter 16: Replacing PerfectFinish 38 Chapter 17: Replacing...

User's Guide
Page 11
2 Printing from your software application. 3 Choose Print (or Printer) Setup to open your printer driver. 4 In the Print Setup dialog box, click Properties, Options, or Setup (depending on a chart more vibrant? It's easy to change printer settings for any job ... the manual feeder (or multipurpose feeder) and change the corresponding operator panel settings. 2 Open the File Menu from Windows Your printer is set up, your Lexmark driver is just a click away: • Click the Help box in the bottom right corner of any dialog box. • Click the question mark at the...
2 Printing from your software application. 3 Choose Print (or Printer) Setup to open your printer driver. 4 In the Print Setup dialog box, click Properties, Options, or Setup (depending on a chart more vibrant? It's easy to change printer settings for any job ... the manual feeder (or multipurpose feeder) and change the corresponding operator panel settings. 2 Open the File Menu from Windows Your printer is set up, your Lexmark driver is just a click away: • Click the Help box in the bottom right corner of any dialog box. • Click the question mark at the...
User's Guide
Page 12
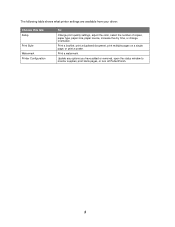
Print a watermark. Print a booklet, print a duplexed document, print multiple pages on a single page, or print a poster. The following table shows what printer settings are available from your driver: Choose this tab: Setup Print Style Watermark Printer Configuration To: Change print quality settings, adjust the color, select the number of copies, paper type, paper size, paper source, increase the dry time, or change orientation. Update any options you have added or removed, open the status window to monitor supplies, print blank pages, or turn off PerfectFinish. 3
Print a watermark. Print a booklet, print a duplexed document, print multiple pages on a single page, or print a poster. The following table shows what printer settings are available from your driver: Choose this tab: Setup Print Style Watermark Printer Configuration To: Change print quality settings, adjust the color, select the number of copies, paper type, paper size, paper source, increase the dry time, or change orientation. Update any options you have added or removed, open the status window to monitor supplies, print blank pages, or turn off PerfectFinish. 3
User's Guide
Page 13
... Paper Size select Executive. 4 Click OK to close the Page Setup dialog box. 5 Go back to the File Menu and click Print. 4 3 Printing from your Lexmark driver -
... Paper Size select Executive. 4 Click OK to close the Page Setup dialog box. 5 Go back to the File Menu and click Print. 4 3 Printing from your Lexmark driver -
User's Guide
Page 15
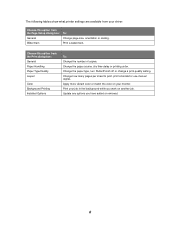
...: General Paper Handling Paper Type/Quality Layout Color Background Printing Installed Options To: Change the number of copies. Update any options you work on your driver: Choose this option from the Page Setup dialog box: To: General Change page size, orientation or scaling. Change how many pages per sheet to print...
...: General Paper Handling Paper Type/Quality Layout Color Background Printing Installed Options To: Change the number of copies. Update any options you work on your driver: Choose this option from the Page Setup dialog box: To: General Change page size, orientation or scaling. Change how many pages per sheet to print...
User's Guide
Page 19
...It is the new default setting for the MP Feeder. 13 Press Return to go back to Ready. 14 In your printer driver, change the operator panel settings and driver settings. -FOR EXAMPLELet's say you share the printer. An asterisk appears indicating that MP Feeder is loaded), change the Print ... MP Feeder on the second line of the display. 6 Press Select. 5 Changing operator panel settings Changing settings from your software application or printer driver override everything except the Paper Size and Paper Type settings on the operator panel, but the new settings only apply to the job you are...
...It is the new default setting for the MP Feeder. 13 Press Return to go back to Ready. 14 In your printer driver, change the operator panel settings and driver settings. -FOR EXAMPLELet's say you share the printer. An asterisk appears indicating that MP Feeder is loaded), change the Print ... MP Feeder on the second line of the display. 6 Press Select. 5 Changing operator panel settings Changing settings from your software application or printer driver override everything except the Paper Size and Paper Type settings on the operator panel, but the new settings only apply to the job you are...
User's Guide
Page 22
... which pages you want to print. 8 Once you make your selections, click OK. 9 In the Print dialog box, click OK to print your Windows printer driver. 3 In the Print Setup dialog box, click Properties, Options, or Setup (depending on the application). 4 Select the Print Style tab. 5 Select poster and poster size...
... which pages you want to print. 8 Once you make your selections, click OK. 9 In the Print dialog box, click OK to print your Windows printer driver. 3 In the Print Setup dialog box, click Properties, Options, or Setup (depending on the application). 4 Select the Print Style tab. 5 Select poster and poster size...
User's Guide
Page 23
... your t-shirt design from your printer driver. 4 In the Print Setup dialog box, click Properties, Options, or Setup (depending on a t-shirt. 14 Follow the instructions that came with the blank side facing up into the manual feeder (or multipurpose feeder). 2 Open the File Menu from Lexmark Shop Deluxe or other iron-on...
... your t-shirt design from your printer driver. 4 In the Print Setup dialog box, click Properties, Options, or Setup (depending on a t-shirt. 14 Follow the instructions that came with the blank side facing up into the manual feeder (or multipurpose feeder). 2 Open the File Menu from Lexmark Shop Deluxe or other iron-on...
User's Guide
Page 25
... 50 if you are using the multipurpose feeder). 2 Open the File Menu from your software application. 3 Choose Print (or Printer) Setup to open your printer driver. 4 In the Print Setup dialog box, click Properties, Options, or Setup (depending on the application). 5 From Paper Type, select Card Stock. 6 Under Paper Size, click...
... 50 if you are using the multipurpose feeder). 2 Open the File Menu from your software application. 3 Choose Print (or Printer) Setup to open your printer driver. 4 In the Print Setup dialog box, click Properties, Options, or Setup (depending on the application). 5 From Paper Type, select Card Stock. 6 Under Paper Size, click...
User's Guide
Page 27
... panel. • Feed one sheet of media at a time when using the manual feeder. • Select the paper size and paper type from your printer driver. • If you are printing iron-on transfers, always print from the manual feeder or multipurpose feeder. 10 Choosing the right media Your printer's unique...
... panel. • Feed one sheet of media at a time when using the manual feeder. • Select the paper size and paper type from your printer driver. • If you are printing iron-on transfers, always print from the manual feeder or multipurpose feeder. 10 Choosing the right media Your printer's unique...
User's Guide
Page 31
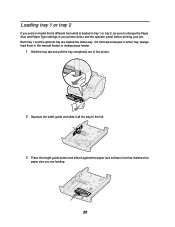
... in tray 1 or tray 2, be sure to change the Paper Size and Paper Type settings in either tray; Do not load envelopes in your printer driver and the operator panel before printing your job.
... in tray 1 or tray 2, be sure to change the Paper Size and Paper Type settings in either tray; Do not load envelopes in your printer driver and the operator panel before printing your job.


