
User's Guide for Windows
Page 3
Contents Finding information about the printer 7 Setting up the printer 10 Checking the box contents...10 Learning about the printer 11 Understanding the parts of the printer 11 Learning about the software 13 Using the printer software...13 Using the Solution Center...13 Using Print Properties...14 Opening Print Properties ...14 Using the Save Settings menu...
Contents Finding information about the printer 7 Setting up the printer 10 Checking the box contents...10 Learning about the printer 11 Understanding the parts of the printer 11 Learning about the software 13 Using the printer software...13 Using the Solution Center...13 Using Print Properties...14 Opening Print Properties ...14 Using the Save Settings menu...
User's Guide for Windows
Page 4
... print cartridge nozzles ...25 Wiping the print cartridge nozzles and contacts 26 Preserving the print cartridges...27 Ordering supplies...27 Recycling Lexmark products...28 Troubleshooting...29 Setup troubleshooting...29 Power light is not lit...29 Software does not install ...29 Page does not...35 Printer does not feed paper, envelopes, or specialty media 36 Banner paper jams ...36 Blinking power light troubleshooting 37 Power light blinks slowly...37 Power light blinks rapidly ...37 Error messages troubleshooting...37 Cartridge Alert ...37 Black cartridge replacement required 37 Color ...
... print cartridge nozzles ...25 Wiping the print cartridge nozzles and contacts 26 Preserving the print cartridges...27 Ordering supplies...27 Recycling Lexmark products...28 Troubleshooting...29 Setup troubleshooting...29 Power light is not lit...29 Software does not install ...29 Page does not...35 Printer does not feed paper, envelopes, or specialty media 36 Banner paper jams ...36 Blinking power light troubleshooting 37 Power light blinks slowly...37 Power light blinks rapidly ...37 Error messages troubleshooting...37 Cartridge Alert ...37 Black cartridge replacement required 37 Color ...
User's Guide for Windows
Page 7
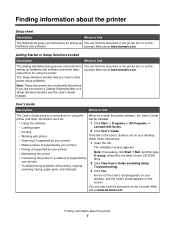
... to find this document in the printer box or on the hardware and software. instructions for using the printer. scanning, faxing, paper jams, and misfeeds 3 Click Yes. Lexmark Web site at www.lexmark.com. You can also find this document in the printer box or on the setting up ...hardware and software and some basic Lexmark Web site at www.lexmark.com. An icon of...
... to find this document in the printer box or on the hardware and software. instructions for using the printer. scanning, faxing, paper jams, and misfeeds 3 Click Yes. Lexmark Web site at www.lexmark.com. You can also find this document in the printer box or on the setting up ...hardware and software and some basic Lexmark Web site at www.lexmark.com. An icon of...

User's Guide for Windows
Page 8
... printed warranty that shipped with your printer. 6 Complete the form, and then click Submit Request. Lexmark 840 Series. 2 Select Lexmark Solution Center. Note: For additional information about the printer 8 Lexmark Solution Center Description Where to find The Lexmark Solution Center software is included on To access the Lexmark Solution Center: your printer 1 Click Start ΠPrograms or All...
... printed warranty that shipped with your printer. 6 Complete the form, and then click Submit Request. Lexmark 840 Series. 2 Select Lexmark Solution Center. Note: For additional information about the printer 8 Lexmark Solution Center Description Where to find The Lexmark Solution Center software is included on To access the Lexmark Solution Center: your printer 1 Click Start ΠPrograms or All...

User's Guide for Windows
Page 9
...Statement of 12 months after the 1 Click customer support. Record the following information (located on the store receipt and the back of the printer), and have it ready when you contact us so that shipped with this limited warranty, see the Statement of country or region. materials... and workmanship for a www.lexmark.com. period of Limited Warranty section, click Inkjet & All-In-One Printers. 4 Scroll through the Web page to find (rest of world) Limited Warranty Information To view the ...
...Statement of 12 months after the 1 Click customer support. Record the following information (located on the store receipt and the back of the printer), and have it ready when you contact us so that shipped with this limited warranty, see the Statement of country or region. materials... and workmanship for a www.lexmark.com. period of Limited Warranty section, click Inkjet & All-In-One Printers. 4 Scroll through the Web page to find (rest of world) Limited Warranty Information To view the ...
User's Guide for Windows
Page 10
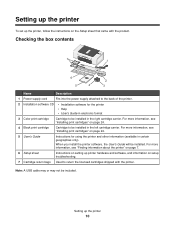
..., the User's Guide will be installed in certain geographies only). For more information, see "Finding information about the printer" on page 7. 6 Setup sheet Instructions on setting up the printer 10 Checking the box contents 7 1 6 2 5 4 3 Name Description 1 Power supply cord Fits into the power...in the right cartridge carrier. Setting up the printer To set up the printer, follow the instructions on the Setup sheet that came with the printer. Note: A USB cable may or may not be installed in electronic format 3 Color print cartridge Cartridge to be included. For more ...
..., the User's Guide will be installed in certain geographies only). For more information, see "Finding information about the printer" on page 7. 6 Setup sheet Instructions on setting up the printer 10 Checking the box contents 7 1 6 2 5 4 3 Name Description 1 Power supply cord Fits into the power...in the right cartridge carrier. Setting up the printer To set up the printer, follow the instructions on the Setup sheet that came with the printer. Note: A USB cable may or may not be installed in electronic format 3 Color print cartridge Cartridge to be included. For more ...
User's Guide for Windows
Page 11
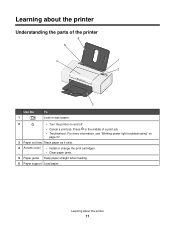
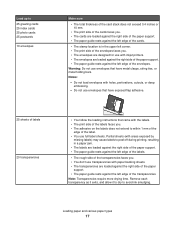
Learning about the printer Understanding the parts of a print job. • Troubleshoot. Press in the middle of the printer Use the 1 To Load or eject paper. 2 • Turn the printer on page 37. 3 Paper exit tray Stack paper as it exits. 4 Access cover • Install or change the print cartridges. • Clear paper jams. 5 Paper guide Keep paper straight when feeding. 6 Paper support Load paper. For more information, see "Blinking power light troubleshooting" on and off. • Cancel a print job. Learning about the printer 11
Learning about the printer Understanding the parts of a print job. • Troubleshoot. Press in the middle of the printer Use the 1 To Load or eject paper. 2 • Turn the printer on page 37. 3 Paper exit tray Stack paper as it exits. 4 Access cover • Install or change the print cartridges. • Clear paper jams. 5 Paper guide Keep paper straight when feeding. 6 Paper support Load paper. For more information, see "Blinking power light troubleshooting" on and off. • Cancel a print job. Learning about the printer 11
User's Guide for Windows
Page 12
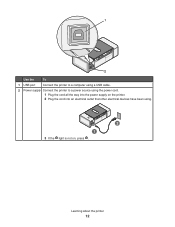
Use the To 1 USB port Connect the printer to a computer using a USB cable. 2 Power supply Connect the printer to a power source using the power cord. 1 Plug the cord all the way into the power supply on the printer. 2 Plug the cord into an electrical outlet that other electrical devices have been using. 3 If the light is not on, press . Learning about the printer 12
Use the To 1 USB port Connect the printer to a computer using a USB cable. 2 Power supply Connect the printer to a power source using the power cord. 1 Plug the cord all the way into the power supply on the printer. 2 Plug the cord into an electrical outlet that other electrical devices have been using. 3 If the light is not on, press . Learning about the printer 12
User's Guide for Windows
Page 13
...transfers, and transparencies. • Find the printable User's Guide. To open the Solution Center: 1 Click Start Œ Programs or All Programs Œ Lexmark 840 Series. 2 Select Solution Center. Learn how to: • Print. • Find and change settings. • Use basic features. •... Print projects such as information about the printer status and ink level. Print Properties Select the best print settings for the document you are printing. The Solution Center consists of six tabs:...
...transfers, and transparencies. • Find the printable User's Guide. To open the Solution Center: 1 Click Start Œ Programs or All Programs Œ Lexmark 840 Series. 2 Select Solution Center. Learn how to: • Print. • Find and change settings. • Use basic features. •... Print projects such as information about the printer status and ink level. Print Properties Select the best print settings for the document you are printing. The Solution Center consists of six tabs:...

User's Guide for Windows
Page 14
You can save the current Print Properties settings for future use the printer. • Obtain software version information. You can change the settings in the lower right corner of project you want to create. The Options menu also... printing on both sides of paper that controls the printing function. Learning about the current status. • Solve printer problems. • Install the print cartridges. • View shopping options for a project. Cleaning the printer rollers is the software that leave powder residues. • Troubleshoot other types of the paper) to fix blurry...
You can save the current Print Properties settings for future use the printer. • Obtain software version information. You can change the settings in the lower right corner of project you want to create. The Options menu also... printing on both sides of paper that controls the printing function. Learning about the current status. • Solve printer problems. • Install the print cartridges. • View shopping options for a project. Cleaning the printer rollers is the software that leave powder residues. • Troubleshoot other types of the paper) to fix blurry...

User's Guide for Windows
Page 15
.... Note: For more information about the software 15 Click Start Œ Programs Œ Lexmark 840 Series Œ Lexmark Fast Pics. Use any of the Print Properties software: Quality/Copies, Paper Setup, and Print...Select a Quality/Speed setting. • Select a Paper Type. • Customize how the printer prints several copies of a single print job: collated, normal, or last page first. • Choose Automatic... Image Sharpening. • Choose to print color images in black and white. • Specify the size of paper loaded. • Select ...
.... Note: For more information about the software 15 Click Start Œ Programs Œ Lexmark 840 Series Œ Lexmark Fast Pics. Use any of the Print Properties software: Quality/Copies, Paper Setup, and Print...Select a Quality/Speed setting. • Select a Paper Type. • Customize how the printer prints several copies of a single print job: collated, normal, or last page first. • Choose Automatic... Image Sharpening. • Choose to print color images in black and white. • Specify the size of paper loaded. • Select ...
User's Guide for Windows
Page 16
.... 10 iron-on transfers • You follow the loading instructions that came with the iron-on the thickness) • The paper is designed for inkjet printers. • The paper is not used or damaged. • If you are using specialty paper, you follow the instructions that came with the paper.) ...paper and various paper types 16 Loading paper and various paper types Loading paper 1 Make sure: • You use paper designed for use with inkjet printers. • The paper is loaded against the right side of the paper support. • The paper guide rests against the left edge of the...
.... 10 iron-on transfers • You follow the loading instructions that came with the iron-on the thickness) • The paper is designed for inkjet printers. • The paper is not used or damaged. • If you are using specialty paper, you follow the instructions that came with the paper.) ...paper and various paper types 16 Loading paper and various paper types Loading paper 1 Make sure: • You use paper designed for use with inkjet printers. • The paper is loaded against the right side of the paper support. • The paper guide rests against the left edge of the...
User's Guide for Windows
Page 17
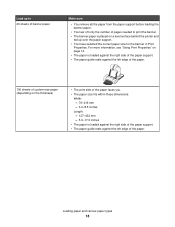
... printing, resulting in the upper left corner. • The print side of the envelopes faces you. • The envelopes are designed for use with inkjet printers. • The envelopes are loaded against the right side of the paper support. • The paper guide rests against the left edge of the transparencies...
... printing, resulting in the upper left corner. • The print side of the envelopes faces you. • The envelopes are designed for use with inkjet printers. • The envelopes are loaded against the right side of the paper support. • The paper guide rests against the left edge of the transparencies...
User's Guide for Windows
Page 18
... support. • The paper guide rests against the left edge of the paper. 100 sheets of custom-size paper (depending on a level surface behind the printer and fed up over the paper support. • You have selected the correct paper size for the banner in Print Properties.
... support. • The paper guide rests against the left edge of the paper. 100 sheets of custom-size paper (depending on a level surface behind the printer and fed up over the paper support. • You have selected the correct paper size for the banner in Print Properties.
User's Guide for Windows
Page 19
Notes: • To avoid paper jams, do not force the cards into the printer. • To prevent smudging, remove each card as it exits, and let it dry before stacking. Select Photo for photos and greeting cards and Normal ...
Notes: • To avoid paper jams, do not force the cards into the printer. • To prevent smudging, remove each card as it exits, and let it dry before stacking. Select Photo for photos and greeting cards and Normal ...
User's Guide for Windows
Page 22
... Continue without saving to retrieve, edit, and print photos stored on your changes. 7 Select a size for each photo and the blank paper size in the printer. Working with photos 22 Using Fast Pics to print borderless photos Use Fast Pics to discard your computer. 1 Open Fast Pics. Using Print Properties to...
... Continue without saving to retrieve, edit, and print photos stored on your changes. 7 Select a size for each photo and the blank paper size in the printer. Working with photos 22 Using Fast Pics to print borderless photos Use Fast Pics to discard your computer. 1 Open Fast Pics. Using Print Properties to...

User's Guide for Windows
Page 23
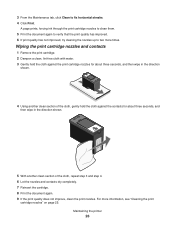
Maintaining the printer 23 If the cartridge you removed is not empty and you want to raise the cartridge carrier lid. 4 Remove the used cartridge, see "Preserving the print cartridges" on page 28. The print cartridge carrier moves and stops at the loading position, unless the printer is busy. 3 Press down on . 2 Lift the access cover. To recycle the used print cartridge. Maintaining the printer Changing the print cartridges Removing a used print cartridge 1 Make sure the printer is on the cartridge carrier lever to use it later, see "Recycling Lexmark products" on page 27.
Maintaining the printer 23 If the cartridge you removed is not empty and you want to raise the cartridge carrier lid. 4 Remove the used cartridge, see "Preserving the print cartridges" on page 28. The print cartridge carrier moves and stops at the loading position, unless the printer is busy. 3 Press down on . 2 Lift the access cover. To recycle the used print cartridge. Maintaining the printer Changing the print cartridges Removing a used print cartridge 1 Make sure the printer is on the cartridge carrier lever to use it later, see "Recycling Lexmark products" on page 27.
User's Guide for Windows
Page 24
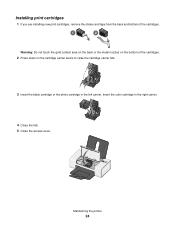
Warning: Do not touch the gold contact area on the back or the metal nozzles on the bottom of the cartridges. Maintaining the printer 24 Installing print cartridges 1 If you are installing new print cartridges, remove the sticker and tape from the back and bottom of the cartridges. 2 Press down on the cartridge carrier levers to raise the cartridge carrier lids. 3 Insert the black cartridge or the photo cartridge in the right carrier. 4 Close the lids. 5 Close the access cover. Insert the color cartridge in the left carrier.
Warning: Do not touch the gold contact area on the back or the metal nozzles on the bottom of the cartridges. Maintaining the printer 24 Installing print cartridges 1 If you are installing new print cartridges, remove the sticker and tape from the back and bottom of the cartridges. 2 Press down on the cartridge carrier levers to raise the cartridge carrier lids. 3 Insert the black cartridge or the photo cartridge in the right carrier. 4 Close the lids. 5 Close the access cover. Insert the color cartridge in the left carrier.
User's Guide for Windows
Page 25
...Wiping the print cartridge nozzles and contacts" on page 25. If you want, follow these steps: 1 Align the print cartridges. Maintaining the printer 25 For more information, see "Aligning the print cartridges" on page 26. Aligning the print cartridges The computer automatically prompts you to improve ... quality, print your document again. Achieving better print quality Improving print quality If you are printing photos or other high-quality images. Use Lexmark Premium Photo Paper if you send your first print job to dry at least 24 hours before stacking, displaying, or storing. •...
...Wiping the print cartridge nozzles and contacts" on page 25. If you want, follow these steps: 1 Align the print cartridges. Maintaining the printer 25 For more information, see "Aligning the print cartridges" on page 26. Aligning the print cartridges The computer automatically prompts you to improve ... quality, print your document again. Achieving better print quality Improving print quality If you are printing photos or other high-quality images. Use Lexmark Premium Photo Paper if you send your first print job to dry at least 24 hours before stacking, displaying, or storing. •...
User's Guide for Windows
Page 26
... nozzles. 3 From the Maintenance tab, click Clean to two more information, see "Cleaning the print cartridge nozzles" on page 25. For more times. Maintaining the printer 26 A page prints, forcing ink through the print cartridge nozzles to clean them. 5 Print the document again to verify that the print quality has improved...
... nozzles. 3 From the Maintenance tab, click Clean to two more information, see "Cleaning the print cartridge nozzles" on page 25. For more times. Maintaining the printer 26 A page prints, forcing ink through the print cartridge nozzles to clean them. 5 Print the document again to verify that the print quality has improved...


