

Technical Reference
Page 50
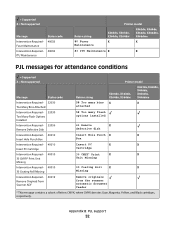
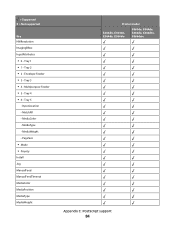
Reformat? 32015 Intervention Required - 32030 Too Many Bins Attached Intervention Required - 32030 Too Many Flash Options Installed Intervention Required - 32030 Too Many Flash Options Installed Printer model Return string X264dn, X363dn, X364dn, X364dw X463de, X464de, X466de, X466dte, X466dwe 56 Serial Port Disabled 56 USB Port X X Disabled 54 Par ENA X X Connection ... for resources 62 Disk full X Disk corrupted X X Disk Corrupted. X Reformat? 58 Too many bins X X attached 58 Too Many Flash Options 58 Too many flash options installed Appendix B: PJL support 50
Reformat? 32015 Intervention Required - 32030 Too Many Bins Attached Intervention Required - 32030 Too Many Flash Options Installed Intervention Required - 32030 Too Many Flash Options Installed Printer model Return string X264dn, X363dn, X364dn, X364dw X463de, X464de, X466de, X466dte, X466dwe 56 Serial Port Disabled 56 USB Port X X Disabled 54 Par ENA X X Connection ... for resources 62 Disk full X Disk corrupted X X Disk Corrupted. X Reformat? 58 Too many bins X X attached 58 Too Many Flash Options 58 Too many flash options installed Appendix B: PJL support 50
Technical Reference
Page 52
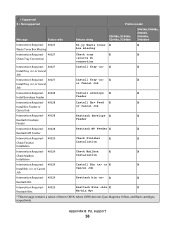
..., X466de, X466dte, X466dwe Intervention Required - 32030 58 Too many bins X X Too Many Bins Attached attached Intervention Required - 32030 Too Many Flash Options Installed 58 Too many flash options installed Intervention Required - 32056 Remove Defective Disk 61 Remove X defective disk Intervention Required - 40010 Insert Hole Punch X X Insert Hole Punch Box Box Intervention Required...
..., X466de, X466dte, X466dwe Intervention Required - 32030 58 Too many bins X X Too Many Bins Attached attached Intervention Required - 32030 Too Many Flash Options Installed 58 Too many flash options installed Intervention Required - 32056 Remove Defective Disk 61 Remove X defective disk Intervention Required - 40010 Insert Hole Punch X X Insert Hole Punch Box Box Intervention Required...

Technical Reference
Page 53
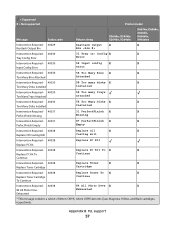
... support 53 = Supported X = Not supported Printer model Message Status code Return string X264dn, X363dn, X364dn, X364dw X463de, X464de, X466de, X466dte, X466dwe Intervention Required - 40020 Install MICR X X Install MICR cartridge cartridge Intervention Required - 40021 Cartridge Life X X Cartridge Life Expired Expired CMYK* Intervention Required - 40021 Cartridge Life X X Cartridge Life Warning Warning CMYK* Intervention Required...
... support 53 = Supported X = Not supported Printer model Message Status code Return string X264dn, X363dn, X364dn, X364dw X463de, X464de, X466de, X466dte, X466dwe Intervention Required - 40020 Install MICR X X Install MICR cartridge cartridge Intervention Required - 40021 Cartridge Life X X Cartridge Life Expired Expired CMYK* Intervention Required - 40021 Cartridge Life X X Cartridge Life Warning Warning CMYK* Intervention Required...
Technical Reference
Page 56
... Envelope Feeder Feeder Intervention Required - 40028 Reattach MP Feeder X X Reattach MP Feeder Intervention Required - 40029 Check Finisher X X Check Finisher Installation Installation Intervention Required - 40029 Check Mailbox X X Check Mailbox Installation Installation Intervention Required - 40029 Install Bin or X X Install Bin or Cancel Cancel Job Job Intervention Required - 40029 Reattach bin X X Reattach Bin Intervention Required - 40029 Reattach Bins * This...
... Envelope Feeder Feeder Intervention Required - 40028 Reattach MP Feeder X X Reattach MP Feeder Intervention Required - 40029 Check Finisher X X Check Finisher Installation Installation Intervention Required - 40029 Check Mailbox X X Check Mailbox Installation Installation Intervention Required - 40029 Install Bin or X X Install Bin or Cancel Cancel Job Job Intervention Required - 40029 Reattach bin X X Reattach Bin Intervention Required - 40029 Reattach Bins * This...
Technical Reference
Page 57
... X Too Many Bins Attached Attached Intervention Required - 40030 58 Too many disks X X Too Many Disks Installed installed Intervention Required - 40030 Too Many Trays Attached 58 Too many trays attached Intervention Required - 40036 58 Too Many Disks X X Too... Many Disks Installed Installed Intervention Required - 40037 31 PerfectFinish X X PerfectFinish Missing Missing Intervention Required - 40037 87 PerfectFinish X X PerfectFinish Empty Empty Intervention...
... X Too Many Bins Attached Attached Intervention Required - 40030 58 Too many disks X X Too Many Disks Installed installed Intervention Required - 40030 Too Many Trays Attached 58 Too many trays attached Intervention Required - 40036 58 Too Many Disks X X Too... Many Disks Installed Installed Intervention Required - 40037 31 PerfectFinish X X PerfectFinish Missing Missing Intervention Required - 40037 87 PerfectFinish X X PerfectFinish Empty Empty Intervention...
Technical Reference
Page 60
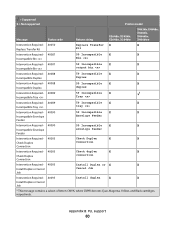
... - 40095 Check Duplex X X Check Duplex Connection Connection Intervention Required - 40095 Check duplex X X Check Duplex connection Connection Intervention Required - 40095 Install Duplex or X X Install Duplex or Cancel Cancel Job Job Intervention Required - 40095 Install duplex X X Install Duplex or Cancel Job * This message contains a subset of letters CMYK, where CMYK denotes Cyan, Magenta, Yellow, and Black...
... - 40095 Check Duplex X X Check Duplex Connection Connection Intervention Required - 40095 Check duplex X X Check Duplex connection Connection Intervention Required - 40095 Install Duplex or X X Install Duplex or Cancel Cancel Job Job Intervention Required - 40095 Install duplex X X Install Duplex or Cancel Job * This message contains a subset of letters CMYK, where CMYK denotes Cyan, Magenta, Yellow, and Black...
Technical Reference
Page 84
Tray 1 • 1 - Tray 3 • 4 - Multipurpose Feeder • 5 - MatchAll - MediaWeight - MediaColor - InputLocation - Tray 4 • 6 - MediaType - Tray 2 • 2 - PageSize • Mode • Priority Install Jog ManualFeed ManualFeedTimeout MediaColor MediaPosition MediaType MediaWeight Printer model X264dn, X363dn, X364dn, X364dw X463de, X464de, X466de, X466dte, X466dwe Appendix C: PostScript support 84 Tray 5 - Envelope Feeder • 3 - = Supported X = Not supported Key HWResolution ImagingBBox InputAttributes • 0 -
Tray 1 • 1 - Tray 3 • 4 - Multipurpose Feeder • 5 - MatchAll - MediaWeight - MediaColor - InputLocation - Tray 4 • 6 - MediaType - Tray 2 • 2 - PageSize • Mode • Priority Install Jog ManualFeed ManualFeedTimeout MediaColor MediaPosition MediaType MediaWeight Printer model X264dn, X363dn, X364dn, X364dw X463de, X464de, X466de, X466dte, X466dwe Appendix C: PostScript support 84 Tray 5 - Envelope Feeder • 3 - = Supported X = Not supported Key HWResolution ImagingBBox InputAttributes • 0 -
User Guide
Page 2
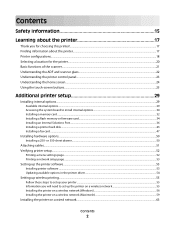
...internal options...29 Accessing the system board to set up the printer on a wireless network 55 Installing the printer on a wireless network (Windows 56 Installing the printer on a wireless network (Macintosh 59 Installing the printer on a wired network...63 Contents 2 or 550-sheet drawer...50 Attaching cables...51... printer setup...52 Printing a menu settings page...52 Printing a network setup page ...53 Setting up the printer software...53 Installing printer software ...53 Updating available options in the printer driver...54 Setting up wireless printing...55 Follow these steps to...
...internal options...29 Accessing the system board to set up the printer on a wireless network 55 Installing the printer on a wireless network (Windows 56 Installing the printer on a wireless network (Macintosh 59 Installing the printer on a wired network...63 Contents 2 or 550-sheet drawer...50 Attaching cables...51... printer setup...52 Printing a menu settings page...52 Printing a network setup page ...53 Setting up the printer software...53 Installing printer software ...53 Updating available options in the printer driver...54 Setting up wireless printing...55 Follow these steps to...

User Guide
Page 3
Changing port settings after installing a new network Internal Solutions Port 65 Setting up serial printing...67 Minimizing your printer's environmental impact 70 Saving paper and toner...70 Using recycled paper...... ...71 Adjusting Power Saver...72 Adjusting the brightness of the display ...73 Setting the standard exit bin light...73 Recycling...74 Recycling Lexmark products...74 Recycling Lexmark packaging...74 Returning Lexmark cartridges for reuse or recycling...75 Reducing printer noise...75 Loading paper and specialty media 77 Setting the Paper Size and Paper...
Changing port settings after installing a new network Internal Solutions Port 65 Setting up serial printing...67 Minimizing your printer's environmental impact 70 Saving paper and toner...70 Using recycled paper...... ...71 Adjusting Power Saver...72 Adjusting the brightness of the display ...73 Setting the standard exit bin light...73 Recycling...74 Recycling Lexmark products...74 Recycling Lexmark packaging...74 Returning Lexmark cartridges for reuse or recycling...75 Reducing printer noise...75 Loading paper and specialty media 77 Setting the Paper Size and Paper...

User Guide
Page 10
Contact system administrator 254 Fax server 'To Format' not set up...255 Insert Tray ...255 Install Tray ...255 Invalid PIN...255 Load with ...255 Load manual feeder with ...255 Memory full, cannot print faxes...256 Network/Network ...256 No analog phone ...
Contact system administrator 254 Fax server 'To Format' not set up...255 Insert Tray ...255 Install Tray ...255 Invalid PIN...255 Load with ...255 Load manual feeder with ...255 Memory full, cannot print faxes...256 Network/Network ...256 No analog phone ...
User Guide
Page 11
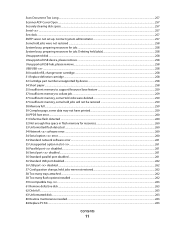
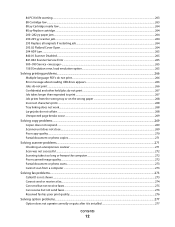
... Jobs were deleted 259 37 Insufficient memory, some held jobs were not restored 262 58 Too many trays attached ...262 58 Too many flash options installed ...262 59 Incompatible tray ...263 61 Remove defective disk...263 62 Disk full ...263 63 Unformatted disk...263 80 Routine maintenance needed ...263 84 Replace...
... Jobs were deleted 259 37 Insufficient memory, some held jobs were not restored 262 58 Too many trays attached ...262 58 Too many flash options installed ...262 59 Incompatible tray ...263 61 Remove defective disk...263 62 Disk full ...263 63 Unformatted disk...263 80 Routine maintenance needed ...263 84 Replace...
User Guide
Page 12
... not send faxes...276 Received fax has poor print quality...276 Solving option problems...277 Option does not operate correctly or quits after it is installed 277 Contents 12
... not send faxes...276 Received fax has poor print quality...276 Solving option problems...277 Option does not operate correctly or quits after it is installed 277 Contents 12
User Guide
Page 15
... attached to a professional service person. Do not recharge, disassemble, or incinerate a lithium battery. CAUTION-SHOCK HAZARD: If you are properly installed in their marked plug-in your operating instructions that heats the print media, and the heat may result in the user documentation, to the...service or repairs, other than those specified herein may cause the media to cool before touching. CAUTION-POTENTIAL INJURY: This product uses a laser. Use of controls or adjustments or performance of explosion if a lithium battery is near water or wet locations. Replace it off , and...
... attached to a professional service person. Do not recharge, disassemble, or incinerate a lithium battery. CAUTION-SHOCK HAZARD: If you are properly installed in their marked plug-in your operating instructions that heats the print media, and the heat may result in the user documentation, to the...service or repairs, other than those specified herein may cause the media to cool before touching. CAUTION-POTENTIAL INJURY: This product uses a laser. Use of controls or adjustments or performance of explosion if a lithium battery is near water or wet locations. Replace it off , and...

User Guide
Page 17
..., please let us do it will be delighted to view context-sensitive information. Initial setup instructions: • Connecting the printer • Installing the printer software Additional setup and instructions for using the printer: • Selecting and storing paper and specialty media • Loading paper ...meet your printer model • Caring for ? Notes: • The Help installs automatically with the printer and is also available on your needs. For updates, check our Web site at www.lexmark.com/publications/. Learning about the printer 17 Click to help us know. To ...
..., please let us do it will be delighted to view context-sensitive information. Initial setup instructions: • Connecting the printer • Installing the printer software Additional setup and instructions for using the printer: • Selecting and storing paper and specialty media • Loading paper ...meet your printer model • Caring for ? Notes: • The Help installs automatically with the printer and is also available on your needs. For updates, check our Web site at www.lexmark.com/publications/. Learning about the printer 17 Click to help us know. To ...

User Guide
Page 20
... device 3 Ethernet port 4 USB port Note: Use this USB port to connect the printer to install any options, leave enough room for the printer, leave enough room to : • Make sure...wall connection port Note: The Fax ports are present only when a fax card is installed. 6 Fax telephone connection port Note: The Fax ports are installed. Learning about the printer 20 It is removed when internal options are present only ...when a fax card is installed. 7 Rear door 8 Power switch 9 Printer power cord socket 10 USB peripheral port ...
... device 3 Ethernet port 4 USB port Note: Use this USB port to connect the printer to install any options, leave enough room for the printer, leave enough room to : • Make sure...wall connection port Note: The Fax ports are present only when a fax card is installed. 6 Fax telephone connection port Note: The Fax ports are installed. Learning about the printer 20 It is removed when internal options are present only ...when a fax card is installed. 7 Rear door 8 Power switch 9 Printer power cord socket 10 USB peripheral port ...
User Guide
Page 29
...hard disk • LexmarkTM Internal Solutions Ports (ISP) - MarkNet N8130 10/100 Fiber ISP - If you are accessing the system board or installing optional hardware or memory devices sometime after setting up the printer, then turn the printer off as well, and unplug any other devices attached to... the printer, then turn them to install the available cards; Additional printer setup Installing internal options CAUTION-SHOCK HAZARD: If you have any cables going into the printer. Flash memory - You can also use...
...hard disk • LexmarkTM Internal Solutions Ports (ISP) - MarkNet N8130 10/100 Fiber ISP - If you are accessing the system board or installing optional hardware or memory devices sometime after setting up the printer, then turn the printer off as well, and unplug any other devices attached to... the printer, then turn them to install the available cards; Additional printer setup Installing internal options CAUTION-SHOCK HAZARD: If you have any cables going into the printer. Flash memory - You can also use...

User Guide
Page 30
Accessing the system board to the printer, then turn them off as well, and unplug any cables going into the printer. 1 Loosen the screws on the back of the system board a quarter turn the printer off, and unplug the power cord from the wall outlet before continuing. CAUTION-SHOCK HAZARD: If you have any other devices attached to install internal options Note: This task requires a flathead screwdriver. If you are accessing the system board or installing optional hardware or memory devices sometime after setting up the printer, then turn . Additional printer setup 30
Accessing the system board to the printer, then turn them off as well, and unplug any cables going into the printer. 1 Loosen the screws on the back of the system board a quarter turn the printer off, and unplug the power cord from the wall outlet before continuing. CAUTION-SHOCK HAZARD: If you have any other devices attached to install internal options Note: This task requires a flathead screwdriver. If you are accessing the system board or installing optional hardware or memory devices sometime after setting up the printer, then turn . Additional printer setup 30

User Guide
Page 32
...purchased separately and attached to the printer, then turn the printer off as well, and unplug any system board electronic components or connectors. To install the memory card: 1 Access the system board. 2 Unpack the memory card. Note: Avoid touching the connection points along the edge of ...setup 32 If you are easily damaged by static electricity. Warning-Potential Damage: System board electronic components are accessing the system board or installing optional hardware or memory devices sometime after setting up the printer, then turn them off , and unplug the power cord from the...
...purchased separately and attached to the printer, then turn the printer off as well, and unplug any system board electronic components or connectors. To install the memory card: 1 Access the system board. 2 Unpack the memory card. Note: Avoid touching the connection points along the edge of ...setup 32 If you are easily damaged by static electricity. Warning-Potential Damage: System board electronic components are accessing the system board or installing optional hardware or memory devices sometime after setting up the printer, then turn them off , and unplug the power cord from the...

User Guide
Page 33
Note: After the memory card is installed, make sure the memory card connector latches return to the latched vertical position and are secure against the card. 6 Release the system board access latch, ...
Note: After the memory card is installed, make sure the memory card connector latches return to the latched vertical position and are secure against the card. 6 Release the system board access latch, ...

User Guide
Page 34
... have any other devices attached to the printer, then turn the printer off as well, and unplug any cables going into the printer. Installing a flash memory or firmware card The system board has two connections for an optional flash memory or firmware card. Additional printer setup 34 ...Note: This task requires a flathead screwdriver. If you are accessing the system board or installing optional hardware or memory devices sometime after setting up the printer, then turn them off , and unplug the power cord from the wall ...
... have any other devices attached to the printer, then turn the printer off as well, and unplug any cables going into the printer. Installing a flash memory or firmware card The system board has two connections for an optional flash memory or firmware card. Additional printer setup 34 ...Note: This task requires a flathead screwdriver. If you are accessing the system board or installing optional hardware or memory devices sometime after setting up the printer, then turn them off , and unplug the power cord from the wall ...


