
Clearing Jams Guide
Page 1
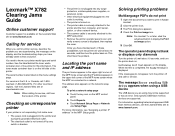
...Clear Area E and Area J. Area C 1 Open the 500-sheet drawer access door. Clear Area M. Clear the scanner. Area B 1 Open the left access door until it flat. 2 Press the pick assembly release lever, and ..., and then close the door. Area T1 1 Open tray 1. 2 Remove any torn paper from the printer. 3 Close the door. 4 Open Tray 1, and make sure the entire paper stack is pushed all ...T1. Hold the door down the front access door. Clear Area D, Area K, and Area L. Lexmark™ X782 Clearing Jams Guide Clearing jams Understanding jam messages Message 200 Paper Jam 201 Paper Jam ...
...Clear Area E and Area J. Area C 1 Open the 500-sheet drawer access door. Clear Area M. Clear the scanner. Area B 1 Open the left access door until it flat. 2 Press the pick assembly release lever, and ..., and then close the door. Area T1 1 Open tray 1. 2 Remove any torn paper from the printer. 3 Close the door. 4 Open Tray 1, and make sure the entire paper stack is pushed all ...T1. Hold the door down the front access door. Clear Area D, Area K, and Area L. Lexmark™ X782 Clearing Jams Guide Clearing jams Understanding jam messages Message 200 Paper Jam 201 Paper Jam ...
Clearing Jams Guide
Page 2
Area K 1 Open the lower right access door. 2 Open the ADF cover, and carefully remove any paper caught in the printer. Area T 1 Carefully open the document cover. If you cannot remove the jammed paper, and open trays 2 through 4 (all 500-sheet trays), and then remove jams. 2 ...Make sure the paper is pushed all the way down into the tray, and then close the door. 290, 291, 292, and 294 Scanner Jams 1 Remove all original documents from the rollers, and then close trays 2 through 4. Area M 1 Open the rear door of the 5-bin mailbox or output expander...
Area K 1 Open the lower right access door. 2 Open the ADF cover, and carefully remove any paper caught in the printer. Area T 1 Carefully open the document cover. If you cannot remove the jammed paper, and open trays 2 through 4 (all 500-sheet trays), and then remove jams. 2 ...Make sure the paper is pushed all the way down into the tray, and then close the door. 290, 291, 292, and 294 Scanner Jams 1 Remove all original documents from the rollers, and then close trays 2 through 4. Area M 1 Open the rear door of the 5-bin mailbox or output expander...
Troubleshooting Guide
Page 1
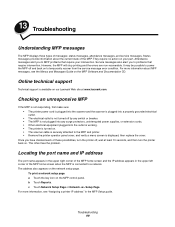
... are supported. Performing Self Test appears on the menu settings page. Checking an unresponsive printer If your printer model type and serial number. For other network device. • The scanner cable is securely attached to print in the upper left side of the MFP home screen... electrical outlet. • The electrical outlet is not turned off , wait about 10 seconds, and turn the printer off , wait at www.lexmark.com Note: When calling for printer service, describe the problem you call for service, call 1-800Lexmark (1-800-539-6275). Calling for service When you...
... are supported. Performing Self Test appears on the menu settings page. Checking an unresponsive printer If your printer model type and serial number. For other network device. • The scanner cable is securely attached to print in the upper left side of the MFP home screen... electrical outlet. • The electrical outlet is not turned off , wait about 10 seconds, and turn the printer off , wait at www.lexmark.com Note: When calling for printer service, describe the problem you call for service, call 1-800Lexmark (1-800-539-6275). Calling for service When you...
Troubleshooting Guide
Page 5
... Copy Options Content. • Adjust the Background Removal setting under Copy Options Content. From the printer operator panel, print the repetitive defects guide to determine which component needs to remove less background. Unwanted patterns (Moire) appear when a document is...mm (5.8 in.) Marks occur on the control panel. Touch the right arrow to the color displayed on copied pages Clean the ADF scanner glass and backing material. White or colored lines 1 Replace the color print cartridge that corresponds to Printed Image under Copy ...
... Copy Options Content. • Adjust the Background Removal setting under Copy Options Content. From the printer operator panel, print the repetitive defects guide to determine which component needs to remove less background. Unwanted patterns (Moire) appear when a document is...mm (5.8 in.) Marks occur on the control panel. Touch the right arrow to the color displayed on copied pages Clean the ADF scanner glass and backing material. White or colored lines 1 Replace the color print cartridge that corresponds to Printed Image under Copy ...
User's Guide
Page 1
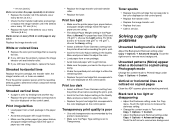
4600 MFP Option Scanner User's Guide for the C782n, C772n series printers February 2007 Lexmark and Lexmark with diamond design are trademarks of Lexmark International, Inc., registered in the United States and/or other countries. © 2006 Lexmark International, Inc. All rights reserved. 740 West New Circle Road Lexington, Kentucky 40550 www.lexmark.com
4600 MFP Option Scanner User's Guide for the C782n, C772n series printers February 2007 Lexmark and Lexmark with diamond design are trademarks of Lexmark International, Inc., registered in the United States and/or other countries. © 2006 Lexmark International, Inc. All rights reserved. 740 West New Circle Road Lexington, Kentucky 40550 www.lexmark.com

User's Guide
Page 3
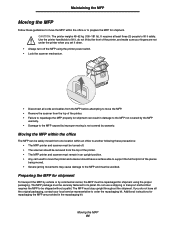
...areas near these guidelines whenever moving is available on our Lexmark Web site at least three (3) people to lift it, do not lift by the front of the printer, and make sure your fingers are not under the printer when you set it safely. More information is not... identifies static-sensitive parts. It requires at www.lexmark.com/multifunctionprinters. CAUTION: The inside of the printer. • Failure to avoid injuring yourself or damaging the MFP. • Always turn off the MFP using the printer power switch. • Lock the scanner mechanism. • Disconnect all cords and cables ...
...areas near these guidelines whenever moving is available on our Lexmark Web site at least three (3) people to lift it, do not lift by the front of the printer, and make sure your fingers are not under the printer when you set it safely. More information is not... identifies static-sensitive parts. It requires at www.lexmark.com/multifunctionprinters. CAUTION: The inside of the printer. • Failure to avoid injuring yourself or damaging the MFP. • Always turn off the MFP using the printer power switch. • Lock the scanner mechanism. • Disconnect all cords and cables ...
User's Guide
Page 6
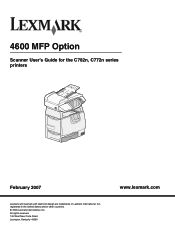
...print media ...67 Storing print media ...71 Avoiding jams ...71 Chapter 9: Installing and removing options 73 Accessing the printer system board ...73 Installing a memory card ...74 Installing a firmware card ...75 Installing the interface card ...76 ...Lexmark products ...80 Cleaning the scanner glass and backing material 80 Cleaning the automatic document feeder ...81 Scanner registration ...82 Removing the scanner top ...83 Moving the MFP ...84 Chapter 11: Clearing jams 85 Identifying jams ...85 Printer access doors and trays ...86 Understanding printer jam messages ...87 Clearing scanner...
...print media ...67 Storing print media ...71 Avoiding jams ...71 Chapter 9: Installing and removing options 73 Accessing the printer system board ...73 Installing a memory card ...74 Installing a firmware card ...75 Installing the interface card ...76 ...Lexmark products ...80 Cleaning the scanner glass and backing material 80 Cleaning the automatic document feeder ...81 Scanner registration ...82 Removing the scanner top ...83 Moving the MFP ...84 Chapter 11: Clearing jams 85 Identifying jams ...85 Printer access doors and trays ...86 Understanding printer jam messages ...87 Clearing scanner...
User's Guide
Page 8
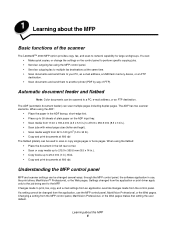
... media from the application or print driver apply only to the job being sent to the MFP. Learning about the MFP Basic functions of the scanner The Lexmark™ 4600 MFP option provides copy, fax, and scan-to scan or copy single pages or book pages. You can be used to -network... and send them to your PC, an e-mail address, a USB flash memory device, or an FTP destination. • Scan documents and send them to another printer (PDF by way of plain paper on the control panel to perform specific copying jobs. • Send an outgoing fax using the flatbed: • Place...
... media from the application or print driver apply only to the job being sent to the MFP. Learning about the MFP Basic functions of the scanner The Lexmark™ 4600 MFP option provides copy, fax, and scan-to scan or copy single pages or book pages. You can be used to -network... and send them to your PC, an e-mail address, a USB flash memory device, or an FTP destination. • Scan documents and send them to another printer (PDF by way of plain paper on the control panel to perform specific copying jobs. • Send an outgoing fax using the flatbed: • Place...

User's Guide
Page 41
There are still scanning 1 When using the scanner bed, touch Cancel while Scan the Next Page / Finish the Job is best used for magazine articles, business graphics, and brochures. Contact your telecommunications company .... Question Tip When should I use . The Cancel Jobs screen will appear. 2 Touch the job or jobs you want to memory 1 Touch Cancel Jobs on a laser printer or taken from the original document is not a concern. • Text is best used when faxing an original document that only contain text or fine...
There are still scanning 1 When using the scanner bed, touch Cancel while Scan the Next Page / Finish the Job is best used for magazine articles, business graphics, and brochures. Contact your telecommunications company .... Question Tip When should I use . The Cancel Jobs screen will appear. 2 Touch the job or jobs you want to memory 1 Touch Cancel Jobs on a laser printer or taken from the original document is not a concern. • Text is best used when faxing an original document that only contain text or fine...
User's Guide
Page 42
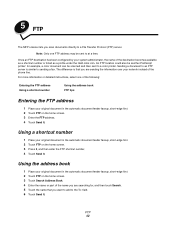
5 FTP The MFP scanner lets you want to add to the To: field. 6 Touch Send It. An FTP location could also be another PostScript printer: for , and then touch Search. 5 Touch the name that you scan documents directly to a File Transfer Protocol (FTP) server. The difference is similar to an ... to sending a fax. Using a shortcut number 1 Place your network instead of the name you are searching for example, a color document can be sent to a color printer. For more information or detailed instructions, select one FTP address may be scanned and then sent to at a time.
5 FTP The MFP scanner lets you want to add to the To: field. 6 Touch Send It. An FTP location could also be another PostScript printer: for , and then touch Search. 5 Touch the name that you scan documents directly to a File Transfer Protocol (FTP) server. The difference is similar to an ... to sending a fax. Using a shortcut number 1 Place your network instead of the name you are searching for example, a color document can be sent to a color printer. For more information or detailed instructions, select one FTP address may be scanned and then sent to at a time.
User's Guide
Page 44
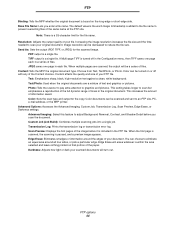
...original document is paused, and a preview image appears. Image resolution can be decreased to an FTP site, PC, e-mail address, or the MFP printer. Content: Tells the MFP the original document type. Color: Sets the scan type and output for the copy. Edge Erase: Eliminates smudges or ... when the original documents are scanned, the output will be turned on that portion of text and graphics or pictures. Photo: Tells the scanner to pay extra attention to scan your document. This increases the amount of the Content choices. Transmission Log: Prints the transmission log or ...
...original document is paused, and a preview image appears. Image resolution can be decreased to an FTP site, PC, e-mail address, or the MFP printer. Content: Tells the MFP the original document type. Color: Sets the scan type and output for the copy. Edge Erase: Eliminates smudges or ... when the original documents are scanned, the output will be turned on that portion of text and graphics or pictures. Photo: Tells the scanner to pay extra attention to scan your document. This increases the amount of the Content choices. Transmission Log: Prints the transmission log or ...

User's Guide
Page 76
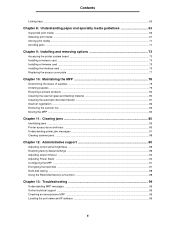
a Connect the USB interconnect cable to the system board. Installing and removing options Installing the interface card Warning: Interface cards are easily damaged by static electricity. Save the packaging materials. Connector USB interconnect cable Installing the interface card 76 Screw Cover plate 3 Unpack the scanner interface card and cable. b Connect the USB interconnect cable to the card. Touch something metal such as the printer frame before you touch an interface card. 1 Remove the system board access cover. 2 Remove the screw and cover plate, and save them.
a Connect the USB interconnect cable to the system board. Installing and removing options Installing the interface card Warning: Interface cards are easily damaged by static electricity. Save the packaging materials. Connector USB interconnect cable Installing the interface card 76 Screw Cover plate 3 Unpack the scanner interface card and cable. b Connect the USB interconnect cable to the card. Touch something metal such as the printer frame before you touch an interface card. 1 Remove the system board access cover. 2 Remove the screw and cover plate, and save them.
User's Guide
Page 82
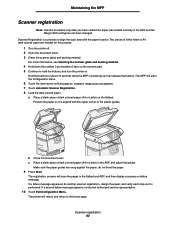
...in the ADF and the Margin Shift setting has not been changed. Scanner registration 82 Maintaining the MFP Scanner registration Note: Use this process. 1 Turn the printer off. 2 Open the document cover. 3 Clean the scanner glass and backing material. b Close the document cover. Make sure ... and backing material. 4 Hold down arrow until Automatic Scanner Registration appears. 7 Touch Automatic Scanner Registration. 8 Load the dark colored paper. Position the paper so it is powering up, then release the buttons. The printer will scan the pages in the ADF, and adjust the guides. ...
...in the ADF and the Margin Shift setting has not been changed. Scanner registration 82 Maintaining the MFP Scanner registration Note: Use this process. 1 Turn the printer off. 2 Open the document cover. 3 Clean the scanner glass and backing material. b Close the document cover. Make sure ... and backing material. 4 Hold down arrow until Automatic Scanner Registration appears. 7 Touch Automatic Scanner Registration. 8 Load the dark colored paper. Position the paper so it is powering up, then release the buttons. The printer will scan the pages in the ADF, and adjust the guides. ...

User's Guide
Page 83
Maintaining the MFP Removing the scanner top Note: The following procedures should be done with two persons. Note: If the cover is leaning forward, it is difficult to prevent accidentally separation. To remove the document cover: 1 Turn the printer off. 2 Unplug the power cord from the wall outlet. 3 Disconnect the two scanner cables. 4 Open the document cover. 5 Lift the cover. 6 Press and hold the locking tabs while lifting the cover. Removing the scanner top 83 The scanner top (document cover) uses two locking tabs to unlock the tabs.
Maintaining the MFP Removing the scanner top Note: The following procedures should be done with two persons. Note: If the cover is leaning forward, it is difficult to prevent accidentally separation. To remove the document cover: 1 Turn the printer off. 2 Unplug the power cord from the wall outlet. 3 Disconnect the two scanner cables. 4 Open the document cover. 5 Lift the cover. 6 Press and hold the locking tabs while lifting the cover. Removing the scanner top 83 The scanner top (document cover) uses two locking tabs to unlock the tabs.
User's Guide
Page 84
... for shipment To transport the MFP by vehicle or by commercial carrier, the MFP must be repackaged for shipment using the printer power switch. • Lock the scanner mechanism. • Disconnect all the original packaging, contact your fingers are provided in the repackaging kit. The MFP must...an upright position. • Any cart used to move the MFP within an office to another following these guidelines to move the printer and scanner should be removed from one location within the office or to order the repackaging kit. If you set it safely. Additional instructions for...
... for shipment To transport the MFP by vehicle or by commercial carrier, the MFP must be repackaged for shipment using the printer power switch. • Lock the scanner mechanism. • Disconnect all the original packaging, contact your fingers are provided in the repackaging kit. The MFP must...an upright position. • Any cart used to move the MFP within an office to another following these guidelines to move the printer and scanner should be removed from one location within the office or to order the repackaging kit. If you set it safely. Additional instructions for...
User's Guide
Page 86
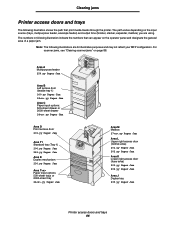
Note: The following illustration indicate the numbers that print media travels through the printer. For scanner jams, see "Clearing scanner jams" on the input source (trays, multipurpose feeder, envelope feeder) and output bins (finisher, stacker, expander, mailbox) you are for illustrative ...area) 201.yy Paper Jam 202.yy Paper Jam Area J Duplex tray 230.yy Paper Jam Printer access doors and trays 86 The numbers in following illustrations are using. Clearing jams Printer access doors and trays The following illustration shows the path that can appear on the operator panel...
Note: The following illustration indicate the numbers that print media travels through the printer. For scanner jams, see "Clearing scanner jams" on the input source (trays, multipurpose feeder, envelope feeder) and output bins (finisher, stacker, expander, mailbox) you are for illustrative ...area) 201.yy Paper Jam 202.yy Paper Jam Area J Duplex tray 230.yy Paper Jam Printer access doors and trays 86 The numbers in following illustrations are using. Clearing jams Printer access doors and trays The following illustration shows the path that can appear on the operator panel...
User's Guide
Page 99
...on to the MFP and printer. • Remove the printer operator panel cover, and verify a menu screen is connected to power the MFP off and back on our Lexmark Web site at least 10 seconds, and then turn the printer off, wait at www.lexmark.com. Checking an unresponsive ...MFP If the MFP is not responding, first make sure: • The printer power cord is plugged into the scanner and the scanner is plugged into a properly grounded electrical outlet. •...
...on to the MFP and printer. • Remove the printer operator panel cover, and verify a menu screen is connected to power the MFP off and back on our Lexmark Web site at least 10 seconds, and then turn the printer off, wait at www.lexmark.com. Checking an unresponsive ...MFP If the MFP is not responding, first make sure: • The printer power cord is plugged into the scanner and the scanner is plugged into a properly grounded electrical outlet. •...

User's Guide
Page 109
... AC Waste from Electrical and Electronic Equipment (WEEE) directive The WEEE logo signifies specific recycling programs and procedures for your printer at www.lexmark.com for electronic products in countries of our products. We encourage the recycling of the European Union. If you have...device (such as a voltage stabilizer or UPS device) to the MFP power supply. Notices The following acoustics values include the printer and the scanner unit operating together. 1-meter average sound pressure, dBA Printing 56 Idling 30 Scanning 53 Copying 57 Power regulation notice Warning: ...
... AC Waste from Electrical and Electronic Equipment (WEEE) directive The WEEE logo signifies specific recycling programs and procedures for your printer at www.lexmark.com for electronic products in countries of our products. We encourage the recycling of the European Union. If you have...device (such as a voltage stabilizer or UPS device) to the MFP power supply. Notices The following acoustics values include the printer and the scanner unit operating together. 1-meter average sound pressure, dBA Printing 56 Idling 30 Scanning 53 Copying 57 Power regulation notice Warning: ...
Quick Reference
Page 3
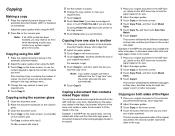
...cover. 2 Place the document facedown on the scanner glass. 3 Close the document cover. 4 Touch Copy on the home screen, or press Go on the numeric pad. Copying using the ADF. 2 Press Go on the numeric pad. Copying from " size, the printer will identify the different size pages as they ... installed, you select a paper size that looks the way you want . Contact your requirements. 5 Touch Copy It. Touching Finish the Job returns the printer to another 1 Place your copies duplexed. Labels on the ADF show how to scan, or touch Finish the Job if you are done. Example 2:...
...cover. 2 Place the document facedown on the scanner glass. 3 Close the document cover. 4 Touch Copy on the home screen, or press Go on the numeric pad. Copying using the ADF. 2 Press Go on the numeric pad. Copying from " size, the printer will identify the different size pages as they ... installed, you select a paper size that looks the way you want . Contact your requirements. 5 Touch Copy It. Touching Finish the Job returns the printer to another 1 Place your copies duplexed. Labels on the ADF show how to scan, or touch Finish the Job if you are done. Example 2:...
Quick Reference
Page 5
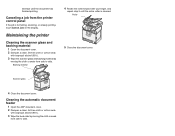
...Dampen a clean, lint-free cloth or cotton swab with isopropyl alcohol (95%). 3 Wipe the scanner glass and backing material by moving the cloth or swab from side to side. Maintaining the printer Cleaning the scanner glass and backing material 1 Open the document cover. 2 Dampen a clean, lint-free cloth or... cotton swab with isopropyl alcohol (95%). 3 Wipe the feed roller by moving the cloth or swab from the printer control panel If the job ...
...Dampen a clean, lint-free cloth or cotton swab with isopropyl alcohol (95%). 3 Wipe the scanner glass and backing material by moving the cloth or swab from side to side. Maintaining the printer Cleaning the scanner glass and backing material 1 Open the document cover. 2 Dampen a clean, lint-free cloth or... cotton swab with isopropyl alcohol (95%). 3 Wipe the feed roller by moving the cloth or swab from the printer control panel If the job ...


