
User's Guide
Page 13
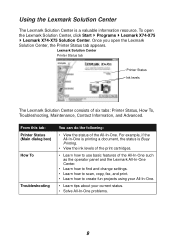
... Center, the Printer Status tab appears. Once you open the Lexmark Solution Center, click Start Programs Lexmark X74-X75 Lexmark X74-X75 Solution Center. From this tab: Printer Status (Main dialog box) How To Troubleshooting You can do the following: • ...In-One. For example, if the All-In-One is printing a document, the status is a valuable information resource. Lexmark Solution Center Printer Status tab Printer Status Ink levels The Lexmark Solution Center consists of six tabs: Printer Status, How To, Troubleshooting, Maintenance, Contact Information, and Advanced. Using the...
... Center, the Printer Status tab appears. Once you open the Lexmark Solution Center, click Start Programs Lexmark X74-X75 Lexmark X74-X75 Solution Center. From this tab: Printer Status (Main dialog box) How To Troubleshooting You can do the following: • ...In-One. For example, if the All-In-One is printing a document, the status is a valuable information resource. Lexmark Solution Center Printer Status tab Printer Status Ink levels The Lexmark Solution Center consists of six tabs: Printer Status, How To, Troubleshooting, Maintenance, Contact Information, and Advanced. Using the...
User's Guide
Page 14
...; Clean print nozzles to fix horizontal streaks. • Align the print cartridges to fix blurry edges. • Troubleshoot ink problems. • Remove residue from Japanese postcards (Hagaki). • Learn how to contact Lexmark by phone. • Change the appearance of the screen. 10 Note: For more information, click the Help button located...
...; Clean print nozzles to fix horizontal streaks. • Align the print cartridges to fix blurry edges. • Troubleshoot ink problems. • Remove residue from Japanese postcards (Hagaki). • Learn how to contact Lexmark by phone. • Change the appearance of the screen. 10 Note: For more information, click the Help button located...
User's Guide
Page 26
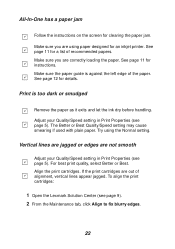
... against the left edge of recommended papers. Vertical lines are jagged or edges are using the Normal setting. To align the print cartridges: 1 Open the Lexmark Solution Center (see page 5). Make sure the paper guide is too dark or smudged Remove the paper as it exits and let the... ink dry before handling. See page 12 for instructions. Align the print cartridges. Make sure you are out of alignment, vertical lines appear jagged. See page ...
... against the left edge of recommended papers. Vertical lines are jagged or edges are using the Normal setting. To align the print cartridges: 1 Open the Lexmark Solution Center (see page 5). Make sure the paper guide is too dark or smudged Remove the paper as it exits and let the... ink dry before handling. See page 12 for instructions. Align the print cartridges. Make sure you are out of alignment, vertical lines appear jagged. See page ...

User's Guide
Page 32
... card stock paper 11 cartridges viewing ink levels of your All-In-One 1 photo paper 11 photographs modifying 7, 8 scanning 14 poor quality printing 22 poster 7, 8 Power button 2 power light 2 power supply 2 28 Index A Advanced tab 10 All-In-One Center, see Lexmark All-In-One Center All-In-...black and white, printing in 5 Black Copy button 2, 16 bond paper 11 both sides, printing on transfers 11 L labels 11 Lexmark All-In-One Center 6 opening 6 using 6 Lexmark Solution Center 9 Advanced tab 10 Contact Information tab 10 How To tab 9 Maintenance tab 10 opening 9 Status tab 9 Troubleshooting ...
... card stock paper 11 cartridges viewing ink levels of your All-In-One 1 photo paper 11 photographs modifying 7, 8 scanning 14 poor quality printing 22 poster 7, 8 Power button 2 power light 2 power supply 2 28 Index A Advanced tab 10 All-In-One Center, see Lexmark All-In-One Center All-In-...black and white, printing in 5 Black Copy button 2, 16 bond paper 11 both sides, printing on transfers 11 L labels 11 Lexmark All-In-One Center 6 opening 6 using 6 Lexmark Solution Center 9 Advanced tab 10 Contact Information tab 10 How To tab 9 Maintenance tab 10 opening 9 Status tab 9 Troubleshooting ...
User's Guide
Page 33
Preview Area Preview Now button 14 Print/Copy preview 7 Scan preview 7 Preview Now button 14 print cartridges viewing ink levels of 10 Q Quality/Copies tab 5 R reduce an image 7, 8 reinstalling software 25 S safety information ii Save Settings menu 5 saved images viewing 8 Scan & Copy Main Page ...
Preview Area Preview Now button 14 Print/Copy preview 7 Scan preview 7 Preview Now button 14 print cartridges viewing ink levels of 10 Q Quality/Copies tab 5 R reduce an image 7, 8 reinstalling software 25 S safety information ii Save Settings menu 5 saved images viewing 8 Scan & Copy Main Page ...


