User's Guide
Page 5
... Using the Embedded Web Server...254 Checking the device status...254 Setting up e-mail alerts...254 Viewing reports...255 Restoring the factory default settings...255 Troubleshooting 256 The indicator light is blinking...256 Solving basic printer problems...256 Understanding printer messages...257 Clearing jams...266 Solving printing problems...280 Solving copy...
... Using the Embedded Web Server...254 Checking the device status...254 Setting up e-mail alerts...254 Viewing reports...255 Restoring the factory default settings...255 Troubleshooting 256 The indicator light is blinking...256 Solving basic printer problems...256 Understanding printer messages...257 Clearing jams...266 Solving printing problems...280 Solving copy...
User's Guide
Page 9
.../publications/. Learning about the printer 9 To get back on the Lexmark Web site at www.lexmark.com/publications/. Initial setup instructions: • Connecting the printer • Installing the printer software Additional setup and instructions for and maintaining the printer • Troubleshooting and solving problems Help using printer software • Setting up and using...
.../publications/. Learning about the printer 9 To get back on the Lexmark Web site at www.lexmark.com/publications/. Initial setup instructions: • Connecting the printer • Installing the printer software Additional setup and instructions for and maintaining the printer • Troubleshooting and solving problems Help using printer software • Setting up and using...

User's Guide
Page 10
...varies by country or region: • In the US-See the Statement of Limited Warranty included with this printer, or at support.lexmark.com. • Rest of operation for ? Away from direct sunlight, humidity extremes, or temperature fluctuations - Support telephone numbers and ...so that they may serve you plan to open trays, covers, and doors. The latest supplemental information, updates, and technical support: • Troubleshooting hints and tips • Frequently asked questions • Documentation • Driver downloads • Live chat support • E-mail support •...
...varies by country or region: • In the US-See the Statement of Limited Warranty included with this printer, or at support.lexmark.com. • Rest of operation for ? Away from direct sunlight, humidity extremes, or temperature fluctuations - Support telephone numbers and ...so that they may serve you plan to open trays, covers, and doors. The latest supplemental information, updates, and technical support: • Troubleshooting hints and tips • Frequently asked questions • Documentation • Driver downloads • Live chat support • E-mail support •...
User's Guide
Page 256
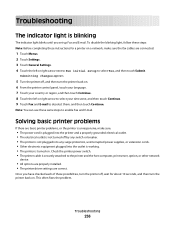
This often fixes the problem. Troubleshooting The indicator light is blinking The indicator light blinks until you have checked each of these possibilities, turn the printer off, wait for a printer on a ..., and then touch Continue. 9 Touch Fax and E-mail to enable Fax and E-mail. Check the printer power switch. • The printer cable is turned on . Troubleshooting 256 Once you set up Fax and E-mail.
This often fixes the problem. Troubleshooting The indicator light is blinking The indicator light blinks until you have checked each of these possibilities, turn the printer off, wait for a printer on a ..., and then touch Continue. 9 Touch Fax and E-mail to enable Fax and E-mail. Check the printer power switch. • The printer cable is turned on . Troubleshooting 256 Once you set up Fax and E-mail.

User's Guide
Page 257
... outlet. 3 Remove the tray. 4 Reattach the tray. 5 Connect the power cord to cancel the current job. Disk corrupted The printer attempted a hard disk recovery on . Troubleshooting 257 Try one or more of the print job. If the error occurs a second time: 1 Turn the printer off . 2 Unplug the power cord from the...
... outlet. 3 Remove the tray. 4 Reattach the tray. 5 Connect the power cord to cancel the current job. Disk corrupted The printer attempted a hard disk recovery on . Troubleshooting 257 Try one or more of the print job. If the error occurs a second time: 1 Turn the printer off . 2 Unplug the power cord from the...

User's Guide
Page 258
.... Try one or more of the following : • Load the specified paper in Fax Server mode, but the Fax Server setup has not been completed. Troubleshooting 258 Contact system administrator. Fax Station Name not set up . If the message appears again, contact your system support person. Sending and receiving faxes is...
.... Try one or more of the following : • Load the specified paper in Fax Server mode, but the Fax Server setup has not been completed. Troubleshooting 258 Contact system administrator. Fax Station Name not set up . If the message appears again, contact your system support person. Sending and receiving faxes is...

User's Guide
Page 259
... is not enough memory to be restored. Scan Document Too Long The scan job exceeds the maximum number of paper from the standard exit bin. Troubleshooting 259 Try one or more of the following : • Load the specified paper in the multipurpose feeder. • Touch Continue to restore all held jobs...
... is not enough memory to be restored. Scan Document Too Long The scan job exceeds the maximum number of paper from the standard exit bin. Troubleshooting 259 Try one or more of the following : • Load the specified paper in the multipurpose feeder. • Touch Continue to restore all held jobs...

User's Guide
Page 260
... begin collating the rest of the following: • Touch Continue to clear the message. • Cancel the current print job. • Install additional printer memory. Troubleshooting 260 Touch Continue to clear the message. 38 Memory full Try one or more of the print job. • Cancel the current print job. 37...
... begin collating the rest of the following: • Touch Continue to clear the message. • Cancel the current print job. • Install additional printer memory. Troubleshooting 260 Touch Continue to clear the message. 38 Memory full Try one or more of the print job. • Cancel the current print job. 37...

User's Guide
Page 261
Troubleshooting 261 Downloaded fonts and macros not previously stored in flash memory are deleted. • Delete fonts, macros, and other data stored in flash memory. • ...
Troubleshooting 261 Downloaded fonts and macros not previously stored in flash memory are deleted. • Delete fonts, macros, and other data stored in flash memory. • ...

User's Guide
Page 262
... to a properly grounded outlet. 5 Turn the printer back on the printer system board. 55 Unsupported option in slot is the number of the parallel port. Troubleshooting 262 Try one or more of the following : • Touch Continue to a properly grounded outlet. 5 Turn the printer power back on. 56 Parallel port disabled...
... to a properly grounded outlet. 5 Turn the printer back on the printer system board. 55 Unsupported option in slot is the number of the parallel port. Troubleshooting 262 Try one or more of the following : • Touch Continue to a properly grounded outlet. 5 Turn the printer power back on. 56 Parallel port disabled...
User's Guide
Page 263
... printer hard disk. If the error message remains, the hard disk may be defective and require replacing. 80 Fuser life warning 1 Order a replacement fuser immediately. Troubleshooting 263 When print quality is reduced, install the new fuser using the specified tray. 61 Remove defective disk Try one or more of the following...
... printer hard disk. If the error message remains, the hard disk may be defective and require replacing. 80 Fuser life warning 1 Order a replacement fuser immediately. Troubleshooting 263 When print quality is reduced, install the new fuser using the specified tray. 61 Remove defective disk Try one or more of the following...
User's Guide
Page 264
Troubleshooting 264 80 Replace fuser 1 Replace the fuser using the instruction sheet that came with the replacement part. 2 Touch Continue to clear the message and continue ...
Troubleshooting 264 80 Replace fuser 1 Replace the fuser using the instruction sheet that came with the replacement part. 2 Touch Continue to clear the message and continue ...
User's Guide
Page 265
...-to-side and front-to-back several times to redistribute toner. 4 Reinsert the cartridge, and then touch Continue to clear the message and continue printing. Troubleshooting 265 Note: Repeat this procedure multiple times until the print remains faded, and then replace the cartridge. 840.01 Scanner Disabled This message indicates that...
...-to-side and front-to-back several times to redistribute toner. 4 Reinsert the cartridge, and then touch Continue to clear the message and continue printing. Troubleshooting 265 Note: Repeat this procedure multiple times until the print remains faded, and then replace the cartridge. 840.01 Scanner Disabled This message indicates that...
User's Guide
Page 266
... the printer off and then on . Note: If turning the printer off . 2 Unplug the power cord from the Lexmark Web site at www.lexmark.com. Load it . • Do not load too much paper. Troubleshooting 266 Avoiding jams The following hints can avoid most jams. If jams do occur, follow the steps outlined...
... the printer off and then on . Note: If turning the printer off . 2 Unplug the power cord from the Lexmark Web site at www.lexmark.com. Load it . • Do not load too much paper. Troubleshooting 266 Avoiding jams The following hints can avoid most jams. If jams do occur, follow the steps outlined...
User's Guide
Page 267
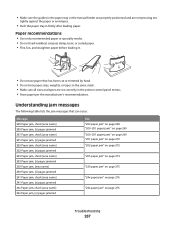
... 272 "203 paper jam" on page 274 "230 paper jam" on page 275 "24x paper jam" on page 276 "24x paper jam" on page 276 Troubleshooting 267 Paper recommendations • Use only recommended paper or specialty media. • Do not load wrinkled, creased, damp, bent, or curled paper. • Flex, fan...
... 272 "203 paper jam" on page 274 "230 paper jam" on page 275 "24x paper jam" on page 276 "24x paper jam" on page 276 Troubleshooting 267 Paper recommendations • Use only recommended paper or specialty media. • Do not load wrinkled, creased, damp, bent, or curled paper. • Flex, fan...
User's Guide
Page 268
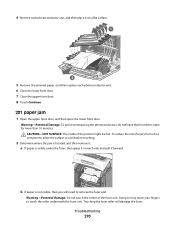
... from the scanner 294.01 Scanner jam, remove jammed originals from a hot component, allow the surface to cool before touching. 2 Open the lower front door. Troubleshooting 268 CAUTION-HOT SURFACE: The inside of injury from the scanner 200 paper jam 1 Open the upper front door. Note: To avoid overexposing the photoconductor...
... from the scanner 294.01 Scanner jam, remove jammed originals from a hot component, allow the surface to cool before touching. 2 Open the lower front door. Troubleshooting 268 CAUTION-HOT SURFACE: The inside of injury from the scanner 200 paper jam 1 Open the upper front door. Note: To avoid overexposing the photoconductor...

User's Guide
Page 269
... photoconductor units. Note: You may need to cool before touching. 2 Open the lower front door. To reduce the risk of the printer might be hot. Troubleshooting 269 Note: To avoid overexposing the photoconductor units, do not leave the front door open longer than 10 minutes. 3 Pull the paper forward if it...
... photoconductor units. Note: You may need to cool before touching. 2 Open the lower front door. To reduce the risk of the printer might be hot. Troubleshooting 269 Note: To avoid overexposing the photoconductor units, do not leave the front door open longer than 10 minutes. 3 Pull the paper forward if it...
User's Guide
Page 270
...: a If paper is not visible, then you will damage the fuser. Warning-Potential Damage: Do not touch the center of the printer might be hot. Troubleshooting 270 4 Remove each photoconductor unit, and then place it on each photoconductor unit. 6 Close the lower front door. 7 Close the upper front door. 8 Touch Continue...
...: a If paper is not visible, then you will damage the fuser. Warning-Potential Damage: Do not touch the center of the printer might be hot. Troubleshooting 270 4 Remove each photoconductor unit, and then place it on each photoconductor unit. 6 Close the lower front door. 7 Close the upper front door. 8 Touch Continue...

User's Guide
Page 271
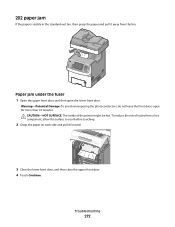
Troubleshooting 271 1 Turn the screws on the fuser to the left to loosen them. 2 Lift the handholds on each side of the fuser, and then pull forward to remove it. 3 Remove the jammed paper. 4 Align the fuser unit using the handholds on each side, and then place it back into the printer. 5 Turn the screws to the right to fasten the fuser securely. 3 Close the lower front door, and then close the upper front door. 4 Touch Continue.
Troubleshooting 271 1 Turn the screws on the fuser to the left to loosen them. 2 Lift the handholds on each side of the fuser, and then pull forward to remove it. 3 Remove the jammed paper. 4 Align the fuser unit using the handholds on each side, and then place it back into the printer. 5 Turn the screws to the right to fasten the fuser securely. 3 Close the lower front door, and then close the upper front door. 4 Touch Continue.
User's Guide
Page 272
... of injury from a hot component, allow the surface to cool before touching. 2 Grasp the paper on each side and pull it away from the bin. Troubleshooting 272 To reduce the risk of the printer might be hot.
... of injury from a hot component, allow the surface to cool before touching. 2 Grasp the paper on each side and pull it away from the bin. Troubleshooting 272 To reduce the risk of the printer might be hot.


