User's Guide
Page 2
... printer control panel...16 Understanding the home screen...17 Using the touch-screen buttons...19 Additional printer setup 23 Installing internal options...23 Installing optional trays...40 Attaching cables...42 Disabling fax and e-mail functions prior to setup 43 Verifying printer setup...44 Setting up the printer software...45 Setting up... Saving energy...59 Recycling...63 Loading paper and specialty media 65 Setting the Paper Size and Paper Type...65 Configuring Universal paper settings...65 Loading trays...66 Contents 2
... printer control panel...16 Understanding the home screen...17 Using the touch-screen buttons...19 Additional printer setup 23 Installing internal options...23 Installing optional trays...40 Attaching cables...42 Disabling fax and e-mail functions prior to setup 43 Verifying printer setup...44 Setting up the printer software...45 Setting up... Saving energy...59 Recycling...63 Loading paper and specialty media 65 Setting the Paper Size and Paper Type...65 Configuring Universal paper settings...65 Loading trays...66 Contents 2

User's Guide
Page 3
Loading the multipurpose feeder...68 Loading the 2000-sheet tray...71 Linking and unlinking trays...74 Paper and specialty media guidelines 76 Paper guidelines...76 Supported paper sizes, types, and weights...79 Printing 82 Printing a document...82 Printing on specialty ...
Loading the multipurpose feeder...68 Loading the 2000-sheet tray...71 Linking and unlinking trays...74 Paper and specialty media guidelines 76 Paper guidelines...76 Supported paper sizes, types, and weights...79 Printing 82 Printing a document...82 Printing on specialty ...
User's Guide
Page 8
... continuing. SAVE THESE INSTRUCTIONS. If you are using a high-capacity input tray, a duplex unit and an input option, or more information, see www.lexmark.com/multifunctionprinters. If you purchased a multifunction printer (MFP) that scans, copies, and faxes, you are installing an optional tray after setting up the printer, then turn them off and unplug...
... continuing. SAVE THESE INSTRUCTIONS. If you are using a high-capacity input tray, a duplex unit and an input option, or more information, see www.lexmark.com/multifunctionprinters. If you purchased a multifunction printer (MFP) that scans, copies, and faxes, you are installing an optional tray after setting up the printer, then turn them off and unplug...

User's Guide
Page 10
If you plan to install any options, leave enough room for the printer, leave enough room to open trays, covers, and doors. Away from direct sunlight, humidity extremes, or temperature fluctuations - Support telephone numbers and hours of air conditioners...8226; Documentation • Driver downloads • Live chat support • E-mail support • Telephone support Warranty information Find it here Lexmark Support Web site-support.lexmark.com Note: Select your region, and then select your printer. When selecting a location for them also. Selecting a location for ? Free...
If you plan to install any options, leave enough room for the printer, leave enough room to open trays, covers, and doors. Away from direct sunlight, humidity extremes, or temperature fluctuations - Support telephone numbers and hours of air conditioners...8226; Documentation • Driver downloads • Live chat support • E-mail support • Telephone support Warranty information Find it here Lexmark Support Web site-support.lexmark.com Note: Select your region, and then select your printer. When selecting a location for them also. Selecting a location for ? Free...
User's Guide
Page 12
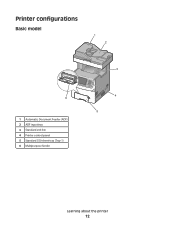
Printer configurations Basic model 1 2 3 6 1 Automatic Document Feeder (ADF) 2 ADF input tray 3 Standard exit bin 4 Printer control panel 5 Standard 550-sheet tray (Tray 1) 6 Multipurpose feeder 4 5 Learning about the printer 12
Printer configurations Basic model 1 2 3 6 1 Automatic Document Feeder (ADF) 2 ADF input tray 3 Standard exit bin 4 Printer control panel 5 Standard 550-sheet tray (Tray 1) 6 Multipurpose feeder 4 5 Learning about the printer 12
User's Guide
Page 13
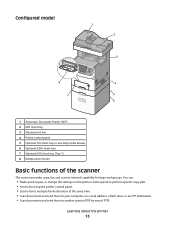
... way of the scanner The scanner provides copy, fax, and scan-to-network capability for large workgroups. Configured model 1 2 3 8 4 7 5 6 1 Automatic Document Feeder (ADF) 2 ADF input tray 3 Standard exit bin 4 Printer control panel 5 Optional 550-sheet tray or specialty media drawer 6 Optional 2,000-sheet tray 7 Standard 550-sheet tray (Tray 1) 8 Multipurpose feeder Basic functions of FTP).
... way of the scanner The scanner provides copy, fax, and scan-to-network capability for large workgroups. Configured model 1 2 3 8 4 7 5 6 1 Automatic Document Feeder (ADF) 2 ADF input tray 3 Standard exit bin 4 Printer control panel 5 Optional 550-sheet tray or specialty media drawer 6 Optional 2,000-sheet tray 7 Standard 550-sheet tray (Tray 1) 8 Multipurpose feeder Basic functions of FTP).
User's Guide
Page 14
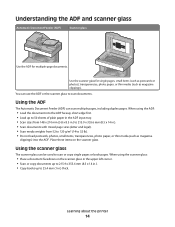
...; Scan or copy documents up to 215.9 x 355.6 mm (8.5 x 14 in.). • Copy books up to 50 sheets of plain paper in the ADF input tray. • Scan sizes from 148 x 210 mm (5.8 x 8.3 in.) to 215.9 x 355.6 mm (8.5 x 14 in .) thick. Using the ADF The Automatic Document Feeder (ADF) can use...
...; Scan or copy documents up to 215.9 x 355.6 mm (8.5 x 14 in.). • Copy books up to 50 sheets of plain paper in the ADF input tray. • Scan sizes from 148 x 210 mm (5.8 x 8.3 in.) to 215.9 x 355.6 mm (8.5 x 14 in .) thick. Using the ADF The Automatic Document Feeder (ADF) can use...
User's Guide
Page 40
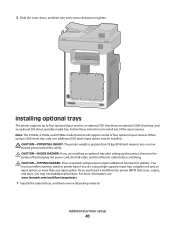
... stability. Note: The X734de, X736de, and X738de model printers will support a total of the input sources. You must use either a printer stand or printer base if you are installing an optional tray after setting up to tighten. If you purchased a multifunction printer (MFP) that scans,...USB cable, and the Ethernet cable before continuing. When using a high-capacity input tray, a duplex unit and an input option, or more information, see www.lexmark.com/multifunctionprinters. 1 Unpack the optional tray, and then remove all packing material. Follow these instructions to lift it safely.
... stability. Note: The X734de, X736de, and X738de model printers will support a total of the input sources. You must use either a printer stand or printer base if you are installing an optional tray after setting up to tighten. If you purchased a multifunction printer (MFP) that scans,...USB cable, and the Ethernet cable before continuing. When using a high-capacity input tray, a duplex unit and an input option, or more information, see www.lexmark.com/multifunctionprinters. 1 Unpack the optional tray, and then remove all packing material. Follow these instructions to lift it safely.
User's Guide
Page 41
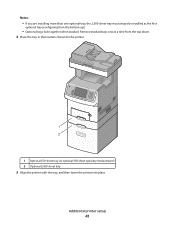
Notes: • If you are installing more than one at a time from the bottom up). • Optional trays lock together when stacked. Remove stacked trays one optional tray, the 2,000-sheet tray must always be installed as the first optional tray (configuring from the top down. 2 Place the tray in the location chosen for the printer. 1 2 1 Optional 550-sheet tray (or optional 550-sheet specialty media drawer) 2 Optional 2,000-sheet tray 3 Align the printer with the tray, and then lower the printer into place. Additional printer setup 41
Notes: • If you are installing more than one at a time from the bottom up). • Optional trays lock together when stacked. Remove stacked trays one optional tray, the 2,000-sheet tray must always be installed as the first optional tray (configuring from the top down. 2 Place the tray in the location chosen for the printer. 1 2 1 Optional 550-sheet tray (or optional 550-sheet specialty media drawer) 2 Optional 2,000-sheet tray 3 Align the printer with the tray, and then lower the printer into place. Additional printer setup 41
User's Guide
Page 65
... do not contain plain paper. 1 Make sure the printer is a user-defined setting that are not preset in each tray except the standard 550-sheet tray and the multipurpose tray. the largest size is 76 x 127 mm (3 x 5 in .). Specify a unit of measure (millimeters or inches) • Portrait Width &#...Paper Size setting is not available from the Paper Size menu. The Paper Size setting for the standard 550-sheet tray and the multipurpose tray must be set manually for the specified tray to Universal when the size you print on and Ready appears. 2 On the home screen, touch . 3 Touch...
... do not contain plain paper. 1 Make sure the printer is a user-defined setting that are not preset in each tray except the standard 550-sheet tray and the multipurpose tray. the largest size is 76 x 127 mm (3 x 5 in .). Specify a unit of measure (millimeters or inches) • Portrait Width &#...Paper Size setting is not available from the Paper Size menu. The Paper Size setting for the standard 550-sheet tray and the multipurpose tray must be set manually for the specified tray to Universal when the size you print on and Ready appears. 2 On the home screen, touch . 3 Touch...

User's Guide
Page 66
... position for the size of paper you are loading. To unlock the tray, slide the button on top of paper you are loading. Loading trays Note: Do not remove trays while a job prints or while Busy appears on the bottom of the tray to help position the guides. 3 Squeeze and slide the length guides... the Paper menu. 9 Touch to return to the right. Use the size indicators on the display. Loading paper and specialty media 66 To lock the tray once a length has been selected, slide the button back to the home screen.
... position for the size of paper you are loading. To unlock the tray, slide the button on top of paper you are loading. Loading trays Note: Do not remove trays while a job prints or while Busy appears on the bottom of the tray to help position the guides. 3 Squeeze and slide the length guides... the Paper menu. 9 Touch to return to the right. Use the size indicators on the display. Loading paper and specialty media 66 To lock the tray once a length has been selected, slide the button back to the home screen.
User's Guide
Page 67
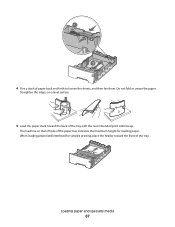
Loading paper and specialty media 67 When loading preprinted letterhead for loading paper. Straighten the edges on the left side of paper back and forth to loosen the sheets, and then fan them. Do not fold or crease the paper. The load line on a level surface. 5 Load the paper stack toward the front of the tray with the recommended print side faceup. ABC 4 Flex a stack of the paper tray indicates the maximum height for simplex printing, place the header toward the back of the tray.
Loading paper and specialty media 67 When loading preprinted letterhead for loading paper. Straighten the edges on the left side of paper back and forth to loosen the sheets, and then fan them. Do not fold or crease the paper. The load line on a level surface. 5 Load the paper stack toward the front of the tray with the recommended print side faceup. ABC 4 Flex a stack of the paper tray indicates the maximum height for simplex printing, place the header toward the back of the tray.
User's Guide
Page 68
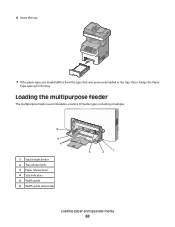
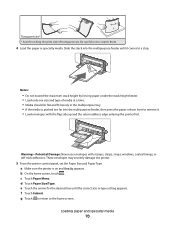
6 Insert the tray. 7 If the paper type you loaded differs from the type that was previously loaded in the tray, then change the Paper Type setting for the tray. Loading the multipurpose feeder The multipurpose feeder accommodates a variety of media types, including envelopes. 6 5 4 1 Stack height limiter 2 Tray release latch 3 Paper release lever 4 Size indicators 5 Width guide 6 Width guide release tab LTAR4&LGL BE5XEC A5 3 2 1 Loading paper and specialty media 68
6 Insert the tray. 7 If the paper type you loaded differs from the type that was previously loaded in the tray, then change the Paper Type setting for the tray. Loading the multipurpose feeder The multipurpose feeder accommodates a variety of media types, including envelopes. 6 5 4 1 Stack height limiter 2 Tray release latch 3 Paper release lever 4 Size indicators 5 Width guide 6 Width guide release tab LTAR4&LGL BE5XEC A5 3 2 1 Loading paper and specialty media 68
User's Guide
Page 69
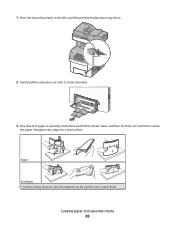
Straighten the edges on a level surface. Do not fold or crease the paper. Loading paper and specialty media 69 Paper Envelopes * Avoid touching the print side of paper or specialty media back and forth to loosen them, and then fan them . 1 Press the tray release latch to the left, and then pull the multipurpose tray down. 2 Gently pull the extension out until it is fully extended. 3 Flex sheets of transparencies. Be careful not to scratch them .
Straighten the edges on a level surface. Do not fold or crease the paper. Loading paper and specialty media 69 Paper Envelopes * Avoid touching the print side of paper or specialty media back and forth to loosen them, and then fan them . 1 Press the tray release latch to the left, and then pull the multipurpose tray down. 2 Gently pull the extension out until it is fully extended. 3 Flex sheets of transparencies. Be careful not to scratch them .
User's Guide
Page 70
... stack height limiter. • Load only one size and type of transparencies. Be careful not to the home screen. e Touch the arrows for the desired tray until it comes to remove it. • Load envelopes with stamps, clasps, snaps, windows, coated linings, or self-stick adhesives. Transparencies* * Avoid touching the print...
... stack height limiter. • Load only one size and type of transparencies. Be careful not to the home screen. e Touch the arrows for the desired tray until it comes to remove it. • Load envelopes with stamps, clasps, snaps, windows, coated linings, or self-stick adhesives. Transparencies* * Avoid touching the print...
User's Guide
Page 71
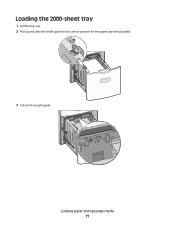
Loading paper and specialty media 71 Loading the 2000-sheet tray 1 Pull the tray out. 2 Pull up and slide the width guide to the correct position for the paper size being loaded. 3 Unlock the length guide.
Loading paper and specialty media 71 Loading the 2000-sheet tray 1 Pull the tray out. 2 Pull up and slide the width guide to the correct position for the paper size being loaded. 3 Unlock the length guide.
User's Guide
Page 73
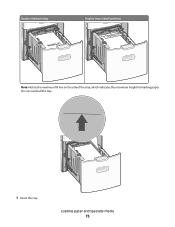
Loading paper and specialty media 73 Single-sided printing Duplex (two-sided) printing LETTERHEAD LETTERHEAD Note: Notice the maximum fill line on the side of the tray, which indicates the maximum height for loading paper. Do not overload the tray. 7 Insert the tray.
Loading paper and specialty media 73 Single-sided printing Duplex (two-sided) printing LETTERHEAD LETTERHEAD Note: Notice the maximum fill line on the side of the tray, which indicates the maximum height for loading paper. Do not overload the tray. 7 Insert the tray.
User's Guide
Page 74
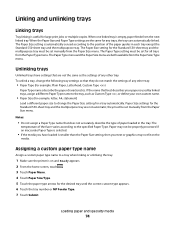
... automatically linked. The temperature of the fuser varies according to the position of paper loaded in each tray except the Standard 550-sheet tray and the multipurpose tray. Unlinking trays Unlinked trays have loaded is smaller than the Paper Size setting, then your own custom name. • Paper Size... describe the type of the paper guides in the tray. Loading paper and specialty media 74 Linking and unlinking trays Linking trays Tray linking is useful for all trays from the Paper Type menu. When one linked tray is automatically sensed according to the specified Paper Type....
... automatically linked. The temperature of the fuser varies according to the position of paper loaded in each tray except the Standard 550-sheet tray and the multipurpose tray. Unlinking trays Unlinked trays have loaded is smaller than the Paper Size setting, then your own custom name. • Paper Size... describe the type of the paper guides in the tray. Loading paper and specialty media 74 Linking and unlinking trays Linking trays Tray linking is useful for all trays from the Paper Type menu. When one linked tray is automatically sensed according to the specified Paper Type....
User's Guide
Page 76
... for 24 to high temperatures. Note: Duplex is very different from 60 to 220 g/m2 (16 to feed the paper correctly. Leave paper in the trays, can contribute to paper curling prior to moisture changes that can automatically feed paper weights from the printer environment. Condition paper before printing by storing...
... for 24 to high temperatures. Note: Duplex is very different from 60 to 220 g/m2 (16 to feed the paper correctly. Leave paper in the trays, can contribute to paper curling prior to moisture changes that can automatically feed paper weights from the printer environment. Condition paper before printing by storing...
User's Guide
Page 77
... Use grain long for use new, undamaged paper. • Before loading paper, know the recommended print side of post-consumer waste (Lexmark tests up to 190°C (374°F) without melting or releasing hazardous emissions. Preprinted papers such as a whole, including the following:...Do not use coated papers unless they are taken into a tray) • Surface roughness (measured in laser (electro-photographic) printers. Using recycled paper and other office papers As an environmentally conscientious company, Lexmark supports the use in Sheffield units, impacts print clarity and how...
... Use grain long for use new, undamaged paper. • Before loading paper, know the recommended print side of post-consumer waste (Lexmark tests up to 190°C (374°F) without melting or releasing hazardous emissions. Preprinted papers such as a whole, including the following:...Do not use coated papers unless they are taken into a tray) • Surface roughness (measured in laser (electro-photographic) printers. Using recycled paper and other office papers As an environmentally conscientious company, Lexmark supports the use in Sheffield units, impacts print clarity and how...

