User's Guide
Page 5
... Using the Embedded Web Server...254 Checking the device status...254 Setting up e-mail alerts...254 Viewing reports...255 Restoring the factory default settings...255 Troubleshooting 256 The indicator light is blinking...256 Solving basic printer problems...256 Understanding printer messages...257 Clearing jams...266 Solving printing problems...280 Solving copy...
... Using the Embedded Web Server...254 Checking the device status...254 Setting up e-mail alerts...254 Viewing reports...255 Restoring the factory default settings...255 Troubleshooting 256 The indicator light is blinking...256 Solving basic printer problems...256 Understanding printer messages...257 Clearing jams...266 Solving printing problems...280 Solving copy...
User's Guide
Page 9
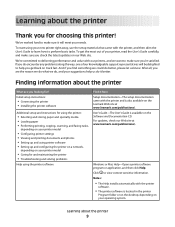
... the printer • Installing the printer software Additional setup and instructions for choosing this printer! For updates, check our Web site at www.lexmark.com/publications/. Windows or Mac Help-Open a printer software program or application, and then click Help. Notes: • The Help installs automatically.... We've worked hard to make sure it will be delighted to make sure you looking for and maintaining the printer • Troubleshooting and solving problems Help using your new printer right away, use the setup materials that came with the printer software. • The...
... the printer • Installing the printer software Additional setup and instructions for choosing this printer! For updates, check our Web site at www.lexmark.com/publications/. Windows or Mac Help-Open a printer software program or application, and then click Help. Notes: • The Help installs automatically.... We've worked hard to make sure it will be delighted to make sure you looking for and maintaining the printer • Troubleshooting and solving problems Help using your new printer right away, use the setup materials that came with the printer software. • The...

User's Guide
Page 10
... for ? It is greater than 18 kg (40 lb) and requires two or more trained personnel to lift it here Lexmark Support Web site-support.lexmark.com Note: Select your region, and then select your product to : • Make sure airflow in the room meets ...the Statement of Limited Warranty included with this printer, or at support.lexmark.com. • Rest of the world-See the printed warranty that came with your printer. The latest supplemental information, updates, and technical support: • Troubleshooting hints and tips • Frequently asked questions • Documentation &#...
... for ? It is greater than 18 kg (40 lb) and requires two or more trained personnel to lift it here Lexmark Support Web site-support.lexmark.com Note: Select your region, and then select your product to : • Make sure airflow in the room meets ...the Statement of Limited Warranty included with this printer, or at support.lexmark.com. • Rest of the world-See the printed warranty that came with your printer. The latest supplemental information, updates, and technical support: • Troubleshooting hints and tips • Frequently asked questions • Documentation &#...
User's Guide
Page 256
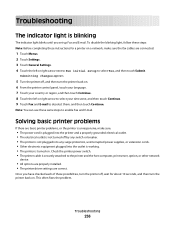
This often fixes the problem. Troubleshooting The indicator light is turned on. Note: You can use these instructions for about 10 seconds, and then turn the printer back on . Check the ... the left or right arrow next to Run initial setup to select Yes, and then touch Submit. Solving basic printer problems If there are correct. Troubleshooting 256 To disable the blinking light, follow these steps: Note: Before completing these same steps to deselect them, and then touch Continue. Once you set...
This often fixes the problem. Troubleshooting The indicator light is turned on. Note: You can use these instructions for about 10 seconds, and then turn the printer back on . Check the ... the left or right arrow next to Run initial setup to select Yes, and then touch Submit. Solving basic printer problems If there are correct. Troubleshooting 256 To disable the blinking light, follow these steps: Note: Before completing these same steps to deselect them, and then touch Continue. Once you set...

User's Guide
Page 257
.... Disk corrupted The printer attempted a hard disk recovery on the disk. Touch Reformat disk to is a tray or feeder, and is a paper size or type. Troubleshooting 257 If the error occurs again: 1 Turn the printer off . 2 Unplug the power cord from the wall outlet. 3 Remove the tray. 4 Contact Customer Support. •...
.... Disk corrupted The printer attempted a hard disk recovery on the disk. Touch Reformat disk to is a tray or feeder, and is a paper size or type. Troubleshooting 257 If the error occurs again: 1 Turn the printer off . 2 Unplug the power cord from the wall outlet. 3 Remove the tray. 4 Contact Customer Support. •...

User's Guide
Page 258
... to send the fax job. Try one or more of the following : • Touch Continue to clear the message. • Complete the Analog Fax Setup. Troubleshooting 258 The fax partition appears to clear the message. If the message appears again, contact your system support person. If the message appears again, contact...
... to send the fax job. Try one or more of the following : • Touch Continue to clear the message. • Complete the Analog Fax Setup. Troubleshooting 258 The fax partition appears to clear the message. If the message appears again, contact your system support person. If the message appears again, contact...

User's Guide
Page 259
... printer cannot find a tray with is not enough memory to print the fax job. Remove paper from standard output bin Remove the stack of pages. Troubleshooting 259 Contact system administrator. Unsupported disk An unsupported printer hard disk has been installed. Restore Held Jobs? Try one or more of the following : •...
... printer cannot find a tray with is not enough memory to print the fax job. Remove paper from standard output bin Remove the stack of pages. Troubleshooting 259 Contact system administrator. Unsupported disk An unsupported printer hard disk has been installed. Restore Held Jobs? Try one or more of the following : •...

User's Guide
Page 260
...; Touch Continue to disable Resource Save and continue printing. • To enable Resource Save after receiving this message, make sure the link buffers are set . Troubleshooting 260
...; Touch Continue to disable Resource Save and continue printing. • To enable Resource Save after receiving this message, make sure the link buffers are set . Troubleshooting 260

User's Guide
Page 261
... continue printing. • Cancel the current print job. • Install additional printer memory. 50 PPDS font error Try one or more of the network connection. Troubleshooting 261 Downloaded fonts and macros not previously stored in flash memory are deleted. • Delete fonts, macros, and other data stored in flash memory. •...
... continue printing. • Cancel the current print job. • Install additional printer memory. 50 PPDS font error Try one or more of the network connection. Troubleshooting 261 Downloaded fonts and macros not previously stored in flash memory are deleted. • Delete fonts, macros, and other data stored in flash memory. •...

User's Guide
Page 262
... of the following : 1 Turn the printer power off . 2 Unplug the power cord from the printer system board. 4 Connect the power cord to clear the message. Troubleshooting 262 The printer discards any data received through the serial port. • Make sure the Serial Buffer menu item is not set to Disabled. 56...
... of the following : 1 Turn the printer power off . 2 Unplug the power cord from the printer system board. 4 Connect the power cord to clear the message. Troubleshooting 262 The printer discards any data received through the serial port. • Make sure the Serial Buffer menu item is not set to Disabled. 56...
User's Guide
Page 263
...; Install a larger printer hard disk. 63 Unformatted disk Try one or more of the following : • Touch Continue to clear the message and continue printing. Troubleshooting 263
...; Install a larger printer hard disk. 63 Unformatted disk Try one or more of the following : • Touch Continue to clear the message and continue printing. Troubleshooting 263
User's Guide
Page 264
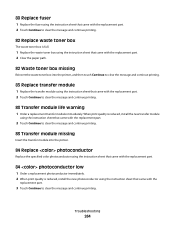
... transfer module 1 Replace the transfer module using the instruction sheet that came with the replacement part. 2 Touch Continue to clear the message and continue printing. Troubleshooting 264
... transfer module 1 Replace the transfer module using the instruction sheet that came with the replacement part. 2 Touch Continue to clear the message and continue printing. Troubleshooting 264
User's Guide
Page 265
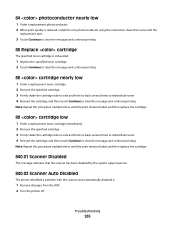
....02 Scanner Auto Disabled The printer identified a problem with the scanner and automatically disabled it. 1 Remove all pages from the ADF. 2 Turn the printer off. Troubleshooting 265 84 photoconductor nearly low 1 Order a replacement photoconductor. 2 When print quality is exhausted. 1 Replace the specified toner cartridge. 2 Touch Continue to clear the message and...
....02 Scanner Auto Disabled The printer identified a problem with the scanner and automatically disabled it. 1 Remove all pages from the ADF. 2 Turn the printer off. Troubleshooting 265 84 photoconductor nearly low 1 Order a replacement photoconductor. 2 When print quality is exhausted. 1 Replace the specified toner cartridge. 2 Touch Continue to clear the message and...
User's Guide
Page 266
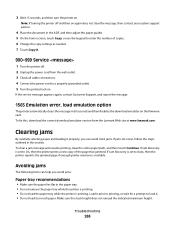
... clears the message in 30 seconds and then disables the download emulator on . Make sure the stack height does not exceed the indicated maximum height. Troubleshooting 266 Clearing jams By carefully selecting paper and loading it . • Do not load too much paper. 3 Wait 15 seconds, and then turn the printer... Service 1 Turn the printer off and then on . If Jam Recovery is printing. Note: If turning the printer off . 2 Unplug the power cord from the Lexmark Web site at www...
... clears the message in 30 seconds and then disables the download emulator on . Make sure the stack height does not exceed the indicated maximum height. Troubleshooting 266 Clearing jams By carefully selecting paper and loading it . • Do not load too much paper. 3 Wait 15 seconds, and then turn the printer... Service 1 Turn the printer off and then on . If Jam Recovery is printing. Note: If turning the printer off . 2 Unplug the power cord from the Lexmark Web site at www...
User's Guide
Page 267
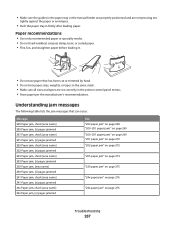
... 272 "203 paper jam" on page 274 "230 paper jam" on page 275 "24x paper jam" on page 276 "24x paper jam" on page 276 Troubleshooting 267 • Make sure the guides in the paper tray or the manual feeder are properly positioned and are set correctly in firmly after loading...
... 272 "203 paper jam" on page 274 "230 paper jam" on page 275 "24x paper jam" on page 276 "24x paper jam" on page 276 Troubleshooting 267 • Make sure the guides in the paper tray or the manual feeder are properly positioned and are set correctly in firmly after loading...
User's Guide
Page 268
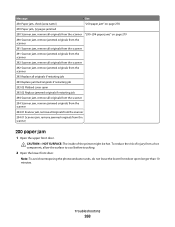
... jam, remove jammed originals from the scanner 200 paper jam 1 Open the upper front door. To reduce the risk of the printer might be hot. Troubleshooting 268 Message See 250 Paper jam, check [area name] "250 paper jam" on page 278 250 Paper jam, [x] pages jammed 290 Scanner jam, remove all...
... jam, remove jammed originals from the scanner 200 paper jam 1 Open the upper front door. To reduce the risk of the printer might be hot. Troubleshooting 268 Message See 250 Paper jam, check [area name] "250 paper jam" on page 278 250 Paper jam, [x] pages jammed 290 Scanner jam, remove all...

User's Guide
Page 269
3 Pull the jammed paper up and out to remove it is lodged too tightly under the photoconductor units. Troubleshooting 269 Note: Make sure all paper fragments are removed. 4 Close the lower front door. 5 Close the upper front door. 6 Touch Continue. 200-201 paper jams 1 ...
3 Pull the jammed paper up and out to remove it is lodged too tightly under the photoconductor units. Troubleshooting 269 Note: Make sure all paper fragments are removed. 4 Close the lower front door. 5 Close the upper front door. 6 Touch Continue. 200-201 paper jams 1 ...
User's Guide
Page 270
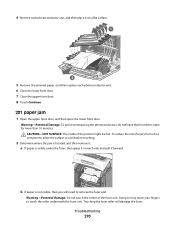
Troubleshooting 270 Warning-Potential Damage: To avoid overexposing the photoconductors, do not leave the front doors open the lower front door. Warning-Potential Damage: Do not ...
Troubleshooting 270 Warning-Potential Damage: To avoid overexposing the photoconductors, do not leave the front doors open the lower front door. Warning-Potential Damage: Do not ...

User's Guide
Page 271
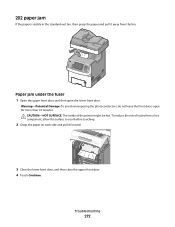
1 Turn the screws on the fuser to the left to loosen them. 2 Lift the handholds on each side of the fuser, and then pull forward to remove it. 3 Remove the jammed paper. 4 Align the fuser unit using the handholds on each side, and then place it back into the printer. 5 Turn the screws to the right to fasten the fuser securely. 3 Close the lower front door, and then close the upper front door. 4 Touch Continue. Troubleshooting 271
1 Turn the screws on the fuser to the left to loosen them. 2 Lift the handholds on each side of the fuser, and then pull forward to remove it. 3 Remove the jammed paper. 4 Align the fuser unit using the handholds on each side, and then place it back into the printer. 5 Turn the screws to the right to fasten the fuser securely. 3 Close the lower front door, and then close the upper front door. 4 Touch Continue. Troubleshooting 271
User's Guide
Page 272
... inside of injury from the bin. Warning-Potential Damage: To avoid overexposing the photoconductors, do not leave the front doors open the lower front door. Troubleshooting 272 202 paper jam If the paper is visible in the standard exit bin, then grasp the paper and pull it away from a hot component...
... inside of injury from the bin. Warning-Potential Damage: To avoid overexposing the photoconductors, do not leave the front doors open the lower front door. Troubleshooting 272 202 paper jam If the paper is visible in the standard exit bin, then grasp the paper and pull it away from a hot component...


